BMW K bikes (Bricks)


You are not connected. Please login or register

View previous topic View next topic Go down  Message [Page 1 of 1]


1Back to top Go down   1990 K75S 'Spruce-Up' Empty 1990 K75S 'Spruce-Up' Wed Feb 06, 2013 6:06 pm

MikeP

MikeP
Life time member
Life time member
This will be the second K75S treated to a spruce-up in six months, the third K75 I've done and the fourth K-Series attacked in a similar manner in the past twelve months.

As you may have worked out, I have nothing better to do with my time and something approaching a fetish for K-Series 'Bricks' (as well as an almost anal approach so I'm told). Very Happy

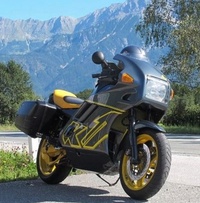
The background is this: My nephew, like me, had an R1150GSA but one thing or another has prevented him using it in the way he intended, ie long journeys loaded to the gunwales. I persuaded him that he should sell the GSA and buy something that he can use on the odd occasion that he gets, something inexpensive yet will provide some pride in owning as well being practical.

In short I suggested a K-Series and as he liked the K75S that I'd owned for a short period last year, why not one for himself knowing that I'd enjoy fettling it for him?

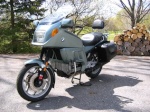
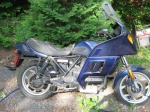
Well in December he did a deal on one, a 16,000 mile bike that was in a sad state cosmetically yet mechanically sound. The price was on the low side, accurately reflecting the condition.

1990 K75S 'Spruce-Up' Ryan%27s%20K75S%20%2801%29-L

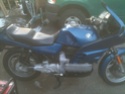
It was subsequently delivered to me just after Christmas. My first task was to take it out and make certain that everything worked, plus to evaluate what needed sorting apart from the obvious. My rides showed that it was all fine except that the steering head adjustment was on the tight side of acceptable.

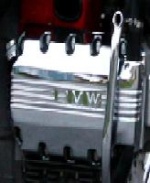
Only once I'd given the bike a wash did realise how poor it was beneath the mud and dirt. In fact, I discovered that someone had taken a can of black paint and squirted it about with gay abandon covering the dirt on the transmission as well as anything else that got in the way such as the air-box and intake tube (among many things).

1990 K75S 'Spruce-Up' BMW%20K75S%20%287%29-L

1990 K75S 'Spruce-Up' BMW%20K75S%20%2826%29%20-L

After some digging, I think that I've worked out that this bike was laid-up in less than than ideal circumstances. Probably a farm or at least a very rural environment where it had been allowed to stand covered in dirt, probably in a puddle of mud judging by the state of the main-stand:

1990 K75S 'Spruce-Up' BMW%20K75S%20%28190%29-XL

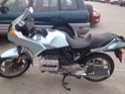
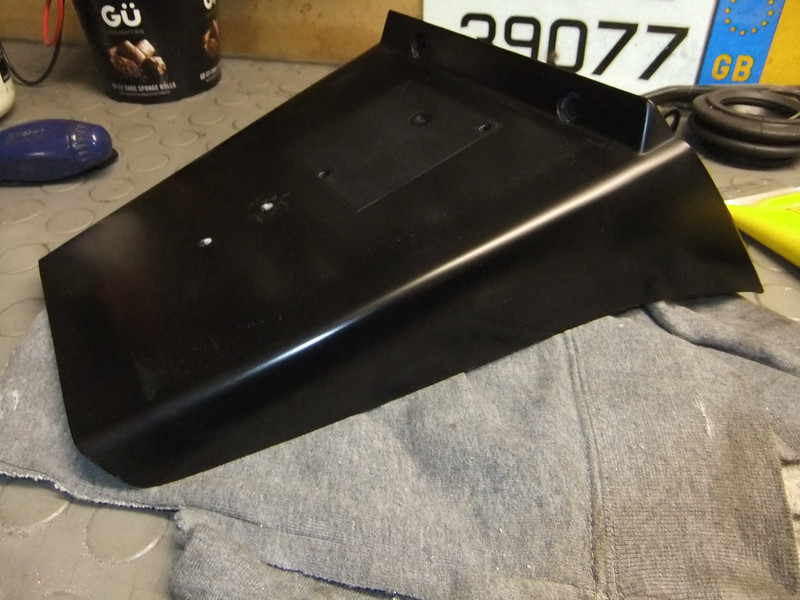
There wasn't one body panel that didn't have damage to the paint. It was always anticipated that some panels would need re-painting but it was a bit of a blow to discover that they all did. One good thing about this is that it makes a colour change an option. If the whole thing needs re-spraying then why not choose a colour that you like? We've chosen a BMW colour that was used for the K75S but one that I don't think was used for UK bikes.

An hour or two saw the panels all removed, stripped of all the fixings and badges and cleaned inside and out:

1990 K75S 'Spruce-Up' BMW%20K75S%20%2848%29-L

Another pile saw the parts for refurbishment begin to grow:

1990 K75S 'Spruce-Up' BMW%20K75S%20%2847%29-XL

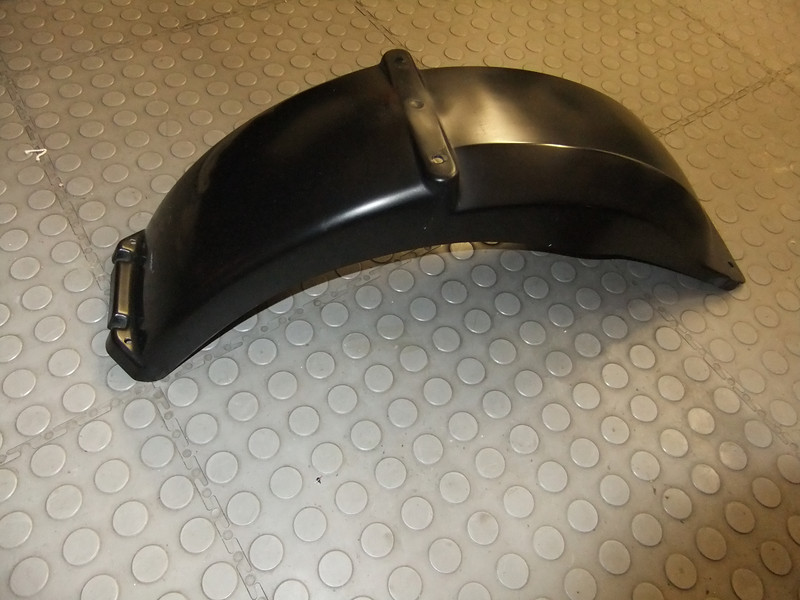
It wasn't all plane sailing however. The long screw that passes through the fork brace and holds the two part mudguard together had suffered badly.

1990 K75S 'Spruce-Up' BMW%20K75S%20%2851%29-XL

I had anticipated this along with the likelihood that the fork leg mudguard retaining screws would also be seized. A couple of days soaking in penetrating oil worked for two screws but the rest were solid.

The fork brace screw began to turn but once the corroded threads reached the captive nut it was game over. Anyone having experienced this will know that access to the screw and the nut is a problem. My first attempt was to clamp the captive screw that was no longer captive (being captive in a plastic housing is probably like being in an open prison);

1990 K75S 'Spruce-Up' BMW%20K75S%20%2852%29-L

It failed and I had to drill it out from the rear.

Next, two of the side screws were solid (both on the same side and the side of the bike that seems to have suffered most from the elements, possibly because it was up against a wall with one side a bit better protected). With the forks removed, I set about driling out the screws:

1990 K75S 'Spruce-Up' BMW%20K75S%20%2862%29-XL

I've had to do this before now and find that leaving the head of the Allen screw in place, it acts as a guide for the drill. Once beyond the depth of the head I cut the head off.

It's always a bit of a leap of faith to drill by hand (not a bench drill) into a steel screw that's housed in soft aluminium. The only saving grace here is that if you end up damaging the ali at least here it's not threaded and nor is the size of the hole crucial. As it is, I use an under-size drill bit then pick out the remains of the screw.

Having done this sort of thing on cars and bikes for many years, I've learnt that my best modus operandi is to clean, polish and refurbish parts as I remove them. That way there's less tendency to get all excited about putting it back together and being tempted to rush things or cut corners. It does make re-assembly quicker and there's a real pleasure to had from taking a component from the shelf that's all sorted when re-assembly begins. It's the nearest I'll ever get to building something new.

So, the forks were stripped, cleaned and the sliders repainted:

1990 K75S 'Spruce-Up' BMW%20K75S%20%28124%29-L

The same goes for the smaller parts such as the battery strap screws, the rear mudguard retaining straps and the seat hinge plates:

1990 K75S 'Spruce-Up' BMW%20K75S%20%2865%29-L

1990 K75S 'Spruce-Up' BMW%20K75S%20%2867%29-L

1990 K75S 'Spruce-Up' BMW%20K75S%20%28116%29-L

1990 K75S 'Spruce-Up' BMW%20K75S%20%28149%29-L

Removing the paint from the intake tube:

1990 K75S 'Spruce-Up' BMW%20K75S%20%2868%29-L

Cleaning the hoses and clips etc;

1990 K75S 'Spruce-Up' BMW%20K75S%20%2872%29-L

Done:

1990 K75S 'Spruce-Up' BMW%20K75S%20%2873%29-L

I have a pet theory that much of the problems associated with water in the fuel tanks of these bikes is caused by the oxidisation that builds up under the filler and breaks the seal:

1990 K75S 'Spruce-Up' BMW%20K75S%20%2875%29-L

It afflicts the seal on the flap too:

1990 K75S 'Spruce-Up' BMW%20K75S%20%2874%29-L

It's just a matter of scraping the white crusty muck off, then a dob of rubber treatment helps the seals remain flexible:

1990 K75S 'Spruce-Up' BMW%20K75S%20%2878%29-L

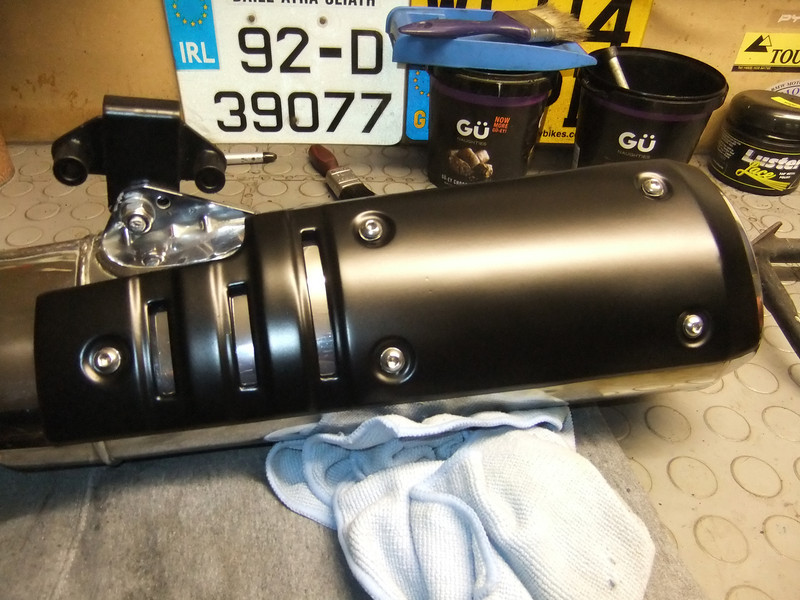
The matt finish always discolours from polish. A wipe with acetone or even brake cleaner is enough to return it to as new:

1990 K75S 'Spruce-Up' BMW%20K75S%20%2879%29-L

The tight steering was explained by an over-tightened adjuster. The bearings were just starting to show signs of brinelling. They're too cheap to ignore so it's off with them:

1990 K75S 'Spruce-Up' BMW%20K75S%20%2871%29-XL

The bare aluminium fork clamps had suffered the usual oxidisation and the screws the usual steel into ali, add moisture and you get cement issues. The threads were cleaned with a tap:

1990 K75S 'Spruce-Up' BMW%20K75S%20%2880%29-L

Then the fork clamp given a quick spin with an emery wheel:

1990 K75S 'Spruce-Up' BMW%20K75S%20%2882%29-L

And finally the whole thing gets a quick buff-up with steel wool and Solvol metal polish:

1990 K75S 'Spruce-Up' BMW%20K75S%20%2883%29-L

The upper clamp gets the same treatment, before:

1990 K75S 'Spruce-Up' BMW%20K75S%20%2884%29-L

After:

1990 K75S 'Spruce-Up' BMW%20K75S%20%2885%29-L

The box of cleaned or refurbished parts grows:

1990 K75S 'Spruce-Up' BMW%20K75S%20%2898%29-L

More washing, scrubbing and polishing done:

1990 K75S 'Spruce-Up' BMW%20K75S%20%28102%29-L

The radiator was flushed through, cleaned and the fan tested:

1990 K75S 'Spruce-Up' BMW%20K75S%20%2876%29-L

The front brakes were stripped, cleaned, checked and re-assembled:

1990 K75S 'Spruce-Up' BMW%20K75S%20%28106%29-L

The screws that hold the calliper halves together were solid with oxidisation, some heat helped free them:

1990 K75S 'Spruce-Up' BMW%20K75S%20%28120%29-L

Once again, grotty threads get cleaned as part of the process:

1990 K75S 'Spruce-Up' BMW%20K75S%20%28121%29-L

Pistons popped out (my air line) and checked for corrosion (all okay):

1990 K75S 'Spruce-Up' BMW%20K75S%20%28122%29-L

All parts cleaned with Wurth brake cleaner:

1990 K75S 'Spruce-Up' BMW%20K75S%20%28123%29-L

Before re-assembly using new seals and stainless steel fasteners (with a dob of Alumslip anti-seize):

1990 K75S 'Spruce-Up' BMW%20K75S%20%28150%29-L

Another pile of parts for cleaning and re-painting:

1990 K75S 'Spruce-Up' BMW%20K75S%20%28135%29-L

More, much more to come.


2Back to top Go down   1990 K75S 'Spruce-Up' Empty Re: 1990 K75S 'Spruce-Up' Wed Feb 06, 2013 6:37 pm

88

88
Life time member
Life time member
Fantastic Mike! I'm amazed by two things:
1. How much grot and deterioration was caused by standing
2. How effective Gu bars are as a restoration aid....

I'm off to the shops to by some cheers

P.S. do you mind if I park my bike in your workshop (everything that goes in there seams to come out pristine) Wink


__________________________________________________
1990 K75S 'Spruce-Up' Ir-log1188....May contain nuts!1990 K75S 'Spruce-Up' Ir-log11

"The world is a book and those who do not travel read only one page." - St. Augustine from 1600 years ago & still true!

K1 - 1989 - AKA Titan (unique K1/K1100RS hybrid by Andreas Esterhammer)
K1100RS - 1995. AKA Rudolf Von Schmurf (in a million bits)
K100RS - 1991 AKA Ronnie. Cafe racer project bike
K75RTP - 1994
K75C - 1991 AKA Jim Beam. In boxes. 
K1100LT 1992 - AKA Big Red (gone)
K100LT - 1988 - AKA the Bullion brick. Should never have sold it.
    

3Back to top Go down   1990 K75S 'Spruce-Up' Empty Thank you MIKEP Wed Feb 06, 2013 6:40 pm

tio Jaimito

tio Jaimito
Silver member
Silver member
Very informative, Mike. Thank you for your great effort and mentoring.
Jim


__________________________________________________
Krazy Kat. 1985 K100RS Alaskablau 13000miles 8valve "Black Belly"

Peggy's 1987 K75s Columbia Grey 9500miles 6 valve.

1990 K75S 'Spruce-Up' K100_m12

1990 K75S 'Spruce-Up' K75_po12
1990 K75S 'Spruce-Up' Basil_10
http://www.nachicagonorth.com
    

4Back to top Go down   1990 K75S 'Spruce-Up' Empty Re: 1990 K75S 'Spruce-Up' Thu Feb 07, 2013 8:39 am

MikeP

MikeP
Life time member
Life time member
88KE wrote:Fantastic Mike! I'm amazed by two things:
1. How much grot and deterioration was caused by standing
2. How effective Gu bars are as a restoration aid....

I'm off to the shops to by some cheers

P.S. do you mind if I park my bike in your workshop (everything that goes in there seams to come out pristine) Wink

Those Gu containers are perfect for storing things and the larger type will hold the same liquid capacity as a K-Series gearbox. That's the only reason why I ever consumed the original contents - honest. Wink

I only did the jobbie on the black K1 because I'd finished the "Turd" and jokingly remarked that I'd have to sell it to buy something else to do. Now I have a waiting list of others the first of which is another K75S from up country.

It's not something that I'd ever considered and I'd hate to do it as a money earner because I'm sure that like many people doing something that you enjoy loses it's attraction when dealing with people as "customers".

Onwards. I'll try and get this up to the point where I'm presently at with the work.

I love the "unitary" construction of these bikes. Five bolts and the frame can be lifted off (once the steering is removed of course):

1990 K75S 'Spruce-Up' BMW%20K75S%20%28118%29-XL

Leaving the engine, gearbox, swing-arm and final drive plus loom in much the same way that it would have trundled down the production line in Spandau:

1990 K75S 'Spruce-Up' BMW%20K75S%20%28119%29-L

If there's anywhere that BMW were a bit stingy on the quality, it's the coating of the frame. It doesn't take much for it to be rubbed through so I set about this one and removed the coating before applying four coats of enamel satin black (still wet and shiny here):

1990 K75S 'Spruce-Up' BMW%20K75S%20%28203%29-XL

Done but not yet cured to the point where it can be polished:

1990 K75S 'Spruce-Up' BMW%20K75S%20%28227%29-XL

1990 K75S 'Spruce-Up' BMW%20K75S%20%28228%29-L

The airbox with the paint being removed:

1990 K75S 'Spruce-Up' BMW%20K75S%20%28215%29-L

Waiting for a final buff-up:

1990 K75S 'Spruce-Up' BMW%20K75S%20%28217%29-L

The usual grubby switch gear:

1990 K75S 'Spruce-Up' BMW%20K75S%20%28159%29-L

Some people strip out the buttons to clean them but I've found that a little kitchen, cream scouring jollop rubbed in between finger and thumb then rinsed off works wonders. The buttons do attract dirt from the rider's gloves and they seem to go a sort of milky, faded version of their original colour. For some reason they attract a sort of bloom, the kitchen surface cleaner works and can be used when needed in the course of ordinary washing of the bike:

1990 K75S 'Spruce-Up' BMW%20K75S%20%28160%29-L

One of the K1's done in situ:

1990 K75S 'Spruce-Up' BMW%20K1%20%28159%29-L

Turning to the exhaust. The silencer heat shield had been treated to some paint brushed on and a couple of the retaining screws were well passed their prime:

1990 K75S 'Spruce-Up' BMW%20K75S%20%2815%29-L

Two of the screws had to be drilled out but fortunately the captive nut brackets were all sound:

1990 K75S 'Spruce-Up' BMW%20K75S%20%2894%29-L

The silencer could then have a clean and polish:

1990 K75S 'Spruce-Up' BMW%20K75S%20%2896%29-L

The silencer mounting was cleaned and prepared for a coat of paint:

1990 K75S 'Spruce-Up' BMW%20K75S%20%2893%29-L

While cleaning the loose rust from the heat shield, I discovered that it was like Swiss cheese in a few places so it's gone into the bin.

Until very recently the black version was less than twenty quid from the likes of Motobins (the chrome one about sixty or so). I was horrified to find that even the black one is now sixty-plus.

Someone kindly offered me a solid but scruffy one that he had kicking around in his garage. First thing was to knock out the worst of the dents and remove the worst of the rust:

1990 K75S 'Spruce-Up' BMW%20K75S%20%28180%29-L

A couple of the screw recess were twisted so I found an old Allen bolt that matched the diameter, used one as an anvil and the other as a press, then bashed them flat:

1990 K75S 'Spruce-Up' BMW%20K75S%20%28181%29-L

1990 K75S 'Spruce-Up' BMW%20K75S%20%28182%29-L

Because the metal is so thin and prone to twisting out of shape, I then made certain that it would lay flush. After some twisting and more bashing, it did so (the cleaned and painted silencer bracket is back on):

1990 K75S 'Spruce-Up' BMW%20K75S%20%28183%29-L

A skim with knifing stopper in the areas where the dents had been:

1990 K75S 'Spruce-Up' BMW%20K75S%20%28186%29-L

Once cured, flatted with wet & dry:

1990 K75S 'Spruce-Up' BMW%20K75S%20%28191%29-L

Then a squirt of paint to see if there were any highs or lows:

1990 K75S 'Spruce-Up' BMW%20K75S%20%28192%29-L

Before building up a few coats. All the fixings screws were beyond hope so they were all replaced (with stainless):

1990 K75S 'Spruce-Up' BMW%20K75S%20%28204%29-L

Even with wave washers the screws have a habit of working loose. Over-tightening them distorts the shield so each captive nut was given a small dob of Loctite before assembly:

1990 K75S 'Spruce-Up' BMW%20K75S%20%28205%29-L

Done:

1990 K75S 'Spruce-Up' BMW%20K75S%20%28206%29-L

The headers came off without any problems (the bike was fitted with the bronze header nuts) but one stud decided to come out with the nut:

1990 K75S 'Spruce-Up' BMW%20K75S%20%28188%29-L

The headers themselves had a bit of clean:

1990 K75S 'Spruce-Up' BMW%20K75S%20%28194%29-L

With the exhaust system out of the way, I turned my attention to some other bits. The radiator and belly-pan meshes were bad. Much attention with a wire brush in an angle-grinder, then on with coats of paint:

1990 K75S 'Spruce-Up' BMW%20K75S%20%28196%29-L

Likewise, other parts were stripped and cleaned before re-painting:

1990 K75S 'Spruce-Up' BMW%20K75S%20%28129%29-L

1990 K75S 'Spruce-Up' BMW%20K75S%20%28207%29-L

1990 K75S 'Spruce-Up' BMW%20K75S%20%28161%29-L

1990 K75S 'Spruce-Up' BMW%20K75S%20%28175%29-L

Some, such as the footrest plates needed a fair bit of attention:

1990 K75S 'Spruce-Up' BMW%20K75S%20%28130%29-L

1990 K75S 'Spruce-Up' BMW%20K75S%20%28151%29-L

The ABS module rear mountings are on BMW's much used bobbins:

1990 K75S 'Spruce-Up' BMW%20K75S%20%28131%29-L

True to form, the rubber parts company with the lower threaded section:

1990 K75S 'Spruce-Up' BMW%20K75S%20%28132%29-L

A tap or two with a hammer to shock the thread, then mole grips and out it comes:

1990 K75S 'Spruce-Up' BMW%20K75S%20%28133%29-L

Of course it was the same both sides and two of the battery mounting ones as well.

Along with the rear brake calliper, the piston, lever and master cylinder were all stripped, cleaned and overhauled as necessary:

1990 K75S 'Spruce-Up' BMW%20K75S%20%28156%29-L

The footrests removed:

1990 K75S 'Spruce-Up' BMW%20K75S%20%28169%29-L

Stripped for cleaning or painting as required:

1990 K75S 'Spruce-Up' BMW%20K75S%20%28170%29-L

Done:

1990 K75S 'Spruce-Up' BMW%20K75S%20%28176%29-L

Footrest plates were cleaned, prepared and painted:

1990 K75S 'Spruce-Up' BMW%20K75S%20%28168%29-L

The bare aluminium detailing was polished and then masked before painting:

1990 K75S 'Spruce-Up' BMW%20K75S%20%28173%29-L

Then the pleasurable job of re-assembly can take place before they are bagged-up and set aside:

1990 K75S 'Spruce-Up' BMW%20K75S%20%28174%29-L

1990 K75S 'Spruce-Up' BMW%20K75S%20%28177%29-L

Like much of this bike, at first glance the wheels don't seem too bad.

1990 K75S 'Spruce-Up' BMW%20K75S%20%2854%29-L

I thought that I'd get away with just polishing the aluminium detailing:

1990 K75S 'Spruce-Up' BMW%20K75S%20%2857%29-L

And that the ingrained brake dust on the spokes would come off leaving the paint like the rim where I've polished a section to see how well it responds:

1990 K75S 'Spruce-Up' BMW%20K75S%20%2858%29-L

Well I shouldn't have been surprised to find that the finish has lifted in quite a few places. That means the wheels will need a respray. Nothing ventured etc.

First thing was to set about the painted sections with wet & dry once the bare bits had been polished. Then the laborious job of masking the bare ali details:

1990 K75S 'Spruce-Up' BMW%20K75S%20%28222%29-L

A sharp blade makes quick work of cutting the masking tape along the edges. The only part that was fiddly was following the radial line around the rim:

1990 K75S 'Spruce-Up' BMW%20K75S%20%28223%29-L

Two coats with a flatting down between did the trick, then off with the tape:

1990 K75S 'Spruce-Up' BMW%20K75S%20%28224%29-L

I'll be leaving the rear wheel for another day but it will get the same treatment:

1990 K75S 'Spruce-Up' BMW%20K75S%20%28225%29-L

The discs have been cleaned, the carriers resprayed. Before:

1990 K75S 'Spruce-Up' BMW%20K75S%20%2853%29-L

The corrosion coming off the inner section of the unswept area (just Solvol and steel wool):

1990 K75S 'Spruce-Up' BMW%20K75S%20%2866%29-L

The carriers were prepared then masked and painted both sides (here with other bits getting a squirt of paint):

1990 K75S 'Spruce-Up' BMW%20K75S%20%28108%29-L

Done:

1990 K75S 'Spruce-Up' BMW%20K75S%20%28139%29-L

Then re-fitted to the finished front wheel using stainless bolts, washers and nyloc nuts (plus a coat of Alumslip anti-seize of course Wink ):

1990 K75S 'Spruce-Up' BMW%20K75S%20%28226%29-L

This is almost as much effort as doing the work so I'll give us both a break and catch-up with this later. Very Happy


5Back to top Go down   1990 K75S 'Spruce-Up' Empty Re: 1990 K75S 'Spruce-Up' Thu Feb 07, 2013 7:25 pm

tio Jaimito

tio Jaimito
Silver member
Silver member
Absolutely inspiring. Great work, Mike and thank you again.


__________________________________________________
Krazy Kat. 1985 K100RS Alaskablau 13000miles 8valve "Black Belly"

Peggy's 1987 K75s Columbia Grey 9500miles 6 valve.

1990 K75S 'Spruce-Up' K100_m12

1990 K75S 'Spruce-Up' K75_po12
1990 K75S 'Spruce-Up' Basil_10
http://www.nachicagonorth.com
    

6Back to top Go down   1990 K75S 'Spruce-Up' Empty Re: 1990 K75S 'Spruce-Up' Thu Feb 14, 2013 12:19 pm

MikeP

MikeP
Life time member
Life time member
The work continues. The frame is back on and the steering reassembled with the new bearings so that the forks can go back in with the wheel to allow the removal of the transmission:

1990 K75S 'Spruce-Up' BMW%20K75S%20%28233%29-L

The loom was cleaned first and has been left loose at present as I have yet to feed the long brake lines for the front-end to be connected to the ABS modulator and that can't go back on until later.

1990 K75S 'Spruce-Up' BMW%20K75S%20%28235%29-XL

The frame will get a polish before properly re-laying the loom.

The front wheel is only in to allow me to strap the front-end down while the transmission is off:

1990 K75S 'Spruce-Up' BMW%20K75S%20%28236%29-XL

I thought that I'd make space on the shelves by re-fitting the cooling system:

1990 K75S 'Spruce-Up' BMW%20K75S%20%28238%29-XL

I'm sure there's little need to detail how the transmission is removed here. Nothing really caused any problems save one of the swing-arm to final-drive screws and that wasn't because it wouldn't undo, rather it was because the inside of the hex-head cap was so badly corroded that it was starting to round off.

It was dealt with by removing the swing-arm with the final-drive together for better access and then a star-key bit was driven into the offending hex-cap. Once a decent purchase was available the screw came out easily (all four will be renewed).

So, at this point, the various splines were inspected and found to be in good order, as was the clutch with no signs of the output/balancer shaft seal or O-Ring having failed.

1990 K75S 'Spruce-Up' BMW%20K75S%20%28234%29-XL

The state of the aluminium casings is frankly horrible:

1990 K75S 'Spruce-Up' BMW%20K75S%20%28237%29-L

I had hoped (before I saw the bike) that the fact that this machine has the black finish on the transmission, that they'd just need a clean and re-paint. Alas not only had the bike been allowed to stand somewhere damp, the mud and crap on it has acted like a wet blanket. Worse, whoever sold it after dragging it out of storage, squirted black paint over the mud, peeling original finish and crumbling surface of the aluminium.

1990 K75S 'Spruce-Up' BMW%20K75S%20%28240%29-L

Before doing anything else, I set about the surface and scraped the worst of the flaking paint and white fluffy oxidisation off:

1990 K75S 'Spruce-Up' BMW%20K75S%20%28242%29-L

1990 K75S 'Spruce-Up' BMW%20K75S%20%28241%29-L

Work in progress:

1990 K75S 'Spruce-Up' BMW%20K75S%20%28244%29-L

There's much work still to do on those. I'm in the process of getting beyond the destabilised surface using 80 grit paper by hand. It's working but it's a slow, dirty, soul destroying process but it will leave a surface ready for new paint.

To cheer myself up and to have a bit of a break from the dirty stuff, I've re-assembled some parts.

Now this bike needed work to every painted panel. The owner wasn't keen on the original colour so I suggested that this was as good an opportunity as any to change it. We chatted about the options discarding Marrakech Red as it seems that about half the world's K75S models were red.

My initial advice was to go for a nice, dark-ish, metallic grey. Then I suggested a colour that I've seen North America market models finished in but never seen in the UK - Dakar Yellow. I don't know if it was offered in other markets, I believe that BMW only supplied colours to markets that their local importers believed would sell.

Ryan (the owner) independently, after browsing images on-line, came to the same conclusion. It would have sold in the UK, well maybe only to the two of us but there's no accounting for taste. I strongly disliked the Onyx Black Metallic of my last K75S, hence the appellation "The Turd" and I was surprised when so many people admired the colour. No accounting for taste as they say. Wink

All the parts have been painted:

1990 K75S 'Spruce-Up' Photo%20%286%29-XL

So a little R&R has been taking place by re-assembling some bits. The tail unit is reassembled with a new BMW badge and I opted for the anthracite K75 badges or the tail and headlamp panels in preference to chrome or gold as it's a nice contrast:

1990 K75S 'Spruce-Up' BMW%20K75S%20%28248%29-L

The rear loom, having been cleaned, can be routed back along the frame and poked through the tail unit:

1990 K75S 'Spruce-Up' BMW%20K75S%20%28250%29-L

The ABS control unit lives in the tail unit cubby on these non-Paralever, short-wheelbase bikes. There's hours of fiddling to get it back in and connected;

1990 K75S 'Spruce-Up' BMW%20K75S%20%28251%29-L

These later bikes were built with the owner options in mind. The low seat versions use a lift off bench seat that requires two lugs mounted on the tail unit. This bike has the mounting holes for these plugged with little plastic blanks:

1990 K75S 'Spruce-Up' BMW%20K75S%20%28252%29-L

Just awaiting the new under seat labels:

1990 K75S 'Spruce-Up' BMW%20K75S%20%28253%29-L

1990 K75S 'Spruce-Up' BMW%20K75S%20%28254%29-L

Other painted parts get a polish with Zymol and then where possible, re-assembled. The radiator panel with the re-painted mesh ready to be put to bed in the spare room out of harms way:

1990 K75S 'Spruce-Up' BMW%20K75S%20%28255%29-L

As there's been a colour change, rather than leave the underside or inside blue with over-spray, I'm masking and giving them a squirt of satin black:

1990 K75S 'Spruce-Up' BMW%20K75S%20%28256%29-L

Hopefully I'll get the first coats of paint onto the transmission parts in the next few days.

Phew.


7Back to top Go down   1990 K75S 'Spruce-Up' Empty Re: 1990 K75S 'Spruce-Up' Thu Feb 14, 2013 2:03 pm

Brickee

Brickee
Silver member
Silver member
Hi MikeP,
I like your method of reburbishing/cleaning the parts as they come off the bike and then having nice bits to put back on when you put it all back together. I'm going to follow that same MO now that I'm in the winter maintenance gig. Top notch work too. I can see why you have a waiting list of ones wanting you to do their bikes.
Cheers


__________________________________________________
86 K100RT VIN 0053533

The good news is, I no longer have senior moments. The bad news is, now it's a constant state of mind.
    

8Back to top Go down   1990 K75S 'Spruce-Up' Empty Re: 1990 K75S 'Spruce-Up' Sun Feb 17, 2013 9:37 am

MikeP

MikeP
Life time member
Life time member
Brickee, I'm hoping that this will be the next-to-last for a while unless the summer here is as bad as last year in which case I might need something for the (many) rainy days. :|

Well, to catch-up a bit. The underside of the tank once the masking is removed:

1990 K75S 'Spruce-Up' BMW%20K75S%20%28257%29-L

I popped the old fuel filter out and fitted a new one:

1990 K75S 'Spruce-Up' BMW%20K75S%20%28258%29-L

With the tank resting on the mounts, I could put the new badges on, plus the filler cap and replaced the rubber pad on the rear:

1990 K75S 'Spruce-Up' BMW%20K75S%20%28259%29-L

I was pleasantly surprised to find that Motorworks have taken on the re-manufacture of the after-market injector cover (reasonably priced too):

1990 K75S 'Spruce-Up' BMW%20K75S%20%28261%29-L

Then it was back to scraping away at the gunge in the back of the gearbox:

1990 K75S 'Spruce-Up' BMW%20K75S%20%28262%29-L

While the first coat of paint is curing on the swing-arm and final drive:

1990 K75S 'Spruce-Up' BMW%20K75S%20%28265%29-L

Once the worst of the flaking paint, grease, oil and dirt is out, I gave it a wash with brake cleaner and masked the bits that I don't want sandpaper grit or paint inside, then got in there as best I could with 80 grit paper:

1990 K75S 'Spruce-Up' BMW%20K75S%20%28266%29-L

Once done, any grit that cannot be brushed out is blown out with an air-line, then the whole case is given a good degrease and clean with enamel thinners prior to putting the first, thin coat of paint on the underside and rear:

1990 K75S 'Spruce-Up' BMW%20K75S%20%28270%29-L

At this time of year, it takes longer for the paint to cure so that allows me to get on with more cleaning.

1990 K75S 'Spruce-Up' BMW%20K75S%20%28268%29-L

1990 K75S 'Spruce-Up' BMW%20K75S%20%28267%29-L

1990 K75S 'Spruce-Up' BMW%20K75S%20%28269%29-L

After the third coat, the final-drive is moved from the painting area to where it can cure (still a bit glossy here) before a final check that the paint has covered properly, then de-masking and set aside ready for the re-assembly stage.

1990 K75S 'Spruce-Up' BMW%20K75S%20%28271%29-L

It's like summer here today. What's the betting that it'll be miserable when this is finished? Rolling Eyes


9Back to top Go down   1990 K75S 'Spruce-Up' Empty Re: 1990 K75S 'Spruce-Up' Sun Feb 17, 2013 3:12 pm

daveb

daveb
active member
active member
absolutely brilliant job Mike if you wanted I'm sure the queue of not so pristine 'K' s (like mine)
would go on for miles
Keep it up you inspire even me to get the polish out
Dave


10Back to top Go down   1990 K75S 'Spruce-Up' Empty Re: 1990 K75S 'Spruce-Up' Thu Feb 21, 2013 4:37 am

MikeP

MikeP
Life time member
Life time member
Between getting coats of paint on things I turned my attention to some more of the bits that are off.

The gear lever is one of the black ones anyway so it just had a wipe clean as did the gear position switch and the speedometer sensor:

1990 K75S 'Spruce-Up' BMW%20K75S%20%28276%29-L

The alternator cush-drive rubber were still intact but beginning to break-up, more importantly, the vanes on the drive hadn't snapped. It seems to be an oddity of the triples that they eat the "monkey nuts" much faster than the four cylinder models. Of the five bikes that I've looked at recently, neither four cylinder bikes needed replacements (but I did anyway) and all three K75s have definitely required new, in one case only one of the drive vanes hadn't snapped off:

1990 K75S 'Spruce-Up' BMW%20K75S%20%28272%29-XL

The alternator cover is another bit that had been squirted with black paint (here part removed):

1990 K75S 'Spruce-Up' BMW%20K75S%20%28274%29-XL

Once the paint was off, it had a spruce-up with some polish:

1990 K75S 'Spruce-Up' BMW%20K75S%20%28278%29-L

This bike didn't have the rear wheel centre cover. As the wheel bolts are scabby as hell, the cheaper option was to pick up a very cheap, badly painted one from ebay and then re-paint it (after removing the old paint that had split badly):

1990 K75S 'Spruce-Up' BMW%20K75S%20%28277%29-L

The final coats of paint went onto the transmission parts:

1990 K75S 'Spruce-Up' BMW%20K75S%20%28279%29-L

I've yet to fit the stainless filler plugs:

1990 K75S 'Spruce-Up' BMW%20K75S%20%28280%29-L

The gearbox needs one new battery tray bobbin:

1990 K75S 'Spruce-Up' BMW%20K75S%20%28281%29-L

1990 K75S 'Spruce-Up' BMW%20K75S%20%28282%29-XL

I've made a start on the crank and cam covers. The bike had suffered a stationary fall not long before me getting my hands on it. The bare aluminium detailing had a few gouges and the covers had been treated to a heavy, hand applied, coat of black paint. I needed to remove this as there's a chance that the new paint may react with it.

1990 K75S 'Spruce-Up' BMW%20K75S%20%286%29-L

I used a fairly coarse (80 grit) paper (dry):

1990 K75S 'Spruce-Up' BMW%20K75S%20%28283%29%20-L

Using a fine file I attacked the gouges in the detailing:

1990 K75S 'Spruce-Up' BMW%20K75S%20%28284%29%20-L

Then the detailing was buffed with a medium grit Loybloc (the blue one), followed by the same treatment with the fine (red) one:

1990 K75S 'Spruce-Up' BMW%20K75S%20%28285%29%20-L

This was then followed by a "proper" rubbing down with 400 grit wet & dry:

1990 K75S 'Spruce-Up' BMW%20K75S%20%28287%29%20-L

The cam cover has had the same preparation treatment:

1990 K75S 'Spruce-Up' MW%20K75S%20%28288%29-L

Once dry, I'll mask the detailing, then give them a clean with thinners before getting the first coat of paint on. I've used this process in the past, the masking is fiddly but the end result is better than trying to remove the paint from the bare ali later.


11Back to top Go down   1990 K75S 'Spruce-Up' Empty Re: 1990 K75S 'Spruce-Up' Thu Feb 21, 2013 5:09 am

Erman

Erman
Gold member
Gold member
Wow, Mike, there is some inspirational work going on here!


__________________________________________________
Bikes:

1984 BMW K1000RS

1984 Yamaha XJ750 Seca
    

12Back to top Go down   1990 K75S 'Spruce-Up' Empty Re: 1990 K75S 'Spruce-Up' Thu Feb 21, 2013 6:22 am

blaKey

avatar
Life time member
Life time member
Absolutely fantastic work Mike!


__________________________________________________
Neil
K100RS 1986 RED!

Dress for the ride and the potential slide.
    

13Back to top Go down   1990 K75S 'Spruce-Up' Empty Re: 1990 K75S 'Spruce-Up' Thu Feb 21, 2013 7:26 am

charlie99

charlie99
VIP
VIP
nice work mike ....will look great


__________________________________________________
cheezy grin whilst riding, kinda bloke ....oh the joy !!!! ...... ( brick aviator )

'86 K100 RT..#0090401 ..."Gerty" ( Gertrude Von Clickandshift ) --------O%O
'86 k100 rs.. #######..  "Fred " (f(rame) red ) ( Fredrick leichtundschnell ) - -
bits and pieces from many kind friends across the k100 world ...with many thanks ..
1987 k100rs ########   "Red"  - (red sports rs TWB style )
1989 K100rt #009637   "Black Betty"  (naked rt ala Nigel , now sporting an rs main fairing )
    

14Back to top Go down   1990 K75S 'Spruce-Up' Empty Re: 1990 K75S 'Spruce-Up' Thu Feb 21, 2013 7:27 am

Inge K.

Inge K.
VIP
VIP
+1..... 1990 K75S 'Spruce-Up' 112350


__________________________________________________
Inge K.
K100RS -86. (first owner), K1100LTSE -94.
    

15Back to top Go down   1990 K75S 'Spruce-Up' Empty Re: 1990 K75S 'Spruce-Up' Thu Feb 21, 2013 7:57 pm

robmack

robmack
Life time member
Life time member
Excellent work. I'm inspired by your efforts, as I refurbish my K75 during the off-season.

BTW, what is a "Loybloc"? Don't know if it is called something else here on the far side of the Pond.


__________________________________________________
Robert
1987 K75 @k75retro.blogspot.ca
http://k75retro.blogspot.ca/
    

16Back to top Go down   1990 K75S 'Spruce-Up' Empty Re: 1990 K75S 'Spruce-Up' Fri Feb 22, 2013 3:01 am

MikeP

MikeP
Life time member
Life time member
Thanks for the positive comments everyone. Much appreciated.

Robert, Loyblocs are (or were) rubber blocks impregnated with grit for polishing/burnishing metals. They are like very large pencil erasers and wear away in a similar manner.

I've had mine since the late 80's and recently I thought that I'd buy some more. They don't seem to be sold under that name anymore but are now called Garryflex Abrasive Blocks.

Scroll down this link:

http://www.chronos.ltd.uk/acatalog/Polishing_Equipment.html

They are essentially the same.


17Back to top Go down   1990 K75S 'Spruce-Up' Empty Re: 1990 K75S 'Spruce-Up' Wed Feb 27, 2013 1:11 pm

Fentible

Fentible
Silver member
Silver member
Hi Mike

Incredible attention to detail. Absolutely lovely job.

Can I ask what paint you use on the gearbox and fnal drive components. Im guessing its hammerite 'smoothrite' is it simply satin?? It looks perfect match for my T509 engine, I previously tried Simoniz tough black but its too glossy for my taste.

Incidentally how do you refurb bare alloy castings ?? I want to mirror polish the engine covers and fork sliders on my K100, but the grained finish on the gearbox and drive train have me head scratching a little

Cheers

George


18Back to top Go down   1990 K75S 'Spruce-Up' Empty Re: 1990 K75S 'Spruce-Up' Wed Feb 27, 2013 2:14 pm

MikeP

MikeP
Life time member
Life time member
George,

Yes, it's Hammerite Satin. I have used Simonez Tough Black in the past, I find the properties of enamel paint to be better but more difficult to apply sometimes and of course, you have to remember that other paint will react if applied over the enamel).

Thin coats are the secret. Don't rush to get the item covered. Then when done, a gentle heat cycle from use or a hot-air gun will cure it.

When it comes to cleaning the bare cases I use brass-wire brushes, a selection of different sizes and shapes in a drill.

Brass being less likely to damage the finish and when working a light oil such as WD40 to lubricate and help both to lift the dirt as well as reduce the chance of damage.

In truth, I'm not a fan of WD40 for much else but it does work well as a cleaner. As I work on the surface, I squirt WD40 on it and then use a rag to wipe off the dirt.

A slow speed drill stops the stuff spraying about too much.

Once the grime is removed, I use a decent detergent (just ordinary soap will do but avoid washing-up liquid as it has higher salt content) to clean the oil thoroughly. Brake cleaner works too.

Apart from road salt, grease and oil are what cause the cases to tarnish as they encourage dirt to stick. Once clean a good quality polish and regular washing will keep the aluminium in good nick for quite a long time.


19Back to top Go down   1990 K75S 'Spruce-Up' Empty Re: 1990 K75S 'Spruce-Up' Wed Feb 27, 2013 4:09 pm

Fentible

Fentible
Silver member
Silver member
Thanks Mike, thats really helpful. I used to use SP1 for engines but its become a victim of H&S legislation and is no longer available.
Ive just stripped the K75 S forks I got and am pleased to note Im not the only one that experienced irremovable mudguard mount bolts. Fortunately I have a decent drill press that will make drilling a bit easier.
However in keeping with the rest of the bike I've stripped the black paint off and started smoothing the rough cast with 400 wet and dry which I'll follow with a hard sisal mop and a good cutting compound before moving onto the lighter mops and finer pastes
I discovered alloy polishing in the seventies as an apprentice rod maker for Hardy brothers. The stores guys always wondered why I went through so many mops. I don't think they realised I had extended the art to my motorcycle casings. I also learned a valuable lesson in peripheral speeds as a small bracket I was trying to polish 'caught' in the 5000rpm buffing wheel and was ejected with considerable force, punching a neat hole in the newspaper being read by the floor supervisor a shade to the right of his head. Shocked

George


20Back to top Go down   1990 K75S 'Spruce-Up' Empty Re: 1990 K75S 'Spruce-Up' Mon Mar 04, 2013 3:39 pm

MikeP

MikeP
Life time member
Life time member
I haven't forgotten either the bike or this thread, honest. The owner (Ryan, eldest nephew) wants to be on hand when the major components go back on.

To pick up where I left off, the cam and crankcase covers have been treated to a coat of paint or two. This is the first, very thin coat that acts just as well as any primer:

1990 K75S 'Spruce-Up' BMW%20K75S%20%28292%29-L

A few coats later and the low temperature (relatively speaking) encouraged me to let them spend a day baking a bit on a radiator:

1990 K75S 'Spruce-Up' BMW%20K75S%20%28298%29-L

Once it was hard enough to be handled without damage, I removed the masking of the detailing:

1990 K75S 'Spruce-Up' BMW%20K75S%20%28300%29-L

Then the edges of the detailing are "sharpened" with a fine block as there's nearly always a little leeching under the masking:

1990 K75S 'Spruce-Up' BMW%20K75S%20%28301%29-L

They need a decent polish to finish them but that will wait until the paint has been on for a week or two and a heat cycle from running:

1990 K75S 'Spruce-Up' BMW%20K75S%20%28302%29-L

The gaskets have been cleaned:

1990 K75S 'Spruce-Up' BMW%20K75S%20%28290%29-L

1990 K75S 'Spruce-Up' BMW%20K75S%20%28291%29-L

I've never yet had to replace one of these gaskets but I did learn very early in my K-Series ownership that there's a knack to re-fitting them.

Next job was to make a start on the rear wheel. Same treatment as the front, start by a general clean, then remove the failed clear-coat on the spokes that has allowed corrosion to worm its way over the bare aluminium. The ali is quite soft and the safe way that I use to avoid deep gouging is to use a mild abrasive block and plenty of elbow grease (handy if you fancy doing the odd burglary as your fingerprints disappear with the corrosion Wink ):

1990 K75S 'Spruce-Up' BMW%20K75S%20%28294%29-L

Then when the bare bits are polished, it's time for more masking and the first coat of paint:

1990 K75S 'Spruce-Up' BMW%20K75S%20%28299%29-L

Eventually you can remove the masking and leave the paint to harden fully before, as with the cam and crank covers, dealing with any paint leeching (still to do here):

1990 K75S 'Spruce-Up' BMW%20K75S%20%28303%29-L

Another job done, the re-painted handle bars back on with the crash-pad, master cylinder and switch gear:

1990 K75S 'Spruce-Up' BMW%20K75S%20%28295%29-L

Making a start on re-routing the cables:

1990 K75S 'Spruce-Up' BMW%20K75S%20%28296%29-L

Time to make a start on cleaning the stand bits and pieces:

1990 K75S 'Spruce-Up' BMW%20K75S%20%28305%29-L

1990 K75S 'Spruce-Up' BMW%20K75S%20%28306%29-L

Here's a little tip that I've found to be quite a good way to protect bits. Take some suitable diameter heat-shrink and slip it over the parts then obviously give it waft of heat:

1990 K75S 'Spruce-Up' BMW%20K75S%20%28304%29-L

I've used this on things like the clip that holds the rear master-cylinder and is prone to losing its paint from brake fluid leaks.

I've gone through all the bags of fixings and where I can't replace the screws or clips, they've all been cleaned ready for re-assembly.

The last thing for now is the inner rear mudguard, cleaned and buffed up. I use a cutting paste after washing the worst of the grime off and then just use a normal polish to give it some protection:

1990 K75S 'Spruce-Up' BW%20K75S%20%28308%29-L

There should be a spurt of re-assembly soon. In the meantime I've cleaned all the threads and given them a dollop of alumslip anti-seize paste (I couldn't resist threading the new screws and bolts a little way):

1990 K75S 'Spruce-Up' BMW%20K75S%20%28293%29-XL

More to follow in a few days.


21Back to top Go down   1990 K75S 'Spruce-Up' Empty Re: 1990 K75S 'Spruce-Up' Fri Mar 08, 2013 4:46 am

MikeP

MikeP
Life time member
Life time member
The rear section of the mudguard has been given the same clean and polishing treatment:

1990 K75S 'Spruce-Up' BMW%20K75S%20%28311%29-L

Then I turned my attention to the Motometer. My MO with these is to remove the cover to check for leaks. It's a simple check, remove it and fill it with water then see if the water escapes via the silicon that's used to hold the clear face in the body. It's a fifty-fifty chance that it will leak somewhere and if it does it's a simple fix:

1990 K75S 'Spruce-Up' K75S%20%2860%29-M

It also needs a clean:

1990 K75S 'Spruce-Up' BMW%20K75S%20%28312%29-L

Keep turning the cloth:

1990 K75S 'Spruce-Up' BMW%20K75S%20%28315%29-L

1990 K75S 'Spruce-Up' BMW%20K75S%20%28322%29-L

Two other jobs that I do when inside: First is to clean the blades of all the contacts:

1990 K75S 'Spruce-Up' BMW%20K75S%20%28317%29-L

Second is to tweak-out the under-read in the speedometer:

1990 K75S 'Spruce-Up' BMW%20K75S%20%28316%29-L

I've done it often enough to know the amount to turn the adjuster but it will be checked against a SatNav on the local measured mile once the bike is back on the road and adjusted further if needs be.

At long last Ryan was able to get away from work and the new baby so we began putting some of it back together. The gearbox, starter and alternator going back in/on:

1990 K75S 'Spruce-Up' BMW%20K75S%28309%29-L

It doesn't take long to have something approaching a bike again:

1990 K75S 'Spruce-Up' BMW%20K75S%28311%29-L

1990 K75S 'Spruce-Up' BMW%20K75S%28310%29-L

The grubby finger-marks will be removed in due course:

1990 K75S 'Spruce-Up' BMW%20K75S%28313%29-L

1990 K75S 'Spruce-Up' BMW%20K75S%28315%29-L

A bit blurry but it serves a purpose:

1990 K75S 'Spruce-Up' BMW%20K75S%28314%29-L

At present I'm feeding the rigid brake lines from the front ABS modulator back through to the front, re-connecting all the electrical connectors and will soon drop the new battery in to check things over.

I still have to fit the new brake lines at the front, bleed the brakes and a thousand other small jobs.

One major problem has arisen: The replacement main-stand from a 16-Valve bike was tatty, I've cleaned to, removed a little from the inside of the "feet" to increase clearance (the shorter wheelbase of the older bikes means that the wheel is close to the stand when it's retracted). When the stand was painted and drying I hang it on the swivels through a piece of tube. When I did so I noticed that the nearside swivel is twisted slightly. It needs to be straightened before I go any further or it will just wear-out the pivot pin rapidly.


22Back to top Go down   1990 K75S 'Spruce-Up' Empty Re: 1990 K75S 'Spruce-Up' Fri Mar 08, 2013 9:23 am

Avenger GT

Avenger GT
Life time member
Life time member
https://www.k100-forum.com/t2038-karamba-speedometer-calibration-program-tutorial?highlight=speedometer+calibration

Have a look at the above, might make calibrating the speedo a bit easier. Have not used it myself (yet), but it would save opening the cluster again if you don't get it right first time.


23Back to top Go down   1990 K75S 'Spruce-Up' Empty Re: 1990 K75S 'Spruce-Up' Fri Mar 08, 2013 9:28 am

charlie99

charlie99
VIP
VIP
verry nice mike ...


__________________________________________________
cheezy grin whilst riding, kinda bloke ....oh the joy !!!! ...... ( brick aviator )

'86 K100 RT..#0090401 ..."Gerty" ( Gertrude Von Clickandshift ) --------O%O
'86 k100 rs.. #######..  "Fred " (f(rame) red ) ( Fredrick leichtundschnell ) - -
bits and pieces from many kind friends across the k100 world ...with many thanks ..
1987 k100rs ########   "Red"  - (red sports rs TWB style )
1989 K100rt #009637   "Black Betty"  (naked rt ala Nigel , now sporting an rs main fairing )
    

24Back to top Go down   1990 K75S 'Spruce-Up' Empty Re: 1990 K75S 'Spruce-Up' Fri Mar 08, 2013 11:30 am

88

88
Life time member
Life time member
1990 K75S 'Spruce-Up' Sbowin10

Looking SERIOUSLY good !


__________________________________________________
1990 K75S 'Spruce-Up' Ir-log1188....May contain nuts!1990 K75S 'Spruce-Up' Ir-log11

"The world is a book and those who do not travel read only one page." - St. Augustine from 1600 years ago & still true!

K1 - 1989 - AKA Titan (unique K1/K1100RS hybrid by Andreas Esterhammer)
K1100RS - 1995. AKA Rudolf Von Schmurf (in a million bits)
K100RS - 1991 AKA Ronnie. Cafe racer project bike
K75RTP - 1994
K75C - 1991 AKA Jim Beam. In boxes. 
K1100LT 1992 - AKA Big Red (gone)
K100LT - 1988 - AKA the Bullion brick. Should never have sold it.
    

25Back to top Go down   1990 K75S 'Spruce-Up' Empty Re: 1990 K75S 'Spruce-Up' Fri Mar 08, 2013 8:53 pm

AJ.Valente

AJ.Valente
Life time member
Life time member
Avenger GT wrote: . . . Have a look at the above, might make calibrating the speedo a bit easier.

Thanks for that! 1990 K75S 'Spruce-Up' 112350

I've been looking for a way to test my speedo because it's intermittent at speeds above 95mph.

EDIT: And thanks to Mike for this thread, I've learned quite a lot and taking notes.


Last edited by AJ.Valente on Sat Mar 09, 2013 8:17 am; edited 1 time in total


26Back to top Go down   1990 K75S 'Spruce-Up' Empty Re: 1990 K75S 'Spruce-Up' Fri Mar 08, 2013 8:57 pm

blaKey

avatar
Life time member
Life time member
Great work Mike!


__________________________________________________
Neil
K100RS 1986 RED!

Dress for the ride and the potential slide.
    

27Back to top Go down   1990 K75S 'Spruce-Up' Empty Re: 1990 K75S 'Spruce-Up' Thu Mar 14, 2013 12:24 pm

MikeP

MikeP
Life time member
Life time member
Avenger GT wrote:
Have a look at the above, might make calibrating the speedo a bit easier. Have not used it myself (yet), but it would save opening the cluster again if you don't get it right first time.
Thanks for that. I've seen it before but as I was inside the unit anyway I thought that I'd give it a tweak.

The front ABS modulator is back on and the brake pipes fed through. It was less awkward than I had supposed, still a bit fiddly though. New battery in place too:

1990 K75S 'Spruce-Up' BMW%20K75S%20%28331%29-L

Jetronic and tool tray back:

1990 K75S 'Spruce-Up' BMW%20K75S%20%28332%29-L

The next job was to sort this out:

1990 K75S 'Spruce-Up' BMW%20K75S%20%28178%29-L

I've swapped to the later 16-Valve stand before. It isn't quite as straight-forward as just unbolting one and fitting the later type. In this case, there was an added problem in that the replacement stand was not only "well used" but it turned out to be twisted too.

First it was stripped to bare metal and then I built up several coats of paint with a flatting back between:

1990 K75S 'Spruce-Up' BMW%20K75S%20%28313%29-XL

It was when I looked down over the top as the paint was drying that I saw how badly twisted it was:

1990 K75S 'Spruce-Up' BMW%20K75S%20%28309%29-L

Into the vice and a swing on a long bar saw the twist removed:

1990 K75S 'Spruce-Up' BMW%20K75S%20%28310%29-L

After more paint, the parts are ready for re-assembly (new pivot pins):

1990 K75S 'Spruce-Up' BMW%20K75S%20%28333%29-L

One of the things that I do these days is to wrap the crossbar with helicopter tape to reduce the stone chipping they are always prone to:

1990 K75S 'Spruce-Up' BMW%20K75S%20%28334%29-L

Before going further with the stands, it's time for the silencer to go on because it determines where and how the stands park. A new seal as they always turn to dust:

1990 K75S 'Spruce-Up' BMW%20K75S%20%28336%29-L

1990 K75S 'Spruce-Up' BMW%20K75S%20%28337%29-L

Doing this conversion there's always a bit of fiddling and sometimes some trimming with a grinder to do. In this case the main stand lever needed bending outwards to clear the silencer:

1990 K75S 'Spruce-Up' BMW%20K75S%20%28339%29-L

I was going to use a spare side-stand that I had kicking around but when offered up I discovered that it was a 16-Valve stand (they are slightly shorter and angled differently):

1990 K75S 'Spruce-Up' BMW%20K75S%20%28340%29-L

Putting the original, tatty, side stand back on, it fouled the main-stand slightly. The foot needed a little metal taken off at the inside edge:

1990 K75S 'Spruce-Up' BMW%20K75S%20%28342%29-L

It's a case of trim and check it by offering it up. If you do this swap yourself, don't put the springs back on or you'll be forever pulling them back off. Once it all fits properly it can be re-assembled off the bike. It's much easier to get the springs on rather than when the stands are back on the bike (the tongue thing is the rear mounting for the K75S belly-pan):

1990 K75S 'Spruce-Up' BMW%20K75S%20%28335%29-L

Both stands park properly in the nice new rubber bump-stop:

1990 K75S 'Spruce-Up' BMW%20K75S%20%28343%29-L

And clear the silencer properly above:

1990 K75S 'Spruce-Up' BMW%20K75S%20%28344%29-L

Another thing I did was to remove some metal from the left side "foot" of the stand. There is enough clearance without but it's tight. It shows the difference in the wheel base between the Paralever and non-Paralever models.

1990 K75S 'Spruce-Up' BMW%20K75S%20%28345%29-L

This swap gives you a more robust stand that has the benefit of having grease nipples in the pivots for servicing.

The twist in the main-stand was probably caused by the practice of spinning the bike on one foot, something I'll admit to doing often myself.


28Back to top Go down   1990 K75S 'Spruce-Up' Empty Re: 1990 K75S 'Spruce-Up' Thu Mar 14, 2013 4:25 pm

charlie99

charlie99
VIP
VIP
woohoo !

some great work there mike


__________________________________________________
cheezy grin whilst riding, kinda bloke ....oh the joy !!!! ...... ( brick aviator )

'86 K100 RT..#0090401 ..."Gerty" ( Gertrude Von Clickandshift ) --------O%O
'86 k100 rs.. #######..  "Fred " (f(rame) red ) ( Fredrick leichtundschnell ) - -
bits and pieces from many kind friends across the k100 world ...with many thanks ..
1987 k100rs ########   "Red"  - (red sports rs TWB style )
1989 K100rt #009637   "Black Betty"  (naked rt ala Nigel , now sporting an rs main fairing )
    

29Back to top Go down   1990 K75S 'Spruce-Up' Empty Re: 1990 K75S 'Spruce-Up' Fri Mar 15, 2013 3:15 am

MikeP

MikeP
Life time member
Life time member
Thanks Charlie. Much messing about bleeding brakes among other things still to do.


30Back to top Go down   1990 K75S 'Spruce-Up' Empty Re: 1990 K75S 'Spruce-Up' Fri Mar 15, 2013 4:19 am

charlie99

charlie99
VIP
VIP
some use a vacume type pump for the bleeding of those systems mike

sounds like a plan to me, if i had abs ...

i love the equal length headers mate ...i will have to investigate similar for the k100 ...i know they were around ...but hard to find for us lot out here

good luck ....and hope you get to ride real soon ....and thanks for the pics ... for some it it will explain the 16v type stand diferences as well


__________________________________________________
cheezy grin whilst riding, kinda bloke ....oh the joy !!!! ...... ( brick aviator )

'86 K100 RT..#0090401 ..."Gerty" ( Gertrude Von Clickandshift ) --------O%O
'86 k100 rs.. #######..  "Fred " (f(rame) red ) ( Fredrick leichtundschnell ) - -
bits and pieces from many kind friends across the k100 world ...with many thanks ..
1987 k100rs ########   "Red"  - (red sports rs TWB style )
1989 K100rt #009637   "Black Betty"  (naked rt ala Nigel , now sporting an rs main fairing )
    

31Back to top Go down   1990 K75S 'Spruce-Up' Empty Re: 1990 K75S 'Spruce-Up' Fri Mar 15, 2013 5:09 am

Basic2

Basic2
Platinum member
Platinum member
That's impressive. Better than new Very Happy


__________________________________________________
K100 Basic 2
11/1987 6308319K100CJ
Marakesh Red
    

32Back to top Go down   1990 K75S 'Spruce-Up' Empty Re: 1990 K75S 'Spruce-Up' Fri Mar 29, 2013 7:52 pm

MikeP

MikeP
Life time member
Life time member
Continuing with the brakes, the front callipers are back on:

1990 K75S 'Spruce-Up' BMW%20K75S%20%28350%29-XL

A new cross-over pipe fitted:

1990 K75S 'Spruce-Up' BMW%20K75S%20%28351%29-L

Plus a new braided hose and short rigid pipe:

1990 K75S 'Spruce-Up' BMW%20K75S%20%28352%29-XL

Then it was the bleeding task of bleeding the system:

1990 K75S 'Spruce-Up' BMW%20K75S%20%28353%29-XL

I anticipated that the longest run, from the left-hand ABS modulator to the master cylinder would take the longest so I set about that first. Gravity must have helped because in no time it was done. Then the front callipers and lines were bled, again relatively easily.

Thinking that the rear being much more compact it would take less time I optimistically set about it only to be frustrated time and time again. Even a vacuum bleeder running from my compressor couldn't do the trick. So there was nothing for it but to strip it all off and check that the banjo bolts were seated correctly (new copper crush washers had been used all round) and that all pipes were sound (one was a new stainless braided). Lastly I checked the bleed nipples were closing properly. I had removed and cleaned the one in the calliper but hadn't disturbed the one on the modulator at all until beginning the bleed process.

It turned out that the threads were damaged, possibly too much force to tighten it the last time that the brakes had been bled.

It was at this point that I discovered that FAG used a different, shorter and bigger diameter bleed nipple. Neither BMW nor the usual specialists list the nipple separately. Nor is the whole top cap that includes the nipple available but ebay came to the rescue with a cheap second-hand modulator. Not knowing the condition I opted to swap the top-cap and nipple over:

1990 K75S 'Spruce-Up' BMW%20K75S%20%28375%29-L

That did the trick and it didn't take long to get the rear brake working.

While waiting for the modulator to arrive, I did a few other jobs. The original bits of foam that BMW put on the instruments to seal the gap between the unit and the fairing front panel had disintegrated. A strip of 3M single-sided self-adhesive foam did the trick:

1990 K75S 'Spruce-Up' BMW%20K75S%20%28346%29-L

1990 K75S 'Spruce-Up' BMW%20K75S%20%28347%29-L

Then the front panel:

1990 K75S 'Spruce-Up' BMW%20K75S%20%28348%29-L

The headlamp and the new 'graphite' badge:

1990 K75S 'Spruce-Up' BMW%20K75S%20%28349%29-L

The top-case needed a clean and I set about dealing with the usual rattling that these things are prone to.

1990 K75S 'Spruce-Up' BMW%20K75S%20%28347%29-L

Cleaning begins with some Meths to remove ingrained dirt before a polish:

1990 K75S 'Spruce-Up' BMW%20K75S%20%28357%29-L

Then I used some more of the 3M foam in the places where the top-case contacts the carrier both to stop the rattles and to prevent it chaffing the finish off the carrier:

1990 K75S 'Spruce-Up' BMW%20K75S%20%28359%29-L

1990 K75S 'Spruce-Up' BMW%20K75S%20%28360%29-L

The battery was connected and the various electrics checked and then the loom was re-positioned and the frame given a final polish:

1990 K75S 'Spruce-Up' BMW%20K75S%20%28373%29-XL

As there's been a colour change, I have resprayed the inside of the panels with satin black. Obviously some are not visible but things like the belly-pan are:

1990 K75S 'Spruce-Up' BMW%20K75S%20%28362%29-XL

So it was masked:

1990 K75S 'Spruce-Up' BMW%20K75S%20%28361%29-L

Done:

1990 K75S 'Spruce-Up' BMW%20K75S%20%28364%29-L

With the mesh back in, I offered it up to adjust the forward mounting bracket to get the alignment right. Before:

1990 K75S 'Spruce-Up' BMW%20K75S%20%2817%29%20-L

After:

1990 K75S 'Spruce-Up' BMW%20K75S%20%28370%29-XL

1990 K75S 'Spruce-Up' BMW%20K75S%20%28366%29-XL

1990 K75S 'Spruce-Up' BMW%20K75S%20%28365%29-L

The trick I found after some experience of these belly-pans is not to tighten the forward mounting beneath the water/oil pump housing fully. This allows the top and rear mounts to find their optimum positions.

With that done I applied a five inch width of helicopter tape the full length of the centre to protect the paint:

1990 K75S 'Spruce-Up' BMW%20K75S%20%28367%29-L

If you cast your mind back to the early posts you may recall that the long screw holding the two-part front mudguard was badly corroded. I've replaced it with stainless and sleeved it with heat-shrink to add to the protection:

1990 K75S 'Spruce-Up' BMW%20K75S%20%28376%29-L

With the brakes working, I was able to compress the forks a few times to align the forks before nipping-up the lower triple clamp screws, the fork brace and the axle clamp screws. Then the front mudguard went back on:

1990 K75S 'Spruce-Up' BMW%20K75S%20%28378%29-L

It was now time to re-fit the tank, slosh in a couple of litres of fuel and press the starter. Obviously the injectors and fuel lines need a few turns to fully prime but then it fired-up without any issues. No leaks and the pleasant smell of hot Solvol from the polished exhaust:

1990 K75S 'Spruce-Up' BMW%20K75S%20%28382%29-L

I don't like to get it too hot too soon with all the new paint. Best to warm it a few times getting nearer full operating temperature each time to cure the paint progressively. Then it's out with the old oil and filter and in with new.

ABS re-set and put the side panels on to check their fit. A sliver of the 3M (again) on the side panel clips takes up any play:

1990 K75S 'Spruce-Up' BMW%20K75S%20%28385%29-L

1990 K75S 'Spruce-Up' BMW%20K75S%20%28386%29-L

Not much more to do now.


33Back to top Go down   1990 K75S 'Spruce-Up' Empty Re: 1990 K75S 'Spruce-Up' Sat Mar 30, 2013 2:39 pm

MikeP

MikeP
Life time member
Life time member
Well I had nothing to do today but sling it together. When I can, I'll get some better photos but here it is done:

1990 K75S 'Spruce-Up' BMW%20K75%20%28389%29-L

1990 K75S 'Spruce-Up' BMW%20K75%20%28388%29-XL

1990 K75S 'Spruce-Up' BMW%20K75%20%28391%29-XL

1990 K75S 'Spruce-Up' BMW%20K75%20%28392%29-L

It just needs a decent run then a wash and a proper polish.


34Back to top Go down   1990 K75S 'Spruce-Up' Empty Re: 1990 K75S 'Spruce-Up' Sat Mar 30, 2013 2:47 pm

Tenox

Tenox
Life time member
Life time member
Nice work! I have to admire. And nice colour too. 1990 K75S 'Spruce-Up' 112350


Last edited by Tenox on Sat Mar 30, 2013 4:40 pm; edited 1 time in total


__________________________________________________
BMW K100RT Scrambler (86)
    

35Back to top Go down   1990 K75S 'Spruce-Up' Empty Re: 1990 K75S 'Spruce-Up' Sat Mar 30, 2013 4:11 pm

charlie99

charlie99
VIP
VIP
looking good mike ...its amazing what we see done here ...1990 K75S 'Spruce-Up' 112350


__________________________________________________
cheezy grin whilst riding, kinda bloke ....oh the joy !!!! ...... ( brick aviator )

'86 K100 RT..#0090401 ..."Gerty" ( Gertrude Von Clickandshift ) --------O%O
'86 k100 rs.. #######..  "Fred " (f(rame) red ) ( Fredrick leichtundschnell ) - -
bits and pieces from many kind friends across the k100 world ...with many thanks ..
1987 k100rs ########   "Red"  - (red sports rs TWB style )
1989 K100rt #009637   "Black Betty"  (naked rt ala Nigel , now sporting an rs main fairing )
    

36Back to top Go down   1990 K75S 'Spruce-Up' Empty Re: 1990 K75S 'Spruce-Up' Sat Mar 30, 2013 4:35 pm

MikeP

MikeP
Life time member
Life time member
Thanks for the kind comments. I'll be glad to hand it over to the owner now and have a chance to get out on my own bike. Trouble is, I seem to have committed myself to going over another "little Brick" for someone.


37Back to top Go down   1990 K75S 'Spruce-Up' Empty Re: 1990 K75S 'Spruce-Up' Sat Mar 30, 2013 4:36 pm

charlie99

charlie99
VIP
VIP
lol ...


__________________________________________________
cheezy grin whilst riding, kinda bloke ....oh the joy !!!! ...... ( brick aviator )

'86 K100 RT..#0090401 ..."Gerty" ( Gertrude Von Clickandshift ) --------O%O
'86 k100 rs.. #######..  "Fred " (f(rame) red ) ( Fredrick leichtundschnell ) - -
bits and pieces from many kind friends across the k100 world ...with many thanks ..
1987 k100rs ########   "Red"  - (red sports rs TWB style )
1989 K100rt #009637   "Black Betty"  (naked rt ala Nigel , now sporting an rs main fairing )
    

38Back to top Go down   1990 K75S 'Spruce-Up' Empty Re: 1990 K75S 'Spruce-Up' Fri Apr 05, 2013 6:02 pm

Oldgoat

Oldgoat
Life time member
Life time member
Simply outstanding work Mike! I've not seen that color before, but it looks great. Cool

OG


39Back to top Go down   1990 K75S 'Spruce-Up' Empty Re: 1990 K75S 'Spruce-Up' Mon Jul 06, 2015 2:30 am

1990k75

1990k75
Silver member
Silver member
MikeP, that is fantastic work - you are a master restorer Smile

My just started K75RT rescue looks almost as bad as that one... Sad

Could I interest you in a free vacation in Canada so you could hold my hand through my project? Rolling Eyes

Very inspiring - though I doubt I can match the quality of your work.

The entire thread (& great pics) will be a huge help for me, thanks.

Cheers, Lorne cheers cheers


40Back to top Go down   1990 K75S 'Spruce-Up' Empty Re: 1990 K75S 'Spruce-Up' Mon Jul 06, 2015 4:09 pm

sidecar paul

sidecar paul
Life time member
Life time member
Sadly, MikeP died from prostate cancer at the end of last year.

He is missed by us all, but his posts still remain an inspiration to many.

Paul.


__________________________________________________
'84 K100RS (0014643) (owned since '85), 86 K100RS (0018891) with Martello sidecar (built as an outfit in '88),
'51 Vincent (since '67),'72 Montesa Cota (from new), '87 Honda RS125R NF4 (bought 2015) 
....No CARS never ever!
    

41Back to top Go down   1990 K75S 'Spruce-Up' Empty Re: 1990 K75S 'Spruce-Up' Tue Jul 07, 2015 4:24 am

charlie99

charlie99
VIP
VIP
aye ! ...agree there paul ....an amazing man that will be remembered by many that got to see his fantastic contributions and work ...almost first hand


__________________________________________________
cheezy grin whilst riding, kinda bloke ....oh the joy !!!! ...... ( brick aviator )

'86 K100 RT..#0090401 ..."Gerty" ( Gertrude Von Clickandshift ) --------O%O
'86 k100 rs.. #######..  "Fred " (f(rame) red ) ( Fredrick leichtundschnell ) - -
bits and pieces from many kind friends across the k100 world ...with many thanks ..
1987 k100rs ########   "Red"  - (red sports rs TWB style )
1989 K100rt #009637   "Black Betty"  (naked rt ala Nigel , now sporting an rs main fairing )
    

Sponsored content


View previous topic View next topic Back to top  Message [Page 1 of 1]

Permissions in this forum:
You cannot reply to topics in this forum