BMW K bikes (Bricks)


You are not connected. Please login or register

View previous topic View next topic Go down  Message [Page 1 of 1]


bennyfoofoo

bennyfoofoo
active member
active member
I was just cleaning out my fuel tank and one of the threads on my fuel pump broke off (see pic below). 

Is this an easy fix or costly mistake?? Img_0810


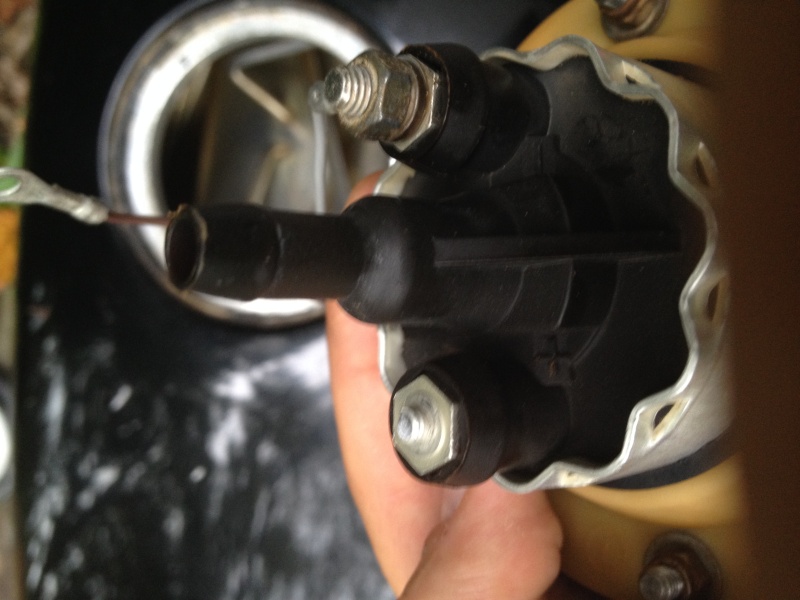
The pump works fine but it won't get power without the threads. Is it possible to re-attach what fell off? Maybe via welding or some type of glue or something? Or maybe there is a way to replace it? I would really rather fix this than buy a new pump.


If not, I am assuming the pump will need to be replaced Mad . Why is it that max bmw shows pumps for around $500 whereas this aftermarket pump is only $80? 


Any advice on this would be much much much appreciated. 

Ben


kioolt

kioolt
Silver member
Silver member
I believe that I would try to drill and tap it for a bolt instead of welding.  Welding will get it very hot and probably melt the plastic.  If the plastic melts it might break a seal around the stud and let gas get into somewhere where it shouldn't.


__________________________________________________
2004 R1150RT 186,800 miles 
1991 K100LT 128,700 miles
1982 R100RT 106,900 miles
Total 422,400 BMW miles

AMA,BMWRA,BMWMOA


The cheapest thing on a BMW is the nut that connects the handlebars to the seat.
    

Point-Seven-five

Point-Seven-five
Life time member
Life time member
This may be the easiest fix:

http://www.ebay.com/itm/331387290009?_trksid=p2055119.m1438.l2649&ssPageName=STRK%3AMEBIDX%3AIT

At 20 bucks it's worth a try.  You will have to replace the ring terminals with 1/4" female blade connectors.


__________________________________________________
Present: 1991 K100RS "Moby Brick Too"
 
Past:
1994 K75RT "Ilsa, She Wolf of the SS"
1988 K100RS SE "Special Ed"
1994 K75S "Cheetos"
1992 K100RS "Moby Brick" R.I.P.
1982 Honda FT500
1979 Honda XR185
1977 Honda XL125
1974 Honda XL125
1972 OSSA Pioneer 250
1968 Kawasaki 175
    

rawdonball

rawdonball
Gold member
Gold member
I have a pump in pieces on my work bench under a Pile of rubble. I will go digging later to have a look with your failure in mind.


__________________________________________________
'88 K100RT, '86 K75C, '05 Yamaha TTR250
    

Dai

Dai
Life time member
Life time member
I'm with K100LT; I'd file it flat, tap it for M5 for the depth of the mounting and then use a high strength Loctite to help hold the bolt in as you'll probably only get 6 or so threads in there. As it is rarely disturbed the repair should hold without trouble. OTOH $20 is nothing...


__________________________________________________
1983 K100 naked upgraded to K100LT spec after spending time as an RS and an RT
1987 K100RT
Others...
1978 Moto Guzzi 850-T3, 1979 Moto Guzzi 850-T3 California,1993 Moto Guzzi 1100ie California
2020 Royal Enfield Bullet 500
    

brickrider

brickrider
Life time member
Life time member
I'd certainly buy the new pump, even after drilling/taping the present one.  $20 for a new fuel pump with all the other needed bits is simply too good to pass up. cheers


__________________________________________________
Brickrider
1985 K100RS; brick red, of course!
    

bennyfoofoo

bennyfoofoo
active member
active member
thanks for the replies!

I really like brickrider's idea of drilling/tapping but perhaps for $20 a new pump is in order. The only thing I am worried about is replacing the ring terminals with blade connectors as point-seven-five mentioned. I have no electrical experience but I am assuming you just expose some new wiring and clamp on the blade connectors? This issue may deter me from buying the new pump...

If rawdonball has a pump in pieces and this piece is replaceable I would be interested in that solution as well.

Hey, at least there are multiple possible solutions to consider! Thanks again for the input and any advice on changing out the ring connector with a blade connector would be welcomed!


brickrider

brickrider
Life time member
Life time member
Benny, fitting terminals shouldn't be so intimidating.  There are any number of tutorials on YouTube to guide you along.  You will need a proper tool though.  In any case, any motorcyclist worth his salt should know how to fit electrical connectors Wink


__________________________________________________
Brickrider
1985 K100RS; brick red, of course!
    

Point-Seven-five

Point-Seven-five
Life time member
Life time member
Anyone working around vehicle electrical stuff should invest in a decent crimping tool and a collection of crimp terminals. 

http://www.homedepot.com/p/Commercial-Electric-8-in-Multi-Purpose-Wiring-Tool-06008/202039373

Crimping a terminal is really simple. 

First, there are three sizes in three different colors. 

Yellow is the largest and is for 10 & 12 AWG wire.  Outside of battery cables, there is little or no need for this size.

Blue is the middle size and is for 14 & 16 AWG wire.  Wires for heavy current stuff on the bike is usually 16 AWG, so some of these can be handy,
.
Red is the smallest and is for 18 & 22 AWG wire.  Outside of battery and starter wires, anything that isn't 16 AWG is probably 18 AWG.

There are four basic crimp terminals.

First, is the flat blade connector.  You see a lot of them used on vehicles and appliances like washing machines and dryers.  They come in a male and female version that connect together.

Second, are ring terminals..  They have a ring that a screw goes through to hold them to a terminal.  They come in different stud sizes, either as number or inch that tells the size of the screw they work with.

Third are spade connectors.  These are similar to the ring connectors except that they are open at the end so you can slide them under the screw without taking the screw out of the terminal.

Fourth is butt splices.  They can be used to permanently connect two wires together.

To make a crimp connection you strip off about 1/4 to 5/16 inch of insulation off the end of the wire.  Carefully stick the stripped wire end into the connector and use the crimp tool to firmly crush the shell of the connector down onto the wire strands.

A gentle tug on the wire confirms that the crimp is good and won't come apart later.

I would go to a good hardware store and have them fix you up with a good crimper and some terminals.  Practice on a couple and you'll see how easy they are to use.


__________________________________________________
Present: 1991 K100RS "Moby Brick Too"
 
Past:
1994 K75RT "Ilsa, She Wolf of the SS"
1988 K100RS SE "Special Ed"
1994 K75S "Cheetos"
1992 K100RS "Moby Brick" R.I.P.
1982 Honda FT500
1979 Honda XR185
1977 Honda XL125
1974 Honda XL125
1972 OSSA Pioneer 250
1968 Kawasaki 175
    

rawdonball

rawdonball
Gold member
Gold member
I've looked at my spare pump delivery end - the terminal spud has a cold formed shoulder on the inner side of the plastic moulding (compressive force has been used to deform the should at four equally spaced points on the circumference) so it is kind of riveted in place. In any case the connection to the brush gear is soldered to the post which is the inner end of the spud in question.

This made me think 'why not just solder a new tail complete with a connector of choice, to the damaged terminal'?

I thought about buying the $20 pump as a spare but postage to Oz is another $46 on top.


__________________________________________________
'88 K100RT, '86 K75C, '05 Yamaha TTR250
    

Holister

Holister
Life time member
Life time member
I thought of soldering also. Maybe you could strip the plastic off a red spade connector and force the crimp end (its about 2.5mm dia) into a drilled hole in the top of the broken terminal. Sweat it into place with solder.

$20 pump??? Gotta wonder if it will go the distance. I saw there was another one there the same for about $10 but it didn't have the vibration damper.


__________________________________________________

1989 K100RT     VIN  0097367 (naked)  
1996 K1100RS   VIN  0451808
 Is this an easy fix or costly mistake?? Austra12    Fuel:  95 Octane
Engine Oil: Nulon Full Synthetic 15W50
Gear Box Oil:  Nulon Synthetic 75W90
    

Dai

Dai
Life time member
Life time member
I'm not sure soldering will work, which is why I didn't suggest it. That's a (relatively) big block of metal to sink heat into and by the time you get it hot enough to get the solder to run, the plastic surrounds will be starting to smoulder/deform. Also, I don't think your standard DIY soldering iron would deliver enough heat. I use an 80watt iron for soldering barrels to control cables; the surface area of the barrel is approximately the same as the surface area of the pump terminal but it still takes a lot of heat to get the solder to run.

Somebody prove me wrong?


__________________________________________________
1983 K100 naked upgraded to K100LT spec after spending time as an RS and an RT
1987 K100RT
Others...
1978 Moto Guzzi 850-T3, 1979 Moto Guzzi 850-T3 California,1993 Moto Guzzi 1100ie California
2020 Royal Enfield Bullet 500
    

Sponsored content


View previous topic View next topic Back to top  Message [Page 1 of 1]

Permissions in this forum:
You cannot reply to topics in this forum