BMW K bikes (Bricks)


You are not connected. Please login or register

Go to page : 1, 2  Next

View previous topic View next topic Go down  Message [Page 1 of 2]


barryt

barryt
Silver member
Silver member
Hi guys,

A short while ago I introduced myself having just acquired my K100. Some background info on everything before I start, without (hopefully) boring anybody! First off, a big thank you for welcoming me into this forum and the words of advice I hacve received on occasion - you're a great bunch of guys and I find the info on here extremely useful indeed.

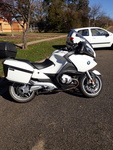
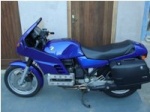
I got my bike about 2 months ago, after years of wondering about one (my dad owned a K100 RT when I was a teenager). So when finally, the wife insisted she would never go on the back of my GSXR 1000 (Suzuki) with me (and rightly so - the thing is highly impractical), I thought about middle age a bit (I'm now 40) and decided the appeal of "touring" the countryside was a nice idea - so I located a K100.

I bought it with a (supposed) 87000kms on the clock, for R 22500 South African Rand (About 3300 US dollars at today's rate).

It was supposedly in "good nick" in terms of what the fellow told me who sold it to me, and it sure did look good, but after riding it for merely a week, I noticed a lot that could do with some attention.

For starters (excuse the pun gentlemen!), the starter started the fabled "spinning" action...Wink

Thats when I joined here and established that it's most probably the sprag clutch.

I tried running diesel through it etc etc, and it seemed to help for a few days, and then got worse...

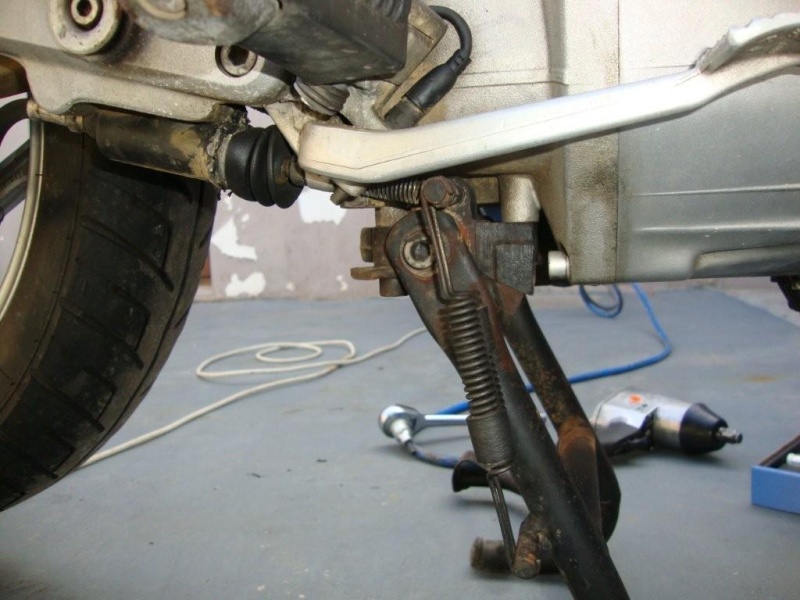
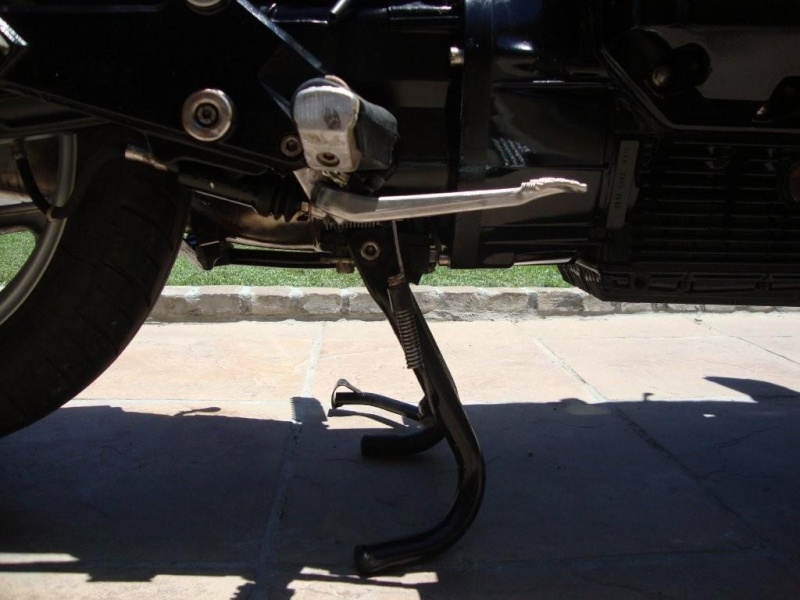
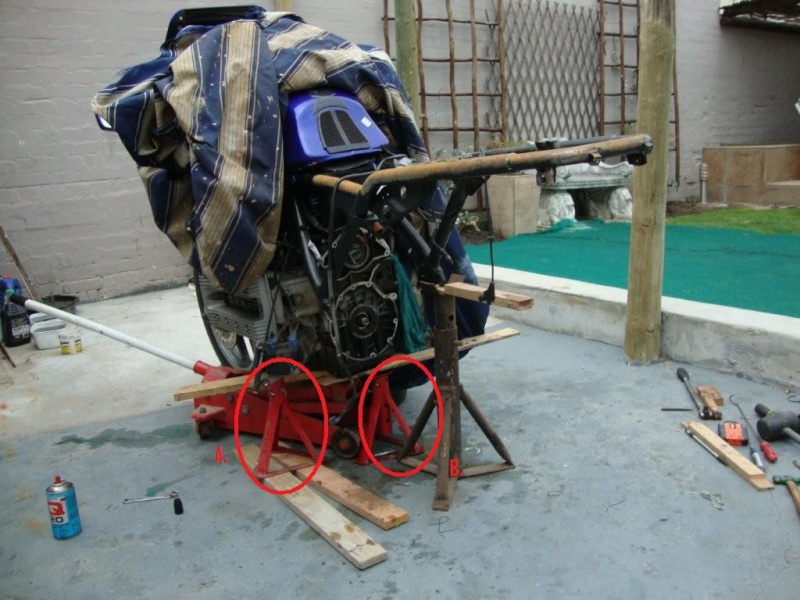
So I made the decision that an (almost) complete tear-down and restoration was in order.

And so, without further ado....here is the story, which took place over a period of the prior 3 weeks to today...

My only regret is that I should've taken even MORE photos of the entire process, to the benefit of everybody else here.

It was a fantastic learning experience, and I had a wonderful time over the past 3 weeks, marvelling over the excellent
design of the bike. It has been over 5 years since I restored my Jaguar V12 so a lot of things were a bit rusty...

Enjoy guys - I hope somebody gets some benefit from this exercise.


barryt

barryt
Silver member
Silver member
This is how the bike looked when I started:

My 1986 K100RS restoration - now complete! Dsc01011

She doesn't look too bad - but the photo doesn't do it any justice really - there was a lot which began to irritate me.

Plenty of rust - the exhaust silencer cover was pretty rusty, the centre stand - the exhausts themselves etc etc


barryt

barryt
Silver member
Silver member
First up during the tear-down was to remove the battery etc, followed by the footrest plates.

Here you can see the footrest plate on the right about to be removed.

I need to tell a funny story here, which I am somewhat embaressed about and which cost me a tiny fortune in money and some wasted time:

My 1986 K100RS restoration - now complete! Dsc01012

You can get an idea of the "rusty and dirty" issues I had...some may find it acceptable, but I wanted it to go back to "new" condition.

So, I began by using a suitable allen key to remove the bolts holding the footplate to the gearbox....

The first 2 came out easily enough, but the last one flatly refused to budge. No amount of leverage would do it - hitting the allen key with a hammer etc, all to no avail, until, the "unthinkable happened" : I stripped the bolt! (IE : The allen key now just spun inside the bolt and would find no purchase at all).

Idiot!

So - being the excitable kind of chap I became at this point, cursing etc, after about an hour battling with this bolt, I decided the best course of action was to get my Dremel tool out with a small cutting disc and CUT the #^&@*!!!!#$@ washer off behind the bolt, together with the rubber washer, as well as cut a nice groove into the bolt so I could get a nice big screwdriver in there to turn it...

I proceeded to "cut" for the next half an hour or so, until while I was lying on my back, out of the corner of my eye, I spotted a tool which I hadn't used in years since my Jag restoration, and forgot I even HAD:

A nice air-gun which hooks up to my compressor, together with commensurate socket and allen key attachment which JUST managed to find a bit of purchase inside the bolt.

The rubbish allen key I had was ever so slightly too small.

In no time I had the bolt out with the air-gun (it has a built in hammer action as well) - I think it was maybe 10 seconds or something silly in the end...

But I had already half destroyed the bolt, washer and rubber grommet with the Dremel tool...Wink

Anyway, I was only too happy to get the damn thing out, and from thereon - that air-gun and its commensurate sockets became my best pal during the rest of the process - I could KICK myself for forgetting I even had it....but it's been 5 years since I was in my workshop working on things mechanical....

In terms of the time and money wastage I refer to - this meant I now had to order a new washer and rubber grommet from BMW in Germany. Living in Cape Town South Africa meant I would now have to wait 2 weeks or so for it to arrive, and since we have "funny money" here compared to the rest of the world - I had to extend the mortgage finance on my house to fund said bolt and rubber grommet... Wink


barryt

barryt
Silver member
Silver member
Another picture with a more honest depiction of the condition of the bike.

In the background is the air-gun I spoke of (much like you find in commercial outfits when they change the tyres on your car etc).

I just LOVE the sound of that thing! But a lot of memories came flooding back to me as well - since this bike and its drivetrain has a lot of ALUMINIUM, (which is like working with butter it is so soft sometimes) - the tool must be used judiciously to prevent stripping threads etc - NOTHING goes BACK via this tool - that is all torqued back with a proper torque wrench.

If yoo don't own one of these and you do a fair amount of work on your bike, I can highly recommend you invest in one, together with a compressor - it saves a HUGE amount of time.

In fact, now understanding exactly how our K's are put together, and having been through the process - I will happily demonstrate how I will go from fully assembled bike and tear it all down from the back up to the bottom oil seal (ie behind the clutch), and I will do it all in 15 minutes maximum - its THAT quick and easy (WHEN you know what you are doing, of course! ... Wink

My 1986 K100RS restoration - now complete! Dsc01013


barryt

barryt
Silver member
Silver member
The bike is actually complete at this stage, but I'm somewhat tired now and ready for bed - I will post more pictures and commentary tommorow


RT

RT
Life time member
Life time member
Keep em coming barryt, these are the things that encourage jubbo s like me to have a go and when it works you feel great. Except that I keep waiting for the next thing to fail.
Good work mate.
Regards RT


barryt

barryt
Silver member
Silver member
A picture from the same angle of the "new" centre stand etc...

My 1986 K100RS restoration - now complete! Dsc01210

Notice the reflection of the rear-brake lever on the bell-housing...Wink You can comb your hair in that reflection now - could not do that the way it was "before"! ... Wink

All the parts were removed and stripped down. Perhaps a summary of the steps I took along the way in "restoring" a part are in order before we proceed, and some pitfalls I learnt from.

The basic process was this (as far as metal and aluminium parts go) :

1. Remove part
2. Strip completely, putting all nuts and bolts back where they came
from so they don't get lost.
3. Anything else not "put backable" - put into plastic zip-loc bags (like bank bags) with a label on it which you write on and describe what its for and where it came from.
4. Degrease each individual part (I used a degreaser I purchased from the hardware store for about 2 USD equivalent).

Degreasing means taking a paintbrush or similar and "working in" the degreaser solution into all the grimy and greasy bits.

5. Rinse with cold water under a tap to remove grease and degreaser at the same time using the paintbrush to help - remember a catchment bowl of some sort underneath the tap to catch the grease! Not nice to send that down into the water system etc! ... Wink

6. Do steps 4 & 5 again until no more grease remains...and part looks reasonably clean.


barryt

barryt
Silver member
Silver member
7. Take a wire-brush to the part and remove all paint, rust etc etc...

Pic below of what I use, which is a handy wire-brush fitment to an
electric drill - takes a lot of effort and "elbow grease" out of the
process - WEAR PROTECTIVE GLASSES TO PROTECT YOUR EYES!!!!

(Say YES
now, and YES SIR again!!!)

Unless you want to lose your eye-sight!


That thing shoots out little wires at a phenomenal rate - you do NOT
want one to stab you in the eye! Also, no bare-feet kids (wife, or
yourself) in the work area either - unless they want a small piece of
wire to poke them in the foot under the sole for example - you will
have tons of little wires on the floor / your work area after a days work when you use my
solution below, but it is very effective and very quick - different
attachments are available as well for getting into difficult "nooks and
crannies" of the various bike components.

I'll say it one more time though : WEAR EYE PROTECTION!!!!

My 1986 K100RS restoration - now complete! Dsc01110


barryt

barryt
Silver member
Silver member
8. Follow steps 4 & 5 again, but THIS time, try not to touch any surface which is going to get paint! (This will cause a tiny layer of human grease / oil to detach itself from your fingers and onto the part, causing the paint not to stick, and run...creating a bad effect and necessitating you start over..Wink


barryt

barryt
Silver member
Silver member
9. Use your compressor to blow compressed air all over the bike part to get rid of as much water as possible and thus drying it as best you can (don't TOUCH the part! [Use a set of degreased pliers to hold the part instead of your fingers]).

If you don't have compressed air / compressor available, then just use paper towel - all you are doing is drying the part and clearing it of water and degreaser solution before painting.


barryt

barryt
Silver member
Silver member
10. Leave the bike part out in the sun for a while to dry out any areas you may have missed while you have some coffee and remenisce on what a fine fellow you are...and what fine fellows BMW are.... Wink [This includes having a smoke if you are a smoker]


barryt

barryt
Silver member
Silver member
11. String a stretch of thin rope somewhere across your workshop / work area where you won't bump into it all the time - preferably in a relatively dustfree and calm area (no wind).

12. Cut up some small lengths of wire of varying lengths (I used old electrical cord innards)

13. Feed / tie a small length of wire mentioned in 12 above through / on to the bike part to be sprayed - again, don't TOUCH the bike part while you do this - even a tiny little "touch" can stuff your whole job...and will be very frustrating for you... Wink

14. Tie the other end of the small wire to your rope length and thus "hang" your bike part to be painted and sprayed...


barryt

barryt
Silver member
Silver member
SPRAYING
----------

Firstly, what paint to use? Well, once you've decided on your color - any sort of engine enamel available quite cheaply in spray cans from your local auto parts store or hardware store will do.

For bike parts which will be getting fairly hot (particularly near the exhaust system, silencer cover etc) you might want to purchase the more expensive and especially made "High Heat" paint types - which I used on my exhaust silencer cover plate - but everywhere else I simply used normal "engine enamel".

The spraying process went like this below, with a nice result - the key thing being not to be too quick or "over-confident". Unfortunately, it is a bit of skill to be learned when spraying to know just when the right amount of paint is hitting the surface of the bike part - too much too quick (spray can too close), and you will get disatrous runs in the paint.

Too LITTLE is probably better.

Process:

15. Spray part gently from a distance (I used about 45 cms - about a school ruler length and a half) - using a gentle motion to try and "cover" the part. Do not stay in one place for too long, to avoid too much paint too quickly.

16. The first coat should barely even change the part's color - it will look more like dust on the part.

17. Leave it to dry

18. Follow steps 15 - 17 about 5 - 6 times until full coverage is realised on the part and it is fully painted with a deep sheen to it in the color you chose.

19. You may wish to skip this step but I chose to give another 2 - 3 coats of "clear coat" (basically clear paint - no color to it). This really brings out the color in the end I found...especially when dealing with gloss enamels - don't bother with the "matt" finishes.

Incidentally, my personal preference is the "gloss" paint...matt colors do nothing for me.

20. HEATING : This step is very important - don't skip it if you can help it. Heating and "baking" the newly painted part will cause the paint to harden nicely and vastly improve its durability - especially important for bike parts because they are always being hit by small stones, boots, shoes, insects, animals, bricks off passing trucks etc, drunk pedestrians with scratchy rings on and mouths/noses/foreheads/ears filled with vast quantities of iron mongery and generally all sorts of things which might scratch your paint job.


barryt

barryt
Silver member
Silver member
21. WIFE PERSUASION : You need to ask your wife if you can do your "baking" in her oven. If this is not possible, you must wait until she is out buying something or having a facial.

Then you must set the temperature to something suitably warm (but not stifling hot) and wait for the temp to be realised before engaging the bike part in the oven.

Be careful if the part you are baking has any plastic or rubber which might melt! (Check first as a last step in your "baking recipe").

I used 140 degrees Celsius for 45 minutes on each part (even WITH plastic and rubber parts in it with no problem) - 140 degrees C is not actually that hot for rubber or plastic - but don't get TOO enthusiastic!

Turn the oven off (don't TOUCH the parts while they are still hot - the paint will be tacky again and you will mess up the finish).

Wait for oven and parts to cool down before removing them.

If not ready to fit back to bike at that stage, wrap in plastic cling wrap and store the part, to keep dust off it...

Also a word of caution (or encouragement, depending on which persuasion you are) about the paint fumes - they can be rather intoxicating!

As can be seen by frequent naps I needed in the afternoon with my dog below...Wink

My 1986 K100RS restoration - now complete! Dsc01014


Thats all there is to "painting"....


barryt

barryt
Silver member
Silver member
Having removed the final transmission, rear shock and rear wheel (all very easy and done in minutes), we are about to remove the gearbox.

Note that the bike is still on its centre stand at this stage....see photo below.

I wanted to show this image because of something which cost me time and money, because I did not read enough posts on this website, and I also overlooked the Haynes Manual a bit (very good btw!) As an aside, I've always found Haynes Manuals somewhat useless, but the one for our K100s is spot on - highly recommended.

Anyhow, what you are looking at below is taken from the rear of the gearbox just below the swing arm.

My 1986 K100RS restoration - now complete! Dsc01015

What you see is the clutch lever and how it joins to the gearbox itself.

Especially take note of the rubber boot which is circled in red.

Having read a few posts on this forum about people complaining about stuff dripping on the floor from this area - it is THIS thing it is leaking from if it is split / torn.

This is not just a rubber boot per se, but actually a seal as well.

Now this is what you must remember, if yours is still OK and you want to remove your gearbox, because if you don't you stand a good chance of tearing this boot (it is very thin rubber) and engineering a trip to BMW for yourself, when you previously had a perfectly good one... Wink

After disconnecting the clutch CABLE from the connecting rod which goes into this boot, hold the clutch connecting rod UP, because if you don't it will just flop down (it has no more clutch cable to hold it up now remember), and when it flops down, it exerts a fair amount of weight and pressure on that boot, and guess what...it tears....Sad

Mine did at least, anyway - I cursed a bit for being a bit stupid about that.

So the trick is, disconnect the clutch cable, and while holding or supporting the clutch connecting rod - DISCONNECT and release the rubber boot - THEN let the clutch connecting rod fall.

To undo the boot is very easy - a simple clamp is holding it on on the gearbox side...expect some gearbox hypoid gear oil to come out after you release it...but it won't be much...perhaps 10ml or so, so don't panic...Wink


K-BIKE

avatar
Life time member
Life time member
Excellent work and you have a fine looking bike as a result you should feel proud of the result. The only things I would add is wearing rubber gloves will enable one to handle the parts and I always degrease with solvent or brake cleaner spray before spray painting. I learnt that tip from a professional painter who would always blast some thinners through his spray gun before putting in the paint and also used that to wash down the part.

If you don't have a spray gun and are using rattle cans then using aerosol brake cleaner is fine, just let it dry before painting.

The other tip is dishwashers are excellent at cleaning up parts just make sure SWMBO is away at the time and the washer is all empty before she returns Very Happy or you will probably get to see Evil or Very Mad
Regards,
K-BIKE


walfish

walfish
Life time member
Life time member
Braaivleis,Rugby and Sunny skies, remember the old advert back in SA,

as an ex Saffa from Durban(rust city) I can appreciate your concerns.

A job well done and something to show down Cifton beach on sundays, not many Beemers there unless things have changed some, bricks are a damm sight cheaper over here.

By the way a bitch like that in my bed would be a sure sign of a rough night out. Smile


barryt

barryt
Silver member
Silver member
"Braaivleis,Rugby and Sunny skies, remember the old advert back in SA,"

You forgot the "Chevrolet" Ungaas... Wink

Now THAT is something you will not see down at Clifton anymore...and you are right, not many Beemer "bonies" either...

At Clifton, 1 must take one's Rolls to attract any attention, but mind you, even then they are all so high on coke and whatever else down there they can't most of the time tell the difference between a Mahindra and a Rolls....which is why I suppose I don't attract many stares when I go down there in my Rolls... Wink

"By the way a bitch like that in my bed would be a sure sign of a rough night out"

Those are just tired eyes from working on the bike Umgaas...Wink I'm actually a tee-totaller for many years now, no drugs, no booze - like to go to the gym etc...

That "dog" has become something special in my wife and I's life for various reasons : I have been threatening and teasing that I am going to have a harness made up for her so she can ride on the Beemer with me - she's only a 6 month old puppy though - wife does not like my new "harness" idea...he he...but I reckon it will work, some shades, piss potty helmet etc for the dog...Now THAT should get some stares down at Clifton - if only from okes high on Coke looking for a new chick and can't properly tell the difference between a dog and a chick...Wink


BIG D

BIG D
Life time member
Life time member
Cool

Great job thats a fine looking bike, nice colour as well.

BIG D


K-BIKE

avatar
Life time member
Life time member
There used to be a German BMW owner who used to come to the IOM TT every year with a little three sided seat behind him a bit like a baby seat but more upright and he had a fully grown Alsatian with him which just sat there and enjoyed the ride. Very well behaved did not bark at anything they went past.
Regards,
K-Bike


charlie99

charlie99
VIP
VIP
nice ......thanks for the post ....gives me something to aim for ...

cheers


__________________________________________________
cheezy grin whilst riding, kinda bloke ....oh the joy !!!! ...... ( brick aviator )

'86 K100 RT..#0090401 ..."Gerty" ( Gertrude Von Clickandshift ) --------O%O
'86 k100 rs.. #######..  "Fred " (f(rame) red ) ( Fredrick leichtundschnell ) - -
bits and pieces from many kind friends across the k100 world ...with many thanks ..
1987 k100rs ########   "Red"  - (red sports rs TWB style )
1989 K100rt #009637   "Black Betty"  (naked rt ala Nigel , now sporting an rs main fairing )
    

barryt

barryt
Silver member
Silver member
Thanks for all the nice compliments and comments so far guys - I have lots more to share about the process, but it takes time to prepare the photos and stories around everything - more coming soon!

And you guys haven't even seen the final result yet in terms of the whole bike! (I am deliberately keeping the final photos of the whole bike until last to keep you all in a bit more suspense...)

She let me down yesterday - clutch cable snapped - one of the things I never replaced - waiting for a new one to arrive from Tjermany...


K-BIKE

avatar
Life time member
Life time member
Hi Barry,
One tip I am sure you know but bears repeating is to not pull any damaged cable out until you thread the new one through over under and beside all obstructions following the exact route of the old one (assuming it is original) that way you are running the cable in the route determined as giving the smoothest result. Then take out the old one, when you tie wrap the new one in places where tie wraps are located do not over tighten them to crush the cable.
Regards,
K-BIKE


barryt

barryt
Silver member
Silver member
Thanks K - great advice. The bike is actually at BMW now - after all the hours I put in, I'm somewhat finished, so I'm letting THEM do it!...(Horrors!) They better get it right! ... Wink


wikur

wikur
Silver member
Silver member
Hi Barryt!
Nice bike and great pics!
I`d love to see some photos of the gearbox removal.
I`m about to do the same job in a few weeks,for a check on the cutch and the outputshaft seal.
Thanks for sharing!
Cheers,Wikur!


barryt

barryt
Silver member
Silver member
Coming up soon wikur...watch this space...


Crazy Frog

Crazy Frog
admin
admin
If you are removing the gear box, check these tips to ease the re-installation.


__________________________________________________
My 1986 K100RS restoration - now complete! Frog15My 1986 K100RS restoration - now complete! Logo2101986 k75, 1985 K100rt, 1985 K100rt/EML GT2 sidecar, 1999 K1200lt/Hannigan Astro Sport sidecar.
    

barryt

barryt
Silver member
Silver member
The gearbox has now been removed:

My 1986 K100RS restoration - now complete! Dsc01111

A picture says a thousand words they say...this one, needs a lot of explanation I think.

What you are looking at is the back of the engine once the gearbox is out.

How to GET to this stage from a complete bike, I will detail step-by step later towards the end of everything for those
who do not have a Haynes manual etc - but do not be daunted, its in fact very easy and quick -this bike has a fabulous
design.

Lets start with the "jacking system" which is required before you can remove the gearbox.

What I did was this, which didn't require any ropes or support system "dangling from the ceiling" as in the Heynes manual.... :


Last edited by barryt on Mon Jan 10, 2011 2:16 pm; edited 1 time in total (Reason for editing : alteration)


barryt

barryt
Silver member
Silver member
Firstly I got a decent jack, and placed it squarely under the sump of the engine.

The sump is basically that thing under the engine at the bottom which holds all the engine oil...Wink [But you knew that, didn't you].

Place it squarely in the middle, you will find that is a little diagonally offline from the cover plate behind which the oil filter sits.

The sump has small fins on for heat dissipation (hope I spelled that correctly), so it's important to protect these a bit by putting a piece of wood between the "cup" [the thing which makes contact with the bottom of the engine when you lift], and the sump itself.

Make sure its fairly sturdy wood - the bike is still quite heavy at this stage and you don't want the wood to split, unsettle the bike's balance and/or possibly cause damage when you start lifting and the wood starts taking up some weight.

Place the wood on, getting everything nicely centred, but do NOT jack UP yet.

My 1986 K100RS restoration - now complete! Dsc01112

I tried to illustrate roughly where the centre of the jack cup is and what wood I used (basically old junk I found in my workshop)


barryt

barryt
Silver member
Silver member
Next up is to find 2 jack-stands, depicted as A and B in red circles in this picture :

My 1986 K100RS restoration - now complete! Dsc01113

Note the positioning of the jackstands.

Jackstand A. is on the left and is ready to hold the left-hand side if the engine (the tappet cover/head of the engine) - this jackstand will support the bike by holding the left hand side of the engine up.

Jackstand B. is on the right, and is positioned just on the edge and right of the bellhousing (thats the thing between the gearbox and the engine guys - the clutch goes into it amongst other things...he he....Wink

Note again the "wood insulation" between jackstands and engine...

Also, it's not important at this stage to get the jackstands positioned exactly right under the engine, or to take any weight on them - just roughly position them correctly under the engine, where you can still freely move them around.

Again, do NOT jack up anything yet!


barryt

barryt
Silver member
Silver member
Remember, these pictures of mine are AFTER my gearbox was removed - yours will be slightly different because your gearbox will still be on the machine, together with the centre-stand.

I used these pictures to give you a clear idea of where the jackstands etc must be positioned.

Obviously gentlemen, your jackstands / jack etc must be nowhere near your gearbox, because that is the thing which is being removed and it can't support the weight of the bike and be removed at the same time, right? ... Wink


barryt

barryt
Silver member
Silver member
Next steps are where things get a little hairy / risky / dangerous.

But it needn't be, if you think things through slowly, do the whole process slowly, and don't be in a hurry.

In fact, its a good time to marvel at what a hero you are becoming, have a smoke, coffee etc...Wink

Then go and see your wife or somebody big enough (not a kid) and try to enlist her help.

At this stage, your bike will still be weighing in at about 190kgs, and you don't want it falling on your precious wife, or yourself in the next steps - nor do you want to trash the mirrors, fairing etc by letting it topple over through carelessness.

Bring said wife to the bike and explain everything to her nice and slowly first - show her the jack and the jackstands and what you plan to do - which is essentially to lift the bike up off the ground (and its centre stand), and while its in the air, position the jackstands correctly, and then let the bike down.

Its important for her to understand all this and visualise what is going to happen before the process begins, so she can fully understand the implications and dangers involved.

I hate using the word danger because its not really dangerous, but it CAN BE, if you are too hasty or stupid, and don't know what is going on!

The critical thing is that once you get the bike off the ground, it must stay vertical and not be allowed to "lean" one way or the other more than a couple of centimetres - if it does, (and it goes past the critical lean level in terms of centre of gravity, it will topple over for sure - and there will be not much you can do to stop it).

However, its very easy to keep vertical within a few centimetres with very small amounts of pressure while holding the stearing - explain this nicely to your wife to eliminate fear. The trick is to not let it go too far one way or the other.

It's pretty easy to keep your bike upright while sitting on it, right?

This is the same thing - but your wife / helper needs to properly understand the dynamics first to keep things safe... Wink


barryt

barryt
Silver member
Silver member
Next thing is to explain to your wife WHERE TO HOLD the bike:

Ask her to put one hand through the fairing and reach for the top of the fork closest to her and hold the fork.

The other hand (left hand) can just rest firmly on the seat or tank (but no pressure).

The reason I suggest the fork is two-fold:

1. The forks are much closer to the centreline of the centre of gravity - and the forks will have a lesser tendency to turn and unsettle the bike's balance since there is less leverage there than out on the handle-bar

2. Holding the end of the handle-bar is further away from the centre of gravity and thus less control when she is trying to keep the bike balance.

3. Also, I don't trust my handle rubber staying on....but that's just my bike - imagine wifey having the handlebar rubber come off in her hand and giving you a big smile while nobody is holding the bike anymore and you are still on the ground with the jack...could be good for a few laughs I imagine...and tears later! ... Wink

After she's properly briefed, start jacking...SLOWLY - no need to be a ham-fisted monkey to prove how strong you are...

As the jack begins to take the weight of the bike, it will slowly come up off its centre stand.

Jack the bike up until the centre stand is about 5cms off the ground (or whatever you are comfortable with for your jackstands to properly extend etc, and remember, you need to get the centre-stand off next, so make sure you will have enough room for it to swing etc).

Ensure that your wife does not let go or stop balancing the bike as you get up from the jack when its in the air - tell her so - the job ain't done yet... Wink

Next step is to now perfectly position your jackstands under the relevant areas - make sure that when the bike comes down it will remain pretty much as vertical as it should be when it lands on the jackstands and wood - no good having 1 jackstand 10cm higher than the other.

Some ultimate lean angle for the bike when it comes down onto the jackstands is no big deal - but I would say no more than 5 degrees.

When you are happy the jackstands are in position, and your wife still balancing the bike, SLOWLY, EVER SO SLOWLY, let the pressure out of the jack and let the bike come down very gracefully and slowly onto the jackstands.

BE READY TO STOP THE JACK the moment you sense something might be amiss with the jackstands or the lean angle to big...then take her up again and readjust the jackstands if necessary.

In the end the bike should be sitting nicely on the jackstands with the centre-stand in the air and the jack flat....

NOW your wifey can let go and make some coffee for you... Wink


barryt

barryt
Silver member
Silver member
One last thing about "jacking" in general, whether for a car or a bike (and the more experienced among us, please excuse the "common sense" you yourselves already have):

NEVER rely solely on the jack to keep something up in the air.

ALWAYS use jackstands.

NEVER climb under any vehicle which is solely up in the air on a jack!

The world has (literally) lost count of how many dead souls there are which wound up under a vehicle because the jack collapsed - it constantly amazes me how even some PROFESSIONALS risk this daily - I've seen it in workshops with my very own eyes...

If only they knew that all there is between them and a big piece of heavy machinery falling onto and crushing them is a SMALL BALL BEARING!!!! (Yes, you read that correctly...)

I would never trust my life to a silly ball bearing - would you?

By now you've probably gathered I'm a somewhat of a safety freak, and too bad if I'm boring you...that's the way I swing...Wink

And don't get me on about "riding safely" - but that's for another topic on this forum someday...woe betide you all...he he... Wink


barryt

barryt
Silver member
Silver member
Now would be a good time to remove the jack from the scene of the crime so nobody trips over or falls on it (especially you!).

I personally do not do that but prefer to have it positioned so that it is still not in the way while I work, but at the same time I jack it up again to ever so slightly take some weight off the jackstands as well and just provide a third point of weight distribution so there is not so much pressure on the head of the engine or the bell-housing.

But you will be amazed the next morning to see the jack is no longer taking any weight and you will have to lift it up again slightly to do its job (see what I mean about ball bearings? ...Wink


barryt

barryt
Silver member
Silver member
Now its time to take off the centre stand.

I feel its better to remove the whole thing as a unit, including it's mounting, instead of stand itself first, then mounting - easier to remove the stand from the mounting on your workbench later if you so choose...

There are 4 bolts on the mounting you must concern yourself with.

The position of which is roughly depicted with the red circles in this photo:

My 1986 K100RS restoration - now complete! Dsc01114

You will need to get under the bike and undo them from the bottom.

If yours had not been touched in decades (like mine), you will do well with an airgun type socket wrench as I described earlier, and some Q20 lubricant.

They were large allen bolts if I remember correctly -and didn't give me too much grief!

Remember also when applying lots of pressure (torque) when trying to undo a bolt if you don't have a hammer airgun like mine, that you don't turn the whole bike off its jackstand and onto you!

Don't try to remove the 2 springs until its on the workbench - you will battle when they are extended as in this photo (very tight), but once the whole lot is on your workbench - its quite easy.


Last edited by barryt on Tue Jan 11, 2011 12:09 pm; edited 1 time in total


barryt

barryt
Silver member
Silver member
Here is another pic of the removed centre stand, with maybe a better depiction of where the 4 bolts are to be located:

My 1986 K100RS restoration - now complete! Dsc01115

As you can see, my particular centre-stand was in a very sorry state...


barryt

barryt
Silver member
Silver member
In the end, I got it to look like this (after going through the paint and bake process previously mentioned):

My 1986 K100RS restoration - now complete! Centre10

The photo doesn't do it enough justice - but trust me, you can comb your hair in the reflection on the centre-stand now... Wink


K-BIKE

avatar
Life time member
Life time member
Great step by step instructions for all of us to use.

When refurbishing a centre stand it is vital to make sure the inside of the centre stand tubing is protected from corrosion. Many a stand has rusted away silently from the inside until one day failing suddenly causing the bike to topple over and probably doing a lot of damage to the fairing.
Regards,
K-BIKE


barryt

barryt
Silver member
Silver member
Good point K-Bike!...I forgot to mention that...Everybody take note!

Also, a good idea to inspect the bearings where the stand is connected to the mounting, and regrease if necessary.

The bearings are located here (indicated by red circles) :

My 1986 K100RS restoration - now complete! Dsc01116


barryt

barryt
Silver member
Silver member
Also, when protecting the inside of the stand as K-Bike says, probably the best way to do this is use some sort of anti-corrosion paint which not only stops rust in the future, but seals up any current rust.

Here in South Africa, we have something called NS4 which is excellent stuff.

Because the inside of the stand is not very accessible, its probably wise to remove the end-caps (depicted with the red circles in the pic below) and simply pour in a fair amount of NS4 or equivalent, replace the end caps and give the stand a good shake for a few minutes to try and ensure maximum coverage inside the stand:

My 1986 K100RS restoration - now complete! Dsc01117

Same goes for the "lever" which is welded to the side of the stand and which you normally use your foot on to bring the stand down when standing the bike up - but not so easy to get to the inside of that, because there is no end-cap to remove and "pour down into", but with some effort, you can reach a syringe in there possibly and pump NS4 into it...


wikur

wikur
Silver member
Silver member
Exellent Barryt!
Lots of useful info.
Cheers,Wikur!


barryt

barryt
Silver member
Silver member
Thanks for the encouragement Wikur!

Enough about centre-stands now...

The next step is to get the gearbox out (remember, I am ultimately after the sprag clutch to sort out my starting issues)....

To remove the gearbox at this stage is quite simple - just a few bolts.

Also, at this stage remember I have already removed my battery, starter, alternator, rear wheel, final transmission and spring (if you haven't done that yet - you need to do that first - apologies for not showing those steps initially in this forum - I got ahead of myself...Wink

[I will start a new topic soon which will detail how to go from complete bike to just before removing the gearbox which is where this topic really starts).

It is probably a good idea to use a third jackstand or something similar to support the weight of the gearbox while you undo the bolts - thats what I did.

The gearbox probably won't fall off if you don't, but the thing is, it will only be held on by 2 steel dowels which do not protrude that far, and depending on the condition of your dowels (maybe they are a bit rusty and weak), the entire weight of the gearbox without the bolts being solely supported by the dowels may be just enough to break and trash your dowels - which will mean more work potentially than you anticipated - but if this happens you probably need to replace the dowels anyway...

Still, even with "good" dowels - I don't like having the weight of the gearbox supported only on the dowels - so the third jackstand is to help with this.

More detailed pics later on where these dowels are, and what bolts to remove, where to place your third jackstand or equivalent.

But first, it's a good idea to first drain all the gearbox oil from the gearbox before removing it - doing it on your workbench (although possible) will probably create an almighty uncontrollable mess of old hypoid gear oil... Wink

So lets start by draining the gearbox oil.

Here is a pic showing you where the filler is - you need to first undo that with an allen key / socket:

My 1986 K100RS restoration - now complete! Dsc01016

You may ask why undo the FILLER first, and not just go straight to the DRAIN?

The reason for this is, so that you can ensure maximum oil will leave the gearbox when you open the drain.

If you leave the FILLER closed while draining, no air can get into the gearbox to replace the escaping gear oil - a vaccuum starts, and not all the oil will leave the gearbox - that's the theory anyway - I don't know enough about the K100 gearbox to completely vouch for that - others may tell me different...Wink

(Those more experience here among us, please excuse my extreme verbosity in stating the somewhat "obvious" perhaps, but nobody ever explained this to me for some time, and it is easily overlooked... Wink


barryt

barryt
Silver member
Silver member
Next up you need to find yourself an empty container which will hold at least a litre of liquid.

The gearbox is supposed to hold about plus minus 850cc (1.5 Imp. pints or 0.90 US quarts).

This is what you will be draining out.

Place the container in such a position to catch the oil from under the gearbox when you undo the FILLER plug, which is located under the gearbox.

It also requires an allen key / socket.


barryt

barryt
Silver member
Silver member
Remember there is a COPPER WASHER on both the FILLER and DRAIN plugs - don't lose it - you can usually always reuse it (contrary to popular belief)!

You will need to wait a good few minutes (about 15 I reckon) for all the oil to nicely drain out - you'll know when nothing is dropping into your container anymore...but you could figure that out yourself right? ... Wink

A short lesson on reusing copper washers and ANNEALING:

Most folks just simply put back the old copper washer when refilling everything again without a second thought.

This is a bad idea - have you ever thought WHY it is a COPPER washer and not something else?

It's because COPPER is very soft initially - I won't go into the technical atomic details of why this is here in this post.

(If you want to "test" what I am saying, try bending a new one back and forth - you should find that it bends very easy), but after some pressure (or a few back and forth bends), it suddenly goes hard - did you know that?

C'mon - own up all you fellows who didn't! ... he he.... Wink

Thats the reason why it is always "suggested" you always use a NEW copper washer when putting things back, because when its "new", it is supposed to still be soft, and in an ANNEALED state for you.

The moment you apply pressure to it (by tightening the filler plug), it goes HARD and provides a nice seal.

(All those with leaking oil sumps, gearboxes and final transmissions from the drain plugs take special note here in this post).

So a NEW WASHER should always seal nicely the moment it takes some pressure when it "hardens into position" sealing the contact areas and preventing leaks.

Those of you who just put back an old used copper washer - shame on you! ... Wink

[And if you got no leaks - you are lucky - but it is just a matter of time man...just a matter of time...]

The price of a NEW COPPER washer is so cheap you almost want to put a new one in every time.

But here's the problem:

How can you know that even a NEW copper washer was properly annealed for you?

(Other than bending it back and forth a few times to check its stiffness, and by then you might make it go hard as if you tightened the filler plug on it, rendering its original function useless!).

So you can't even trust a NEW copper washer, is the bottom line!

Here is the solution (for both NEW and your OLD copper washer which you can use again - provided you didn't bugger or mangle it up to much or a previous hamfisted mechanic did...):

Its quite easy and just takes a bit of patience (and you also need a gas heater gun or some such - even your wifey's oven will do).

What you need to do is ensure that ANY copper washer which goes back onto your bike (new or otherwise) is first properly ANNEALED.

This way you can be sure it will seal properly when it goes back.

Do this by heating the washer up until it goes cherry red hot and almost transparent (obviously don't hold it in your fingers while you do this...he he...use a set of pliers or something, but hey, it depends which way you swing and how much of a "man" you are!....Wink.

Seriously, use pliers...

If you are using wifey's oven, its doubtful it will go cherry red - but it will still achieve almost the same effect - it may be better to heat up the washer directly on the hotplate of the stove rather, in that case,
if you don't have a gas heater gun or some such.

Once it has gotten hot / cherry red, you can dip it into some cold water and marvel at the bubbles and the "hiss" afterwards... Wink

Now it is holdable in your fingers and manageable - but do NOT bend it at this stage.

It will be nicely annealed and "soft" and ready to fit back with the relevant drain / filler plug.

The moment you tighten the relevant drain / filler plug it will go hard and seal nicely...

Got it? Now you are a copper washer and ANNEALING expert / guru!

I learned this from my Jag V12 restoration days where everything on that motor leaked oil wherever and whenever possible - straight from the showroom floor...


barryt

barryt
Silver member
Silver member
It always amazes me how many so-called professional workshops and mechanics are not aware of what the annealing process or proper purpose of a copper washer is.

And a lot more they don't know as well, besides!

Which leads me on to something else:

"Mechanics 101 for putting things back"
Nothing irritates me more than watching somebody put back a nut / bolt / fastener by tightening it until they are absolutely sure that they have proved themselves to be the world's strongest guy, and ensuring that nobody will EVER get the #^#&*!!! thing off again!

Especially oil filler plugs! (These guys LOVE giving that thing an extra "grunt" of a turn!). And they just LOVE their airgun socket drivers for putting things back as well! (Admittedly, I have one as well as you probably read in a previous post, but I very rarely use it when I put something BACK).

Here are some golden rules when things go back:

1. ALWAYS use a torque-wrench with the correct setting when tightening something back in. If no setting available, then use your common sense : usually just a quarter or 1/8th turn "tight" is good enough - do NOT give it that extra "grunt" turn, unless specifically called for (wheel fasteners is one of them - but even that has a torque setting).

ESPECIALLY on all oil filler plugs with the copper washer spoken of - just "nip" it - about 1/8th of a turn - even a quarter turn is probably too much.

Get yourself a good torque wrench if you don't already own one - and learn to use it - its not rocket science.

And if anybody goes near your bike to put something back without one (except in rare cases), then complain and change your workshop, because they obviously employ idiots!

2. NOTHING goes back without a bit of copper slip or anti-seize compound on the threads. It only takes a couple of seconds, and the compound is so cheap with the benefits it provides it is almost unthinkable not to do it!

What it buys you is a level of corrosion protection, as well as complete ease of removal someday again in the future (you can almost just look at the fastener and it will come out for you!..Wink

3. REMEMBER that you are mostly dealing with things made of ALUMINIUM (For Americans, thats ALUMINUM to you [who gave you the right to change the spelling btw? ...Wink])

When you look at your bike and all its aluminium (just about the whole drive-train [engine/gearbox/final drive etc]), you are looking at aluminium.

And that means you are looking at BUTTER.

(IE, it is very soft, and threads strip very easily if you are too ham-fisted!)

Which is why you never want a hamfisted monkey of a mechanic working around it who believes in that extra "grunt" of a turn!

This even goes for screws.

Obviously, anything plastic will not gain any benefit at all (fastener side or the thing you are fastening into - no good if its plastic, besides the corrosion protection for the metal end if any, no benefit).


K-BIKE

avatar
Life time member
Life time member
I am an enthusiastic user of Loctite and usually use it on most screws, nuts and bolts that are not meant to come off except for repair reasons. There are various strength grades and for those screws which one is just trying to make sure wont vibrate loose the Loctite screw lock is great because one can loosen it using ordinary hand tools. Similarly I always use Loctite PTFE pipe sealant when I put drain plugs back in because it guarantees no leaks and stops involuntary loosening of the plug.

I once saw a trail of oil through down-town Auckland which started with a thin dribble (in the direction I was walking) getting thicker as I walked. Eventually after about 1/2 a k I came to the start and there resting in the gutter was a sump drain plug. No sign of the vehicle but it had obviously happened within the last few minutes because the oil had not been spread around by tyres driving over it.
Regards,
K-BIKE


barryt

barryt
Silver member
Silver member
Loctite is a good idea K-Bike - thanks for the additional tip!

You didn't see a broken down car a bit further down the road K-Bike?....Wink

Couldn't have gotten very far without oil I reckon, unless it was a Harley Davidson (farm implement) perhaps...

No pistons, pieces of crankcase lying further up the road? Wink


barryt

barryt
Silver member
Silver member
Right, back to removal of the gearbox then...

Once all the gearbox oil is drained, put the filler plug and the drain plugs back (with their old washers) so they are in a safe place where you won't lose them.

Next, when you are confident the gearbox is supported on something, you need to undo some bolts.

Next, undo all the bolts around the gearbox which are holding the gearbox to the bell-housing.

This pic shows some of them on the RHS of the gearbox:

My 1986 K100RS restoration - now complete! Dsc01118

There are 5 or 6 of them all round the circumference of the gearbox.


barryt

barryt
Silver member
Silver member
Next, you need to remove the 2 bolts on either side of the gearbox where it holds the gearbox to the bike's frame.

The one on the RHS is depicted below:

My 1986 K100RS restoration - now complete! Dsc01119


Sponsored content


View previous topic View next topic Back to top  Message [Page 1 of 2]

Go to page : 1, 2  Next

Permissions in this forum:
You cannot reply to topics in this forum