BMW K bikes (Bricks)


You are not connected. Please login or register

View previous topic View next topic Go down  Message [Page 1 of 1]


tinyspuds

tinyspuds
Life time member
Life time member
Good (insert time as appropriate) all,

I am getting down to the exciting bit of finishing the fuel related rubber bits replacement.

clean and replace throttle bodies and plenum Imag1613

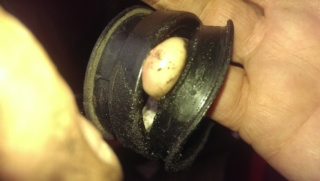
I knew the rubber would be leaky after it’s 10 year stand in the open, but did the squirt carb cleaner at tickover test for before and after comparison. All pots reacted, from the plenum fitting to the crankcase flange, less so at number 4 and getting progressively worse up to number 1. So this wasn’t really a surprise:

clean and replace throttle bodies and plenum Imag1612


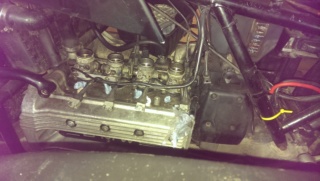
I got this far by detaching the 4 pairs of clamps below the plenum and then rotated the plenum left and towards the back. The front 2 inlets came off with the plenum, 3 and 4 stayed behind on the TB’s.

This wasn’t difficult but felt like there is probably a more elegant way to reinstall. I will also be replacing the manifold rubbers.

Q1. What is the recommended approach to reinstallation e.g. is it possible to assemble manifold through to plenum and reinstall as a unit?

Q2. I can’t see any issues in the schematics but to be sure; is there any reason not to immerse throttle bodies and plenum chamber in degreaser  then carb cleaner?

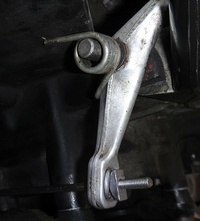
Q3. A bit off piste but just came up. Obv. removing the throttle cable at the throttle end is straightforward atm. But would seem less so at the roadside with all the plastic and rubber back in place. My usual approach would be to create slack in the inner cable, grab it with pliers and free the nipple from the wheel. Not having much luck with that this a.m. - is there a trick/tip/technique?

I’m doing this job simultaneously with replacing radiator hoses, which will be the end of my “I bought a K” journey for now. Hopefully I have done enough to keep her going until my last planned rally in November...
Cheers all,
Stu


__________________________________________________
1985 BMW K100RT + Hedingham HUB and LL’s. VIN 0028106.
1986 K100RS in boxes. VIN 0141918.
1954 Royal Enfield 350 Bullet. Original.
2000 Hayabusa with Charnwood chair, Wasp forks and EZS wheels.
    

Dai

Dai
Life time member
Life time member
Fit the inlets to the plenum, then swear badly as you try to line them all up onto the throttlebodies. Silicon grease helps a lot. Did you replace the manifolds below the throttlebodies? They have a habit of cracking too. If not (and you do replace them), roll the throttlebodies out of the inlets, then scrub as much of the shite off the engine as you can before releasing the manifolds. Refit (or replace) with a bit of Threebond between the manifold and the crankcase.

Don't see any problem with cleaning the throttlebodies that way.

As for the throttle cable... there ain't no easy way. I usually put as much slack in it as possible (i.e. release the bugger at the top), then lever the quadrant round. Most of the time this gives enough slack to get a pair of needlenose pliers onto the inner cable and wriggle the nipple out. When putting it back, you'll probably find that you have four miles of slack because the outer has jumped out of the socket at the top of the quadrant


__________________________________________________
1983 K100 naked upgraded to K100LT spec after spending time as an RS and an RT
1987 K100RT
Others...
1978 Moto Guzzi 850-T3, 1979 Moto Guzzi 850-T3 California,1993 Moto Guzzi 1100ie California
2020 Royal Enfield Bullet 500
    

duck

duck
Life time member
Life time member
Throttle cable attach/detach:

Open the throttles as much as possible and then stick a screwdriver in them to hold them open:

clean and replace throttle bodies and plenum G8FCDYW


__________________________________________________
Current stable:
86 Custom K100 (standard fairing, K75 Belly pan, Ceramic chromed engine covers, paralever)
K75 Frankenbrick (Paralever, K11 front end, hybrid ABS, K1100RS fairing, radial tires)
86 K75C Turbo w/ paralever
94 K1100RS
93 K1100LT
91 K1
93 K75S (K11 front end)
91 K75S (K1 front end)
14 Yamaha WR250R
98 Taxi Cab K1200RS
14 K1600GT
http://www.ClassicKBikes.com
    

tinyspuds

tinyspuds
Life time member
Life time member
Cheers Dai,
I have got replacement manifolds too (used/half price from Motorworks, excellent value, 3 look hardly used. Very pleased). Good tip on cleaning before removal, been thinking about how best to, but hadn’t come up with that (Doh!)
Got a couple of days before my suzuki clamps arrive so time for a good clean.
Thanks, Stu


__________________________________________________
1985 BMW K100RT + Hedingham HUB and LL’s. VIN 0028106.
1986 K100RS in boxes. VIN 0141918.
1954 Royal Enfield 350 Bullet. Original.
2000 Hayabusa with Charnwood chair, Wasp forks and EZS wheels.
    

tinyspuds

tinyspuds
Life time member
Life time member
duck wrote:Throttle cable attach/detach:

Open the throttles as much as possible and then stick a screwdriver in them to hold them open:

clean and replace throttle bodies and plenum G8FCDYW
Thanks Duck. Tried that (successfully) this pm. Think I’ll need to
practice with everything reassembled - the chair stuffs visibilty.
Cheers, Stu


__________________________________________________
1985 BMW K100RT + Hedingham HUB and LL’s. VIN 0028106.
1986 K100RS in boxes. VIN 0141918.
1954 Royal Enfield 350 Bullet. Original.
2000 Hayabusa with Charnwood chair, Wasp forks and EZS wheels.
    

tinyspuds

tinyspuds
Life time member
Life time member
Dai wrote:Fit the inlets to the plenum, then swear badly as you try to line them all up onto the throttlebodies. Silicon grease helps a lot.

Far too frustrated to swear badly. Ended up swearing very well. PITA but done, thanks all for help. Split manifolds, perished vacuum hose, no clamps on crankcase breather...
Airbox and injectors back on tomorrow ready for my first bash at airtight riding. Yay!cheers


__________________________________________________
1985 BMW K100RT + Hedingham HUB and LL’s. VIN 0028106.
1986 K100RS in boxes. VIN 0141918.
1954 Royal Enfield 350 Bullet. Original.
2000 Hayabusa with Charnwood chair, Wasp forks and EZS wheels.
    

Dai

Dai
Life time member
Life time member
Fit the injectors to the fuel rail - do NOT forget the clips unless you don't mind learning to swim in a puddle of fuel! - then use the fuel rail to push the injectors into the crankcases.


__________________________________________________
1983 K100 naked upgraded to K100LT spec after spending time as an RS and an RT
1987 K100RT
Others...
1978 Moto Guzzi 850-T3, 1979 Moto Guzzi 850-T3 California,1993 Moto Guzzi 1100ie California
2020 Royal Enfield Bullet 500
    

tinyspuds

tinyspuds
Life time member
Life time member
Job done. All coolant system rubber replaced. 
All EFI consumables:

- Crankcase to TB rubbers,
- TB to plenum rubbers,
- All 12 clamps (suzuki),
- 3 rubber caps on TBs,
- Crankcase breather hose,
- Vacuum hose from FPR,

Replaced.

Fuel Injectors tested, cleaned and replaced.

70 mile test ride and she ran unbelievably sweet and crisp with a steady ‘unfussy’ tickover and instant throttle response. Carb cleaner spray test says I have very minor leak around TB3. I’ll keep an eye on plug condition, but I’m not going back to plenum chamber fitting hell before my next rally unless it turns major.

Thanks all as always.

Also re routed clutch cable this a.m. The small felt pad at the lever was still in place. Made me smile; my 65 year old lucas magneto uses exactly the same technology for lubricating a spindle Laughing. First bit of tech I’ve recognised since starting this project.


__________________________________________________
1985 BMW K100RT + Hedingham HUB and LL’s. VIN 0028106.
1986 K100RS in boxes. VIN 0141918.
1954 Royal Enfield 350 Bullet. Original.
2000 Hayabusa with Charnwood chair, Wasp forks and EZS wheels.
    

9Back to top Go down   clean and replace throttle bodies and plenum Empty Refitting Plenum Tips needed Mon Apr 12, 2021 3:48 am

GF Wollongong

GF Wollongong
Platinum member
Platinum member
Walked away for "cup of tea" break, perspective and sanity

Refitting plenum to throttle bodies is proving elusive.

Silicon greased TBs and new upper manifold rubbers.
Have been trying to either push or lever plenum down onto TBs - both all together or one end at a time.

Any wise words other than "swearing" ?

Thanks

GF


Dai

Dai
Life time member
Life time member
I would say 'use a big hammer' but you're right; the real sod is the area around no.1 because it hits the frame. I found that fitting the TB rubbers to the plenum and then leaning on it works best. Get mad at it and concentrate on that end - use full weight. Once that one goes on, the rest just follow. A small screwdriver helps to lever the edges of the no.1 TB rubber onto the TB itself.


__________________________________________________
1983 K100 naked upgraded to K100LT spec after spending time as an RS and an RT
1987 K100RT
Others...
1978 Moto Guzzi 850-T3, 1979 Moto Guzzi 850-T3 California,1993 Moto Guzzi 1100ie California
2020 Royal Enfield Bullet 500
    

tinyspuds

tinyspuds
Life time member
Life time member
+1 on Dai.
I would add that I never found any technique that felt like the ‘right way’ (short of deciding it was probably easier for the guy that built the bike than it ever would be for the guy maintaining it). I just kept plugging away using all variations of all tips suggested, and eventually it was done. 
IMHO its the worst K job I’ve done so far, but it will all come together in the end.


__________________________________________________
1985 BMW K100RT + Hedingham HUB and LL’s. VIN 0028106.
1986 K100RS in boxes. VIN 0141918.
1954 Royal Enfield 350 Bullet. Original.
2000 Hayabusa with Charnwood chair, Wasp forks and EZS wheels.
    

GF Wollongong

GF Wollongong
Platinum member
Platinum member
Ahhhh Grasshopper(s).....

After 20mins of fails and the cup of tea option as well as some inhalations into a brown paper bag...

What worked for me was using the garden shears / secators (or wide, thinnish, inflexible piece of metal ... maybe even a spade)

Throttle bodies on engine, plenum with rubbers, rubber grease on the inside of the rubbers, upper oetiker clamps tights, lowers in place (obviously not tightened)

Position over top of TBs and ensure TBs are inside the rubbers

I then used the secators and levered against the underside of the top of the frame down onto the plenum - starting with #1 TB (while holding it straight / vertical) then it slide onto TB1, then repeated for 2, 3 and finally #4.

Then lower clamps tighten using some nail removing pliers.

Couldn't believe it. 5mins all up


No swearing!

Thanks for the prompt replies.


GF
GF


Dai

Dai
Life time member
Life time member
clean and replace throttle bodies and plenum 723598


__________________________________________________
1983 K100 naked upgraded to K100LT spec after spending time as an RS and an RT
1987 K100RT
Others...
1978 Moto Guzzi 850-T3, 1979 Moto Guzzi 850-T3 California,1993 Moto Guzzi 1100ie California
2020 Royal Enfield Bullet 500
    

Point-Seven-five

Point-Seven-five
Life time member
Life time member
Has anyone ever tried heating the rubbers with a hair dryer? I've had good luck with that trick fitting hoses, especially in cold weather.


__________________________________________________
Present: 1991 K100RS "Moby Brick Too"
 
Past:
1994 K75RT "Ilsa, She Wolf of the SS"
1988 K100RS SE "Special Ed"
1994 K75S "Cheetos"
1992 K100RS "Moby Brick" R.I.P.
1982 Honda FT500
1979 Honda XR185
1977 Honda XL125
1974 Honda XL125
1972 OSSA Pioneer 250
1968 Kawasaki 175
    

GF Wollongong

GF Wollongong
Platinum member
Platinum member
The hair drier option did occur to me "pre cuppa". I didn't because I assumed they would cool before all being ready to install.

By way of an up date on my progress... (1984 K100 RS)

New spark plugs

Valve shims changed and clearances balanced.

Did not renew idle screw orings (they are about 12mths old from memory but will redo this) nor the blanking caps (again newish but will replace)

TB upper and lower rubbers replaced. New clamps

TBs removed and cleaned. Typical of me, I dived in before enough research and, underwhelmed with the cleanliness of the butterflies, removed and polished them. I had done this previously on a R series with bing carbs. I made every effort that they were reinstalled the same - by pressing down in the throttle cable cam (in the middle) to the stage where there were no gaps and all were equally snug against the bore. Only later did I see the manual "do not remove the butterflies"

TBs reinstalled to torque spec.

All reinstalled (will omit other tasks - eg radiator etc)

All idle screws set to "1 turn out"

Once warm, had to re-set throttle idle screw position to achieve 950 revs

Tried to balance TBs with newish Carbtune manometer... unsuccessfully. 

Anyone had issues here? While this might sound like amateur hour... the right way up for the meter is hoses at the top (according to a picture in the manual). I was not getting any movement in the gauges. Turned over (hoses downward) gave a clear gauge movement (at least for the purposes of matching them) but no change when screws were turned. This was the problem before I started chasing the air leak

Am beginning to question the manometer. It seems like there is an air leak common to all cylinders.

At this stage cylinders 1 3 and 4 same #2 reading 20% less.

Will do a compression test. 
Any top tips? (apart from read the manual fully and don't touch the butterflies)

GF

If it comes to it, there is one second hand TB assembly in the shed to use - now that I know how to reinstall the plenum!


GF Wollongong

GF Wollongong
Platinum member
Platinum member
Found this on youtube

Interesting bench balancing of TBs

How to align your throttle bodies | BMW K100 build vlog #20 - YouTube

Note that he mentions the use of manometer at end

GF


Suzi Q

Suzi Q
Life time member
Life time member
There could be many causes for what you are experiencing. But, if you have been able to get tickover down to 950 rpm then there's definitely plenty of vacuum there. So I'd suggest getting your gauge working properly, seeing as you've got one and it will be invaluable in setting everything up properly.
Remember - more vacuum means the rod rises higher. The rods should be around a third of the way up on a low tickover. They should drop when you open the throttle (intake vacuum drops) and then rise again as revs pick up (intake vacuum rises).
The rods should be bouncing around a bit with the engine running - responding to the pressure pulses. That's why the hoses should have a small length of small bore clear plastic pipe in them to act as a dampener. If the rods don't move at all with the engine running then there's an issue somewhere. You can check for engine vacuum by pulling the gauge hose off the throttle body stub - tickover should alter as you block and unblock the stub with your finger.


__________________________________________________
Sometimes I'm not really Suzi Quatro.
    

GF Wollongong

GF Wollongong
Platinum member
Platinum member
Thanks for the reply
Will have a look tomorrow

Went for a ride and noticed some things

Took a while to start and needed choke (uncommon) and throttle to stay alive then settle to idle.

Consistent hesitation in idle

Significantly more engine brake effect when throttle was closed off. Previously, this had been far gentler.

Less backfiring - previous owner had drilled several holes in rear of staintune muffler. Might put BMW muffler on and see what happens.

Revved out alright ... but still vibrating noticeably at 5000rpm... did get up to 6000

Idle had risen to 1200 by end of ride and was then adjusted to 950. Again same starting issues when engine was cold later in afternoon

GF


DadofHedgehog

DadofHedgehog
Silver member
Silver member
GF Wollongong wrote:Found this on youtube

Interesting bench balancing of TBs

How to align your throttle bodies | BMW K100 build vlog #20 - YouTube

Note that he mentions the use of manometer at end

GF
I love this simple idea!


__________________________________________________
PRESENT:
1995 K75T.  I am the 3d owner.  Bought it in June 2019 with 6,242 miles on the odo.
1991 K100RS 4-valve attached to a 1990 Flexit sidecar. I am at least the 3d owner. Bought with 21,00+ miles on bike's odo.

PAST:
old (indeterminate age) Ural + sidecar
1997 Buell S3T Thunderbolt
1982 BMW R100CS
1974 Kawasaki KZ400
1970 Suzuki Titan
    

davemadsen

davemadsen
Silver member
Silver member
I have used a solution of evergreen essential oil and rubbing alcohol to “revitalize” rubber. I find it allows the rubber parts to swell ever so slightly as well as making the rubber a bit more pliable. Soak the rubber fitting for 2-3 days. I read about this several years ago and have used the process on getting banks of carburetors mounted with only half the swearing.


__________________________________________________
Dave
    

Sponsored content


View previous topic View next topic Back to top  Message [Page 1 of 1]

Permissions in this forum:
You cannot reply to topics in this forum