BMW K bikes (Bricks)


You are not connected. Please login or register

View previous topic View next topic Go down  Message [Page 1 of 1]


SniperX

SniperX
Silver member
Silver member
Quantity of oil for each leg, and please let me know if the small hex head on the centre of the cover on top of the forks is the way to install the new oil. PLus, is there a drain? Or do I have to remove the old oil form that hex head screw with a make shift suction device?

MANY thanks!

Cheers Mates!

Kev


AL-58

AL-58
Life time member
Life time member
SniperX wrote:Quantity of oil for each leg, and please let me know if the small hex head on the centre of the cover on top of the forks is the way to install the new oil. PLus, is there a drain? Or do I have to remove the old oil form that hex head screw with a make shift suction device?

MANY thanks!

Cheers Mates!

Kev
There is a drain bolt at the bottom of each fork leg at the rear of the fork.

The small hex head screw in the fork cap is one way of getting new oil in,

360cc is the correct factory amount for an 8 valve RT. Personally I used to use more as the smaller air space inside reduced the amount of dive under brakes.

Al


__________________________________________________
'08 F650GS (798cc)
'19 R1250RS

+ another boxer engined motorcycle and sidecar

"When I'm too old and too foolish to handle a sidecar I'll buy a Sportsbike"

Change/service forks on the 1985 K100RT? K-dogs10
    

Born Again Eccentric

Born Again Eccentric
Life time member
Life time member
Kev,

It's as Al says it is. 
Plus a few pics to help you...from my LT, but pretty sure the forks are the same.

Place suitable catchment beneath fork drain bolt
Change/service forks on the 1985 K100RT? Fork_d10

Remove drain bolt.
Change/service forks on the 1985 K100RT? Img_1811

Remove plastic fork cap then the (hex head) filling bolt from top of fork - spanner/shifter to stop the whole top plug spinning instead of the bolt unscrewing.
Change/service forks on the 1985 K100RT? Img_1812

As you remove the filling bolt, the old fork oil will drain out into container 
Change/service forks on the 1985 K100RT? Img_1813
Repeat for other fork.

It is useful to measure the volume of oil removed from each fork- pump forks several times, preferably leave overnight to completely drain and pump forks again to force out as much of the old oil as possible. Measuring the oil removed helps assure yourself that the forks are fully drained.

Replace drain bolt at bottom of both forks and torque to 9Nm (+/- 1Nm) [6.5 lb/ft +/- 0.5].

With bike on centre stand, fully extend forks by lifting front wheel off ground (jack & block of wood under engine) then carefully fill each fork with 360cc (+/- 10cc) with fork oil. Make sure both forks have the same volume of oil in them. Fork Oil 10W is the recommended but some prefer to use a lighter grade - I blended a 7.5W grade using 10W and 5W to give a slightly softer ride. Generally, more oil and/or heavier grade gives harder ride but less "dive" when braking. 

I bought a large syringe and poly hose off Amazon to help measuring the volume of oil and make the refilling clean and easy.
Change/service forks on the 1985 K100RT? Img_1814

Refit the filler plug bolt and torque to 15Nm (+/-2Nm) [11lb/ft +/-1.5] and replace plastic fork cap.
Remove jack, take bike of centre stand, apply front brake and pump forks several times (5-10) until damping effect can be felt. Check for leaks. 

Job done. Very Happy One of the few jobs that doesn't need the fairing/fuel tank removing!!
Good luck.


__________________________________________________
Change/service forks on the 1985 K100RT? Uk-log10 Change/service forks on the 1985 K100RT? Sco-lo15
                              Paul  Change/service forks on the 1985 K100RT? 905546712

"Heidi" K100LT 1991 (Grey) (VIN 0190172 Engine No. 104EB 2590 2213) - 5th owner. January 2014 (34,000 - 61,000 miles and counting....)
"Gretel" K100LT 1989 (Silver Grey) (VIN 0177324 Engine No. 104EA 2789 2211) - 4th+ owner. September 2015 (58,500miles and counting....). Cat C Insurance write-off rebuild Feb 17
"Donor" K100LT 1990 (Red)  (VIN 0178091 Engine No. 4489 2024) - 6th & final owner (crash write-off now donor bike).   June 2012 (73,000 miles) to November 2013 (89,500 miles)
    

SniperX

SniperX
Silver member
Silver member
That was going to be my next question. Does the fairing come off as a unit or are there many many individual parts that need to come off so I can install a new fuel pump in the tank. And as well, service the gauges. Can I get the gauges off without removal of the fairing?


Born Again Eccentric

Born Again Eccentric
Life time member
Life time member
The fairing is in 5 parts:


  • Top (houses headlamp & indicators)
  • Windscreen
  • Right hand lower (need to remove right hand glove box and right hand knee pad to access all mounting bolts/screws)
  • Left hand lower (need to remove left hand glove box and left hand knee pad to access all mounting bolts/screws)
  • Radiator cover (attaches to the top, right and left hand lower sections)


Depending what you're doing different bits of fairing have to come off. I haven't worked on a fuel pump yet - but as far as I know, it is accessed through the fuel tank filler cap (needs removing), so there should be no need to remove the fairing.

If you need to remove the fuel tank (numerous electrical connections, main earth connection, plugs and relays etc. under the tank which benefit from a good deoxit'ing while you're in there), then this can be done by only removing the left hand lower fairing panel to give access to the jubilee clips on the fuel supply and return lines. While the Right hand lower panel does not need to come off (making it easier to reattach the radiator cover on the LHS), it is easier if you do remove the right hand glove box and knee pad).

The Top fairing almost never has to come off.

If your gauges are in the same place as mine (on the panel above the instrument cluster, behind the windscreen), to get to them you only need to remove the windscreen. Remove the two screws on the rear edge of the panel, remove the windscreen and you can then access the two screws at the front top of the panel to get access to the gauges etc.).

Removing/replacing sections of the fairing is something of an art - practice (and a good dose of patience) does help!


__________________________________________________
Change/service forks on the 1985 K100RT? Uk-log10 Change/service forks on the 1985 K100RT? Sco-lo15
                              Paul  Change/service forks on the 1985 K100RT? 905546712

"Heidi" K100LT 1991 (Grey) (VIN 0190172 Engine No. 104EB 2590 2213) - 5th owner. January 2014 (34,000 - 61,000 miles and counting....)
"Gretel" K100LT 1989 (Silver Grey) (VIN 0177324 Engine No. 104EA 2789 2211) - 4th+ owner. September 2015 (58,500miles and counting....). Cat C Insurance write-off rebuild Feb 17
"Donor" K100LT 1990 (Red)  (VIN 0178091 Engine No. 4489 2024) - 6th & final owner (crash write-off now donor bike).   June 2012 (73,000 miles) to November 2013 (89,500 miles)
    

SniperX

SniperX
Silver member
Silver member
So can I get the instrument cluster out without removing the fairing top? Looks like I remove the top pad on the bars and may be able.to vet the instruments out.


__________________________________________________
1985 BMW K100RT, 2006 Ducati ST3, 1996 Honda CBR1000f, 2001 Honda XR400r
    

blaKey

avatar
Life time member
Life time member
Great write-up and photos Paul. Very Happy


__________________________________________________
Neil
K100RS 1986 RED!

Dress for the ride and the potential slide.
    

8Back to top Go down   Change/service forks on the 1985 K100RT? Empty indeed Fri Oct 23, 2015 11:23 pm

SniperX

SniperX
Silver member
Silver member
blaKey wrote:Great write-up and photos Paul. Very Happy
Indeed it was! I am going to use his great write up tomorrow to service the forks. Thanks Paul!


blaKey

avatar
Life time member
Life time member
5mm Allen key for crash pad bolts, 2 of (if fitted).
8mm Allen key for fill bolts and 22mm open ended spanner to stop the fork caps turning.
10mm ring spanner for drain bolts. Go easy on these bolts as they are quite easy to strip.

You will need a container as shown in Paul's photos. Some use aluminium foil to cover the brake disc and the rim and tyre as well, from oil spatter.


__________________________________________________
Neil
K100RS 1986 RED!

Dress for the ride and the potential slide.
    

Born Again Eccentric

Born Again Eccentric
Life time member
Life time member
SniperX wrote:So can I get the instrument cluster out without removing the fairing top? Looks like I remove the top pad on the bars and may be able.to vet the instruments out.
Apologies - I though you were talking about the fuel and temp gauges (are these even fitted to an RT?). I have had to do "maintenance" on both mine due to age related wire breaks which stopped the gauges reading (at different times of course) - easy to fix though.

If you are looking to remove the instrument cluster (speedo, rev counter etc.) - then it is easier if you remove the windscreen, the plastic trim panel and both glove boxes - this gives better access to the bolts securing the instrument cluster mount. (Edited after a quick trip to my garage to check - access is too tight if you don't remove these bits)

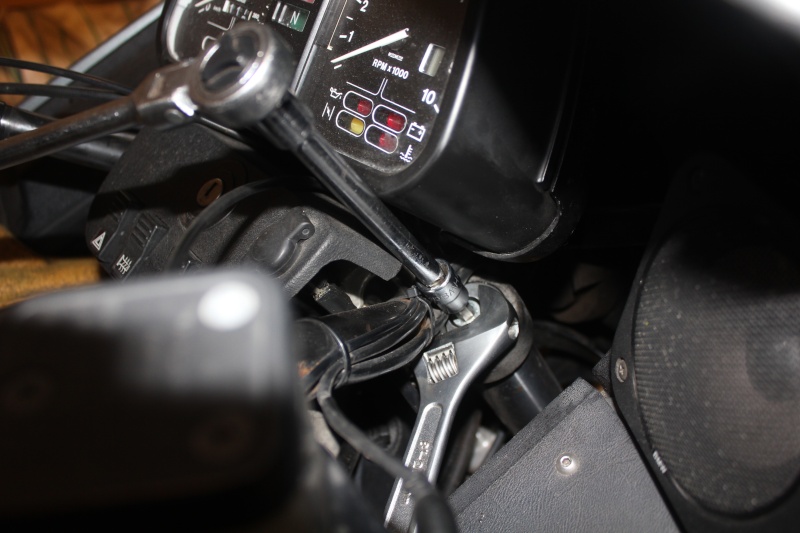
Remove the 2x allen bolts from the under the crash pad (the rubbery bit with the ignition switch in it). You don't need to disconnect any wiring as the crash pad will now move enough to be able to continue with the removal of the instrument cluster. 

Remove the 2x allen bolts securing the instrument panel mounting (need to turn handlebars fully each way to be able to get access to them). Depending on how your wires are routed (I have additional wires that managed to get routed through the hole in the mounting bracket), you may now need to remove the 4x allen bolts that secure the instrument cluster in the mounting. Finally, remove the small allen bolt in the centre of the instrument connector plug and carefully disconnect the plug from the cluster. The cluster should now lift out of the mounting. All this can be done with the fairing in place - obviously, access to the bolts is much easier with the top fairing off, but removing that section of fairing is a lot more work and not necessary! I did some open-cluster surgery on Gretel's instrument cluster a couple of weeks back in order to replace the cracked glass and replace a couple of bulbs (replaced it with my spare/donor bike cluster after changing over the odo/speedo section so that the odometer was correct for her miles). 

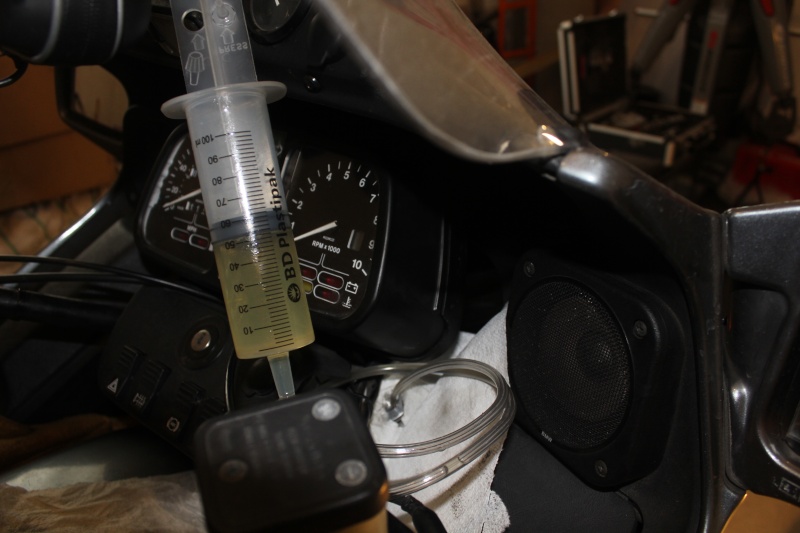
Getting inside the instrument cluster is then a matter of moving the numerous cross head screws at the back. I don't know what maintenance you are planning inside there (only occasional task is to replace the various bulbs), but treat it with respect! If you are doing anything more exciting - there are several posts on fixing odometer gears, fitting anti-condensation fans etc. - use the search facility on the portal page. 

Reassembly is pretty much the reverse process - but in the time honoured tradition of K's...treat the connector plug and socket connections to a good dose of deoxit before you reconnect them.


Last edited by Born Again Eccentric on Sat Oct 24, 2015 5:35 am; edited 1 time in total (Reason for editing : Quick check of bike and correction to amount of fairing that needs removing to access bolts.)


__________________________________________________
Change/service forks on the 1985 K100RT? Uk-log10 Change/service forks on the 1985 K100RT? Sco-lo15
                              Paul  Change/service forks on the 1985 K100RT? 905546712

"Heidi" K100LT 1991 (Grey) (VIN 0190172 Engine No. 104EB 2590 2213) - 5th owner. January 2014 (34,000 - 61,000 miles and counting....)
"Gretel" K100LT 1989 (Silver Grey) (VIN 0177324 Engine No. 104EA 2789 2211) - 4th+ owner. September 2015 (58,500miles and counting....). Cat C Insurance write-off rebuild Feb 17
"Donor" K100LT 1990 (Red)  (VIN 0178091 Engine No. 4489 2024) - 6th & final owner (crash write-off now donor bike).   June 2012 (73,000 miles) to November 2013 (89,500 miles)
    

Sponsored content


View previous topic View next topic Back to top  Message [Page 1 of 1]

Permissions in this forum:
You cannot reply to topics in this forum