BMW K bikes (Bricks)


You are not connected. Please login or register

View previous topic View next topic Go down  Message [Page 1 of 1]


1Back to top Go down   Headlamp switch repair Empty Headlamp switch repair Thu Oct 16, 2008 2:39 pm

scottiesharpe

scottiesharpe
Silver member
Silver member
I disassembled my headlamp switch and repaired it yesterday. The symptom was no low beam working. affraid

First off, when you disassemble the switch, be prepared for a LOT of spring loaded small parts. The parts will not fall out until you remove the switch and rotate the assembly. Be prepared for lots of small spring loaded parts to shoot out. Remember where everything goes. What a Face

The problem on my switch was the switch housing has several contact "bumps" protruding through the plastic housing. On the other side of the bump is a lug to which the wire is soldered. My problem was that the lugs had simply worn out from use. THey were worn flat to the plastic and this did not allow sufficient force with the spring loaded slide to create a good electrical contact.

My fix involved heating the lug with a 100w soldering iron until the plastic became soft enough to push the lug gently into the plastic about 0.25mm or so. When the plastic cooled, the lug was firm again. I cleaned, lubricated the switch with contact cleaner and electric switch grease, respectively.

Now I have a working switch again.

This is a very expensive BMW part, so I am happy I was able to repair it. :albino:


2Back to top Go down   Headlamp switch repair Empty my rh switch gear Sun Mar 01, 2009 4:40 pm

Guest

avatar
Guest
Hi,
You're right - I dismantled my switch and bits have disappeared into a Bermuda triangle (bunced off tank and fairing and never seen again!).
I have nearly all the bits so was wondering if you knew what there should be, as I ay try to fix it. I noticed some small ball bearings and springs... all very annoying.
Did you take photos at all?
Regards,
Neal


3Back to top Go down   Headlamp switch repair Empty Re: Headlamp switch repair Sun Mar 01, 2009 11:45 pm

Crazy Frog

Crazy Frog
admin
admin
I found this in my driveway. Does it belongs to your bike?
Headlamp switch repair Compre10

They are flying quite far!!!
Sorry it's late and i like to be a bugger!
Headlamp switch repair Bug10


4Back to top Go down   Headlamp switch repair Empty Re: Headlamp switch repair Mon Mar 02, 2009 6:47 pm

phil_mars

avatar
Life time member
Life time member
Ahh the Geesus spring/clip etc etc


5Back to top Go down   Headlamp switch repair Empty Re: Headlamp switch repair Mon Mar 02, 2009 7:54 pm

Guest

avatar
Guest
yep that's the one... anyway I have a bought a replacement for 10 pounds from a guy who was breaking his bike - so fingers crossed it'll work. N


6Back to top Go down   Headlamp switch repair Empty Re: Headlamp switch repair Tue Mar 03, 2009 12:35 am

K-BIKE

avatar
Life time member
Life time member
Hi Guys,
After doing a similar thing once before a good friend suggested getting a clear plastic sack and sort of making a photographic changing bag by taping along the mouth of the bag in the middle with room left each side of the mouth to insert bare hands and arms into the bag and then open the device up in the bag. As the shotgun blast of small balls and springs explodes out of the device the bag will catch them all for you. I once dismantled a distributor on the wife's car and there was a small key like a Woodruff key and it pinged away and I searched and searched the garage for over an hour then searched millimetre by millimetre with a very powerful magnet no luck at all. So I sat down and thought where and how was I sitting and then thought what about the turn-up of my trousers and there nestled in the cuff was the key, I was happy and annoyed with myself at the same time.
Regards,
K-BIKE


7Back to top Go down   Headlamp switch repair Empty Re: Headlamp switch repair Sat Mar 07, 2009 3:08 pm

Crazy Frog

Crazy Frog
admin
admin
I found this article on the IBMWR web site:

Headlight (Hi-Lo) Switch Repair

By Don Eilenberger
April 1998
Folks - I know we've beaten it almost to death, butt - a few notes on an experiment I performed this weekend on my K100RT ('85).

As some may remember, I was running an 80/100 bulb in the K in the attempt to get more light where I need it.

I recently removed the 80/100 and found the inside of the envelope (bulb) had deposits on it - indicating to me that it was running at a lower voltage than designed for (halogen bulbs are designed to run so hot that the normal filament deposits are evaporated off the inside of the envelope back onto the filament).

Another thing I'd noticed lately is that my hi-low switch was developing a dead spot when switching from high to low or low to high. It also was stiffer to use than I'd remembered.

Figuring the switch was about to do a meltdown, I decided I had nothing much to loose by taking it apart and looking to see if I could find what was wrong. Or starting to go wrong.

CAVEATS: Don't do this in the driveway (BTDT-WDIA). Don't do it if you're a klutz with tiny parts. Don't do it if your switch is OK - it might not be when you're done.
I unscrewed the switch from the handgrip (while parked in the driveway), unclipped the tie-wraps holding the cable in place, and put it up on my tankbag for dissection.

There are LOTS of little phillips (+) screws holding things together in the light switch. So I grabbed my magnetic parts holder thingie, and put it on the tankbag next to the switch.

It became obvious to me - that to take the actual switch outta the housing, first the plastic plate holding the wires in place gotta be removed (three screws - one of a different length). And then the horn and turn signal buttons gotta come off (more little screws).

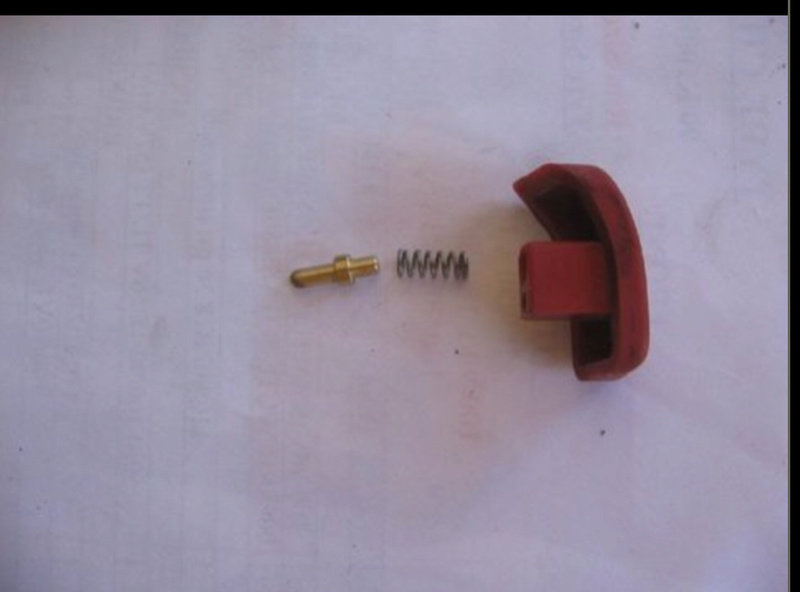
CAVEAT: The horn button has behind it - a tiny spring AND a funny brass piece - which is not magnetic - and WILL jump right outta there onto the driveway (BTDT). Takes a while to find (BTDT), and the horn button only will work if it's put back in (BTDT) the right way (BTDT). IF not installed, or not installed the right way - you have a permanent ON horn button (BTDT) which will annoy the neighbors as soon as you turn the ignition on (BTDT).
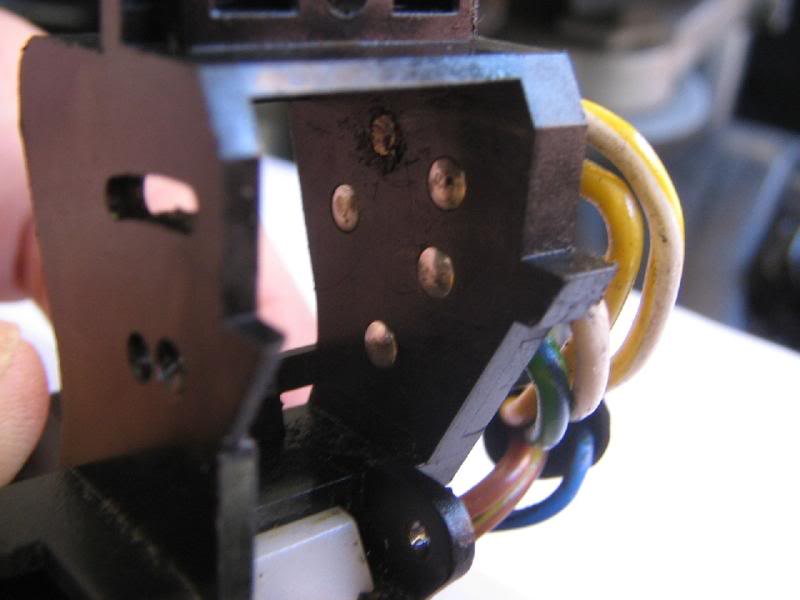
After removal of these two buttons, and 3 more screws (again, different length screws) - you can remove the switch from the housing and examine it.

Mine didn't look 'bad' - but operating it - I could see the contacts which switch the hi/lo. And they were gunked up with dirt. Black sorta dirt.

I used some flammable/carcinogenic/bad-stuff electrical cleaner on the end of a rag with a tiny screwdriver inside it to clean them. I found it necessary to operate the switch lots of times before they started staying clean.

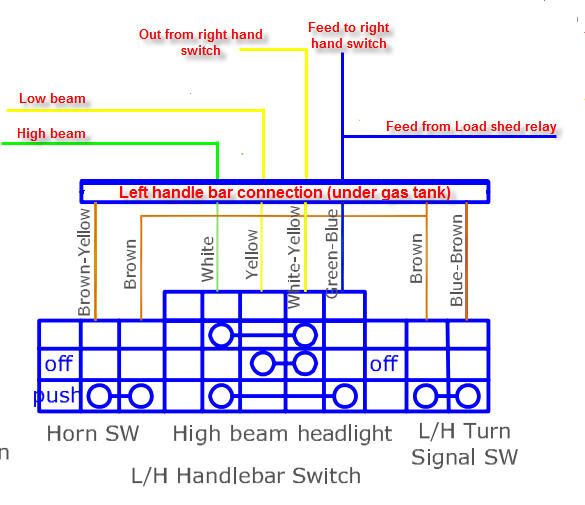
Note - they are barely visible when you switch the switch, but if you look REAL closely - you can see them - they're little round lumps that a wiper assembly rubs over.

This - I hoped - would clear up the dead spot, butt the switch itself was still stiff to operate.

I looked some more, and found that there are two tiny ball-bearings that are prolly spring loaded, which move in/out of several holes and a slot. These provide the detent for hi/lo, and the spring loaded return for the hi-beam flash function.

I tried spritzing (tech-term) some WD-40 on these - with little effect. So I got out my moly-lube (left over from spline stuff), and poked some into the holes with a toothpick as I operated the switch back and forth.

I also lubricated the contact area with a non-greasy lubricant (LPS) made for this sort of application (at least it sez so on the can).

Much smoother now.

Reassembly went OK, until I started looking for the brass piece for the horn button (which I found in a rag I used to protect the tank), and until the tiny - special - screw holding the horn button went flying. Finally found a replacement for it down in my cellar junk-screw-bin. (It is a VERY special screw - don't lose it!).

Turned the ignition on and found:

No dead spot
Regular (55/60) headlight bulb appeared brighter than the 80/100 had
Much smoother operation
Horn blowing continuously - had the brass thingie in backwards.
Conclusions:
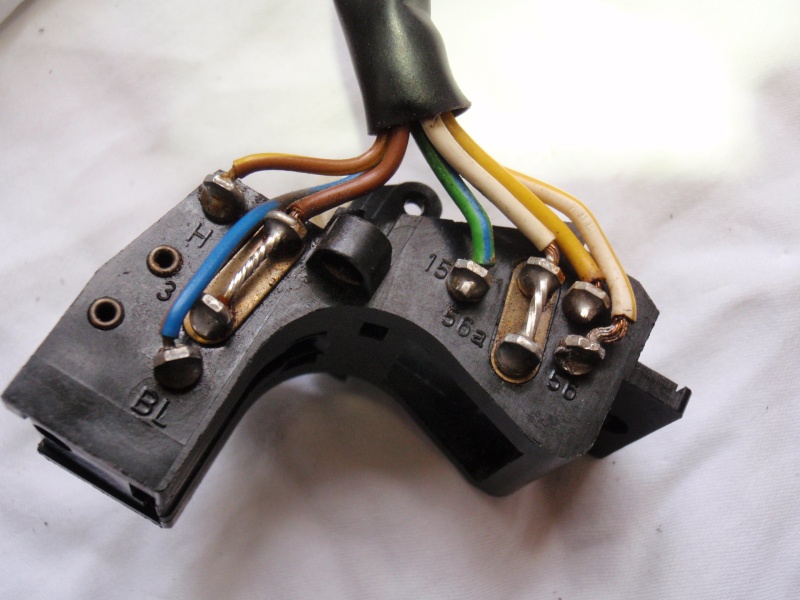
The interior of the switch had obvious road-dirt in it - the bike is 12-13 years old, has obviously been in the rain (rain trails inside the switch), butt - the contacts, once cleaned looked FINE, and all wiring was fine (no solder melting).

I seem to remember some other prez's dissecting their failed switches and finding that the soldered connections to the contacts had failed, indicating to me that there was an AWFUL lotta heat - prolly caused by dirty contacts (resistance) heating up enough to melt the solder. The accumulation of road-dirt could cause this sort of high-resistance failure. The switch is NOT well weather sealed (surprise!), and there is no obvious way to seal it - but a seal where on the joint on the top where it attaches to the handgrip would help a LOT (gonna use some sealant on this - real soon now), since most of the rain marks looked like they came down from this joint.

My advice - don't do this in the driveway - and I'll prolly do it on a semi-annual basis. A trick I learned when rebuilding sailboat winches is to do this sorta thing inside a shoebox - the parts then only have one way to jump out (up) so the chances of retaining all of them is much higher - gonna do it this way next time. If you are seeing what appears to be (a) less light out front (b) stiff or notchy operation (c) a dead spot - you MAY be able to rescue your switch before total failure occurs. If not - you need a new one anyway, so nothing ventured nothing gained.

If any prez's have dead switches laying around - I'd be interested in dissecting a few to see what failure modes I find, or hearing from people who have opened up the failed switches. Plus - if you send it to me, I'll have spares for all those little screws/balls/springs that tend to go flying. EMail me for my address if you'd like to donate dead switches to the cause. I'll summarize what I find and post it.


8Back to top Go down   Headlamp switch repair Empty headlight switch Sat Apr 04, 2009 11:10 pm

tunza60

tunza60
active member
active member
Dumb question folks!! where does the plug end of the handlebar switch run to? is it the to the electrical components box, which i believe is under the tank. I have a new(ish) switch to install coz the old one is missing a coupla buttons and am wondering where the end plugs into. My Haynes doesnt really tell me. Im gonna have to remove the tank arent I?


9Back to top Go down   Headlamp switch repair Empty Re: Headlamp switch repair Sun Apr 05, 2009 3:44 am

phil_mars

avatar
Life time member
Life time member
Hi Tony, yes I am afraid the tank will have to come off but you will get used to it eventually.

Will also be a good time for some housekeeping on the electrical connections as there are a "couple" under there. K-bike and others recommend Caig de-oxit which you can get from Jaycar.

Regards,

Phil


10Back to top Go down   Headlamp switch repair Empty Re: Headlamp switch repair Sun Apr 05, 2009 6:10 am

tunza60

tunza60
active member
active member
Gathering parts, cleaning agents and moral fortitude to do this next weekend.


11Back to top Go down   Headlamp switch repair Empty Re: Headlamp switch repair Sun Apr 05, 2009 6:51 am

K-BIKE

avatar
Life time member
Life time member
Hi Tunza60,
One of the problems with old bikes is electrics and connections. Using the Deoxit kit with the two glass bottles of the cleaner and treatment it is possible to go through every connection on the bike and give them all a spruce up including the main earths under the tank and down by the footrest. Plus the battery terminals. If you do all the electrical connectors with Deoxit you can probably say good bye to electrical connection problems.
Regards,
K-BIKE


12Back to top Go down   Headlamp switch repair Empty Re: Headlamp switch repair Sun Apr 05, 2009 9:02 am

Crazy Frog

Crazy Frog
admin
admin
Hello Tunza60,

Here is the location of the major connections under the tank:

Headlamp switch repair Under-10

When replacing your switches, you may want to consider installing relays on the system.
Here is a diagram for the modification

Headlamp switch repair Headli10


13Back to top Go down   Headlamp switch repair Empty headlight switch Sun Apr 05, 2009 9:21 am

tunza60

tunza60
active member
active member
Thanks Crazy, this will come in very handy indeed!


14Back to top Go down   Headlamp switch repair Empty headlight switch Sun Apr 05, 2009 9:26 am

tunza60

tunza60
active member
active member
Installing relays will save me time & trouble in the future Crazy?


15Back to top Go down   Headlamp switch repair Empty Re: Headlamp switch repair Sun Apr 05, 2009 9:26 pm

phil_mars

avatar
Life time member
Life time member
Great diagram Bert (where do you get these??) and Tony you could try Eastern Beaver for a relay kit as it will take the load off your high beam switch and also enable additional lighting later depending on the kit if you so desire.

Very easy to fit and very good quality and prompt service.

Regards,

Phil


16Back to top Go down   Headlamp switch repair Empty Re: Headlamp switch repair Sun Apr 05, 2009 10:19 pm

Crazy Frog

Crazy Frog
admin
admin
To reply to both Phil and Tunza60:

Yes installing relays will solve a lot of problems as only the intensity to power the relay's coil will pass through your handle bar switch.

Where do I find these schematics??? I made most of them, but this one was buried into my hard disk and I don't remember where it came from.

Bert


17Back to top Go down   Headlamp switch repair Empty Re: Headlamp switch repair Fri Jun 12, 2009 3:17 am

the mule

the mule
active member
active member
The other night I went to ride the bike out to umpire a hockey match and got about 1km from home which is in hilly forest area. The road to the highway (3ks) does not have any street lighting at all. Anyway just as I was about to go into some twisty stuff the highbeam and driving lights all went out. Amazing how quickly one can stop albeit shakily not knowing where the road had suddenly disappeared into total blackness. dipped the headlight back to main beam and still nothing. Still had tail & brakelights turn signals and front park light. Just no main or high beam headlights. cautiously rode bike back under a strobing yellow glow from the hazard lights barely able to distinguish the centrelines luckily there is virtually no traffic on the road. Got home and discovered that if I hit the pass switch the high beam and driving lights came on (wish I found that out earlier)
Started to pull down the fairing to access the globe (initial check to make sure it was not blown and elements intact on it and work when tested on vehicle socket. Switch on right side handlebar that turns park and main headlights on works for parking (possible contacts gone on main lights, any other suggestions welcome. No power at all going to headlight globe socket at all except if using the pass switch. The left hand high/low/pass switch is virtually brand new and looking at the wiring schematics think only area perhaps is the Mains switch on right side which is no doubt the same as the UK setup

https://s5.photobucket.com/albums/y156/the_mule/
    

18Back to top Go down   Headlamp switch repair Empty Re: Headlamp switch repair Fri Jun 12, 2009 5:45 am

Crazy Frog

Crazy Frog
admin
admin
Here is a simplified schematic of the LH light switch.

You can check if your right switch is feeding the left one by checking the power at the white/yellow wire at the left switch.

Headlamp switch repair Left_h10


19Back to top Go down   Headlamp switch repair Empty Re: Headlamp switch repair Sat Jun 13, 2009 4:53 pm

Crazy Frog

Crazy Frog
admin
admin
Today I was checking the headlight on my k100 and guess what?
The low beam was not working anymore. Ficking the 'pass' switch down a couple of time temporarily fixed the problem. I guess I will have to put my switch apart and at least use some contact cleaner.


Last edited by Crazy Frog on Sun Jun 14, 2009 5:16 am; edited 1 time in total


20Back to top Go down   Headlamp switch repair Empty Re: Headlamp switch repair Sun Jun 14, 2009 12:41 am

the mule

the mule
active member
active member
Update - have removed tank and some fairing parts to check headlight globe although doubt it was the globe
(globe works in a car on low and high beam so not the globe)
RH Switch on handlebar has Off-Park-Headlights which all function
Switch turns on/off the parking lights and when holding the pass switch down would turn the headlight on/off ok.
(So RH switch functions appear to be working correctly).
The LH Switch selects either main or high beam and Pass and is virtually brand new. I checked the connection to the LH Switch and have power coming in on yellow/white wire which turns on/off when switching the RH switch on/off. Power goes to the white wire when flash is activated but nothing to either the white or brown wire at all and nothing going to the headlight socket except when pushing the pass switch on. Any other suggestions or area I should be checking ?

https://s5.photobucket.com/albums/y156/the_mule/
    

21Back to top Go down   Headlamp switch repair Empty Re: Headlamp switch repair Sun Jun 14, 2009 6:57 am

Crazy Frog

Crazy Frog
admin
admin
Your test proves that the RH switch is OK and you have a problem with the LH switch or a broken wire.

Where did you test the power of the yellow/white for the LH switch? at the connector under the tank?
If yes, try to test it at the LH switch itself to prove that the wire is not cut. If the power goes to the switch, I hate to tell you but you will have to open the switch to clean the contacts. Be ready for some little springs 'springing' 3 miles away. Use K-Bike method by working in a clear plastic bag.

Bert


22Back to top Go down   Headlamp switch repair Empty Re: Headlamp switch repair Sun Jun 14, 2009 9:37 am

the mule

the mule
active member
active member
Hi Bert

Have had the pleasure of pulling the left switch apart previously and repaired some time back even managed to not lose any of the miniscule bits and recall how fiddly it was albeit the plastic work had melted and had to subsequently replace the switch hence why I indicated the LH switch was virtually brand new. Guess I will be pulling it apart tomorrow

https://s5.photobucket.com/albums/y156/the_mule/
    

23Back to top Go down   Headlamp switch repair Empty Re: Headlamp switch repair Mon Jun 15, 2009 2:52 am

K-BIKE

avatar
Life time member
Life time member
Hi Folks,
As Phil notes the Eastern Beaver kit is very good and the heavy duty kit with waterproof relays which I bought is EXCELLENT! It is well designed, well constructed and best of all I found it to produce a very visible improvement of light output to the headlight.
Regards,
Jeremy


24Back to top Go down   Headlamp switch repair Empty Re: Headlamp switch repair Tue Jun 16, 2009 4:32 am

the mule

the mule
active member
active member
Well I found the culprit all wires intact and on stripdown of switch found the yellow/white contact in the switch block was sitting flush in the block and the contact pin was loose in the moulded housing. I have photographed the full pull down of the switch unit pictures of which can be seen here https://s5.photobucket.com/albums/y156/the_mule/Bike%20mods/?start=20

Headlamp switch repair LHSwitchLightscontacts

https://s5.photobucket.com/albums/y156/the_mule/
    

25Back to top Go down   Headlamp switch repair Empty Re: Headlamp switch repair Wed Jun 17, 2009 5:53 am

the mule

the mule
active member
active member
We have a winner resoldered the contact in the block and reglued the wiring in the housing. Good solid contact and its all working again. Bike all re assembled and ready to go. Damn it has just started raining.

https://s5.photobucket.com/albums/y156/the_mule/
    

26Back to top Go down   Headlamp switch repair Empty Re: Headlamp switch repair Wed Jun 17, 2009 6:24 am

phil_mars

avatar
Life time member
Life time member
Pretty ordinary that a relatively new part caused the problem and therefore the least likely culprit.

I can't say I am overly impressed with the K switchgear but the main thing is you are up and running and I really think you have had more than your fair share of rain of late. Smile

regards,

Phil


27Back to top Go down   Headlamp switch repair Empty Re: Headlamp switch repair Wed Jun 17, 2009 8:47 am

the mule

the mule
active member
active member
isnt that the truth phil lucky it is nothing like we had in Feb or April as a lot here are still recovering from that downpourl

https://s5.photobucket.com/albums/y156/the_mule/
    

28Back to top Go down   Headlamp switch repair Empty Re: Headlamp switch repair Sat Aug 27, 2016 7:39 pm

kennybob

kennybob
Silver member
Silver member
the mule wrote:Well I found the culprit all wires intact and on stripdown of switch found the yellow/white contact in the switch block was sitting flush in the block and the contact pin was loose in the moulded housing. I have photographed the full pull down of the switch unit pictures of which can be seen here https://s5.photobucket.com/albums/y156/the_mule/Bike%20mods/?start=20

Headlamp switch repair LHSwitchLightscontacts
Thanks for posting the pictures.  That's exactly what mine has done in two different bikes--the recessed contact bump (highest one at the top center) is the power feed into the switch for either low (right) or high beam (left) position.  The flash-for-highbeam makes contact between the lowest contact and the one to it's right.

The heat from high current flow thru the top center contact causes the black plastic to melt/soften and the spring pressure pushes the contact bump down into the surface to the point of no longer making a complete circuit possible.  Bummer that it can't really be repaired once the bump has burned off--a relay mod is in my fu-chur.


29Back to top Go down   Headlamp switch repair Empty Re: Headlamp switch repair Sat Aug 27, 2016 8:37 pm

Holister

Holister
Life time member
Life time member
Kenny, you might find this post useful.
Gaz80 has documented a nice repair of that contact on that switch block.

I recently had the same problem on my K1100RS. To keep me temporarily on the road at night till I could do a permanent repair, I soldered the white/yellow wire to the yellow, bypassing the burnt out contact. Meant the low beam was on all the time but that's normal anyway. However it also meant that the low beam didn't go off when switched to high beam. Just a temporary work around. I've since found a switch block in near new condition and have put the old one aside for repair later.
Headlamp switch repair P8240413
Cheers


__________________________________________________

1989 K100RT     VIN  0097367 (naked)  
1996 K1100RS   VIN  0451808
 Headlamp switch repair Austra12    Fuel:  95 Octane
Engine Oil: Nulon Full Synthetic 15W50
Gear Box Oil:  Nulon Synthetic 75W90
    

30Back to top Go down   Headlamp switch repair Empty Re: Headlamp switch repair Sat Aug 27, 2016 8:43 pm

Inge K.

Inge K.
VIP
VIP
kennybob wrote:
Bummer that it can't really be repaired once the bump has burned off--.

https://www.k100-forum.com/t3387-no-lights-working#34057


__________________________________________________
Inge K.
K100RS -86. (first owner), K1100LTSE -94.
    

31Back to top Go down   Headlamp switch repair Empty Re: Headlamp switch repair Sat Aug 27, 2016 11:43 pm

kennybob

kennybob
Silver member
Silver member
Thanks again Holister and Inge--great info on repair tactics.

i heated the contacts from the outside and pushed them in a bit, but the '56a' contact for the high beam has that buss bar piece that holds the two contacts and prevents using that trick.  So i put a little solder on the inner bumps for 56a and filed them down flat to the same level as the others.  i think it will work especially with the relay mod.

The yellow plastic rocker button was broken by the previous owner right at the barrel for the screw, so i couldn't flash for high beams and i'll need to repair, make or buy another.

But flash probably wouldn't have worked anyway--the white/yellow wire was not attached to anything and there was no solder on the terminal when i opened it..?  Maybe it was desoldered and just laid over onto the yellow wire to give the low beam.  It was a pain riding it home 100 miles at night in the dark twisty tennessee foothills with only the low beam.

i don't normally carry a soldering iron in my tool kit, but maybe i should start.  cheers to yall and happy trails...


32Back to top Go down   Headlamp switch repair Empty Re: Headlamp switch repair Fri Feb 02, 2018 3:14 am

MikeisonTV

MikeisonTV
Silver member
Silver member
So I just did the tediously dreadful headlight switch rebuild to regain connection and low beams. I cleaned the contacts with DeOxit then reassembled the housing. 

The good: the headlight switch works properly again!

The bad: the horn is staying on like the Gentleman in Crazy Frogs post said would happen if it wasn’t perfect reassembled.

After another tear down, I inspected the horn button pieces more closely. I’m wondering if there are small springs both directly behind the button that rest on the small shaft AND a smaller one that goes on the back side of the horn contact housing....?

It appears to need the second spring behind it to kick the horn button housing away from the contact on the main housing that actuates the horn when pressed. 

Can some clarify that yes there are springs 2 tiny springs on the horn button and I’ve lost one... Headlamp switch repair 259495


__________________________________________________
Yep! I'm flipping through the air....that ain't good.
    

33Back to top Go down   Headlamp switch repair Empty Re: Headlamp switch repair Fri Feb 02, 2018 4:19 am

MartinW

MartinW
Life time member
Life time member
I don't know whether this will help. Over the years I have sourced springs from various sources, biros,cigarette lighters and old switches just being a few sources. 
Regards Martin.


34Back to top Go down   Headlamp switch repair Empty Re: Headlamp switch repair Fri Feb 02, 2018 7:20 am

charlie99

charlie99
VIP
VIP
i did a similar refurbishment

cant find the pics though ...to confirm the spring layout ...blast


__________________________________________________
cheezy grin whilst riding, kinda bloke ....oh the joy !!!! ...... ( brick aviator )

'86 K100 RT..#0090401 ..."Gerty" ( Gertrude Von Clickandshift ) --------O%O
'86 k100 rs.. #######..  "Fred " (f(rame) red ) ( Fredrick leichtundschnell ) - -
bits and pieces from many kind friends across the k100 world ...with many thanks ..
1987 k100rs ########   "Red"  - (red sports rs TWB style )
1989 K100rt #009637   "Black Betty"  (naked rt ala Nigel , now sporting an rs main fairing )
    

35Back to top Go down   Headlamp switch repair Empty Re: Headlamp switch repair Fri Feb 02, 2018 7:27 am

Dai

Dai
Life time member
Life time member
Sorry guys - one spring only. Are you sure you've put it back in the right place Mike? The first time I did one of those switches I put the spring back on the wrong side. I'm scraping my memory here but IIRC, there's two molded holes in the switch paddle and the spring goes in the shallow one.


__________________________________________________
1983 K100 naked upgraded to K100LT spec after spending time as an RS and an RT
1987 K100RT
Others...
1978 Moto Guzzi 850-T3, 1979 Moto Guzzi 850-T3 California,1993 Moto Guzzi 1100ie California
2020 Royal Enfield Bullet 500
    

36Back to top Go down   Headlamp switch repair Empty Re: Headlamp switch repair Fri Feb 02, 2018 7:33 am

Laitch

Laitch
Life time member
Life time member
MikeisonTV wrote:It appears to need the second spring behind it to kick the horn button housing away from the contact on the main housing that actuates the horn when pressed. 

Can some clarify that yes there are springs 2 tiny springs on the horn button and I’ve lost one...
To confirm Dai's statement, there are some photos of the assembly on this page starting at the left side of the bottom row and continuing to the second page. Only one spring is evident. Likewise, this post indicates only one spring in there. Read the second CAVEAT describing the horn button.


__________________________________________________
1995 K75 90,000 miles
    

37Back to top Go down   Headlamp switch repair Empty Re: Headlamp switch repair Fri Feb 02, 2018 8:32 am

Rick G

Rick G
admin
admin
Dai wrote:Sorry guys - one spring only. Are you sure you've put it back in the right place Mike? The first time I did one of those switches I put the spring back on the wrong side. I'm scraping my memory here but IIRC, there's two molded holes in the switch paddle and the spring goes in the shallow one.
It's the same with the indicator cancel and you have to hold the paddles on to get them working.


__________________________________________________
"Man sacrifices his health in order to make money.
Then he sacrifices money to recuperate his health.
And then he is so anxious about the future that he does not enjoy the present; the result being that he does not live in the present or the future; he lives as if he is never going to die, and then dies having never really lived."   Dalai Lama


Bikes 1999 K1100 LT with a Big Block 1200
    

38Back to top Go down   Headlamp switch repair Empty Re: Headlamp switch repair Fri Feb 02, 2018 12:57 pm

MikeisonTV

MikeisonTV
Silver member
Silver member
Laitch wrote:
MikeisonTV wrote:It appears to need the second spring behind it to kick the horn button housing away from the contact on the main housing that actuates the horn when pressed. 

Can some clarify that yes there are springs 2 tiny springs on the horn button and I’ve lost one...
To confirm Dai's statement, there are some photos of the assembly on this page starting at the left side of the bottom row and continuing to the second page. Only one spring is evident. Likewise, this post indicates only one spring in there. Read the second CAVEAT describing the horn button.
Laitch thank you so much for the pics. So it is only one! This is good news as I’d almost decided I’d dropped one. I’ll fiddle with it again and see if I can get it to work properly. I’d does appear from the pics I have the long end of the spring actuating shaft backwards.


__________________________________________________
Yep! I'm flipping through the air....that ain't good.
    

39Back to top Go down   Headlamp switch repair Empty Re: Headlamp switch repair Fri Feb 02, 2018 1:50 pm

MikeisonTV

MikeisonTV
Silver member
Silver member
Flipping the spring shaft worked! I could have sworn I tried both ways last night. Headlamp switch repair 8c7f8d10


__________________________________________________
Yep! I'm flipping through the air....that ain't good.
    

40Back to top Go down   Headlamp switch repair Empty Re: Headlamp switch repair Fri Feb 02, 2018 2:21 pm

charlie99

charlie99
VIP
VIP
Headlamp switch repair 112350


__________________________________________________
cheezy grin whilst riding, kinda bloke ....oh the joy !!!! ...... ( brick aviator )

'86 K100 RT..#0090401 ..."Gerty" ( Gertrude Von Clickandshift ) --------O%O
'86 k100 rs.. #######..  "Fred " (f(rame) red ) ( Fredrick leichtundschnell ) - -
bits and pieces from many kind friends across the k100 world ...with many thanks ..
1987 k100rs ########   "Red"  - (red sports rs TWB style )
1989 K100rt #009637   "Black Betty"  (naked rt ala Nigel , now sporting an rs main fairing )
    

Sponsored content


View previous topic View next topic Back to top  Message [Page 1 of 1]

Permissions in this forum:
You cannot reply to topics in this forum