BMW K bikes (Bricks)


You are not connected. Please login or register

View previous topic View next topic Go down  Message [Page 1 of 1]


1Back to top Go down   1985 K100RS nagging coolant leak. Empty 1985 K100RS nagging coolant leak. Fri Mar 15, 2024 5:41 pm

RS Rider

RS Rider
Gold member
Gold member
I may have posted about his some time ago, but not sure. Anyways, here it goes. I've had this goofy little coolant leak for the past couple of years and I suspected where it was coming from. Well, now I have proof after running up my bike today to get the bubbles out of the system as I had the rad out for cleaning. The pictures are self explanatory, I think.

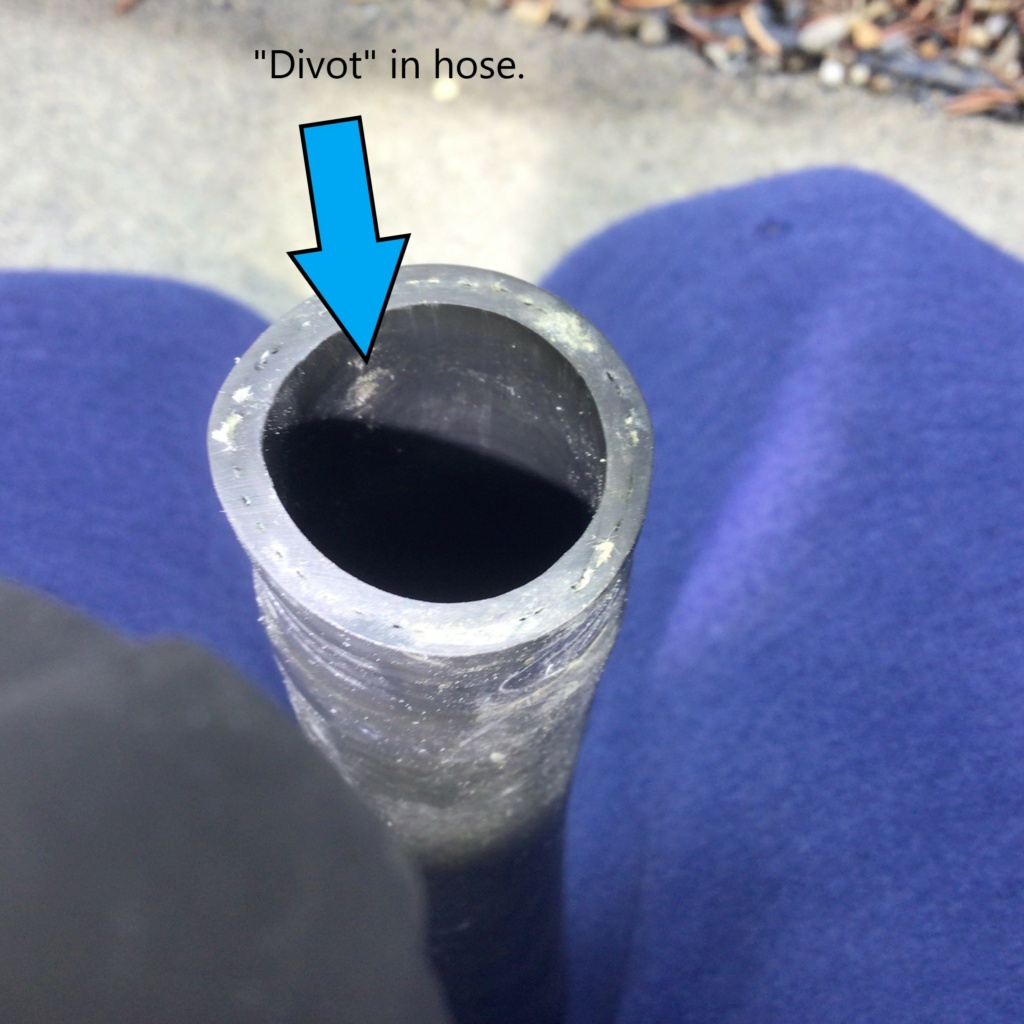
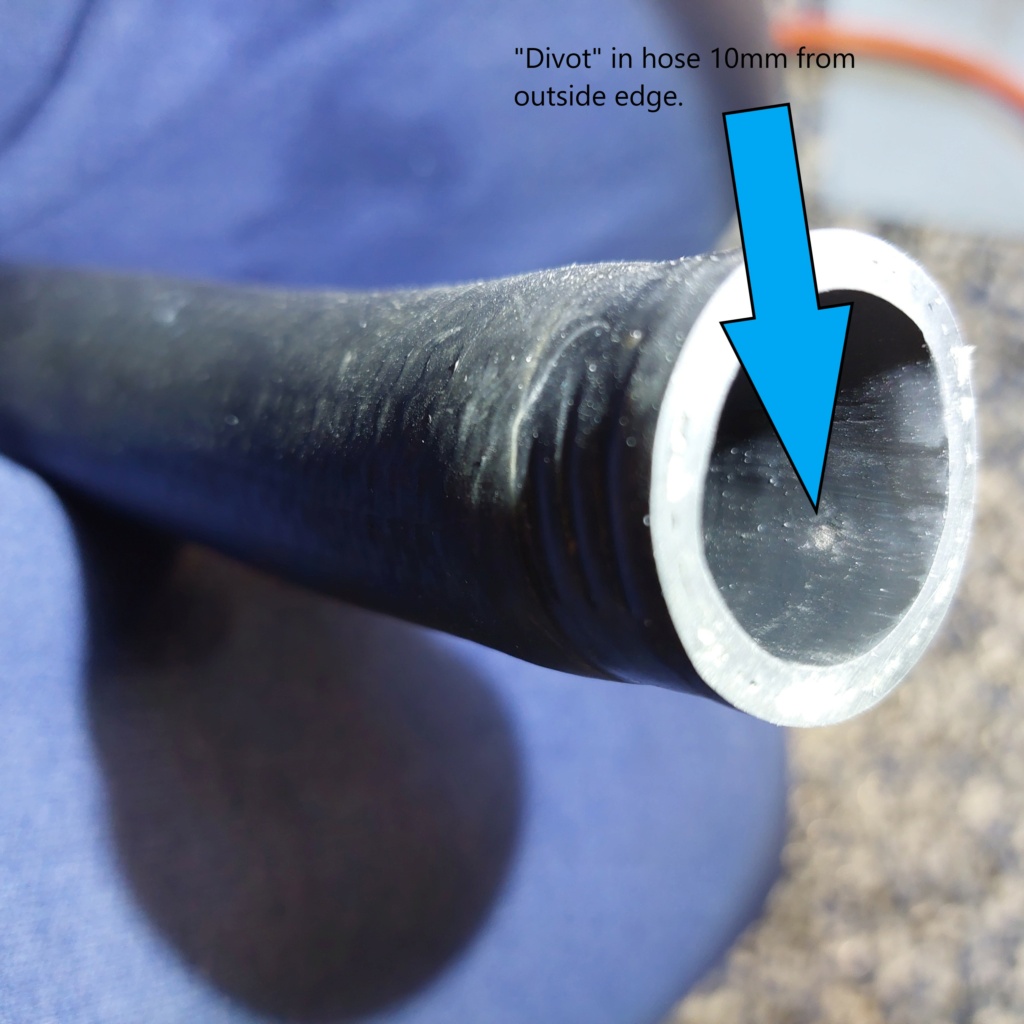
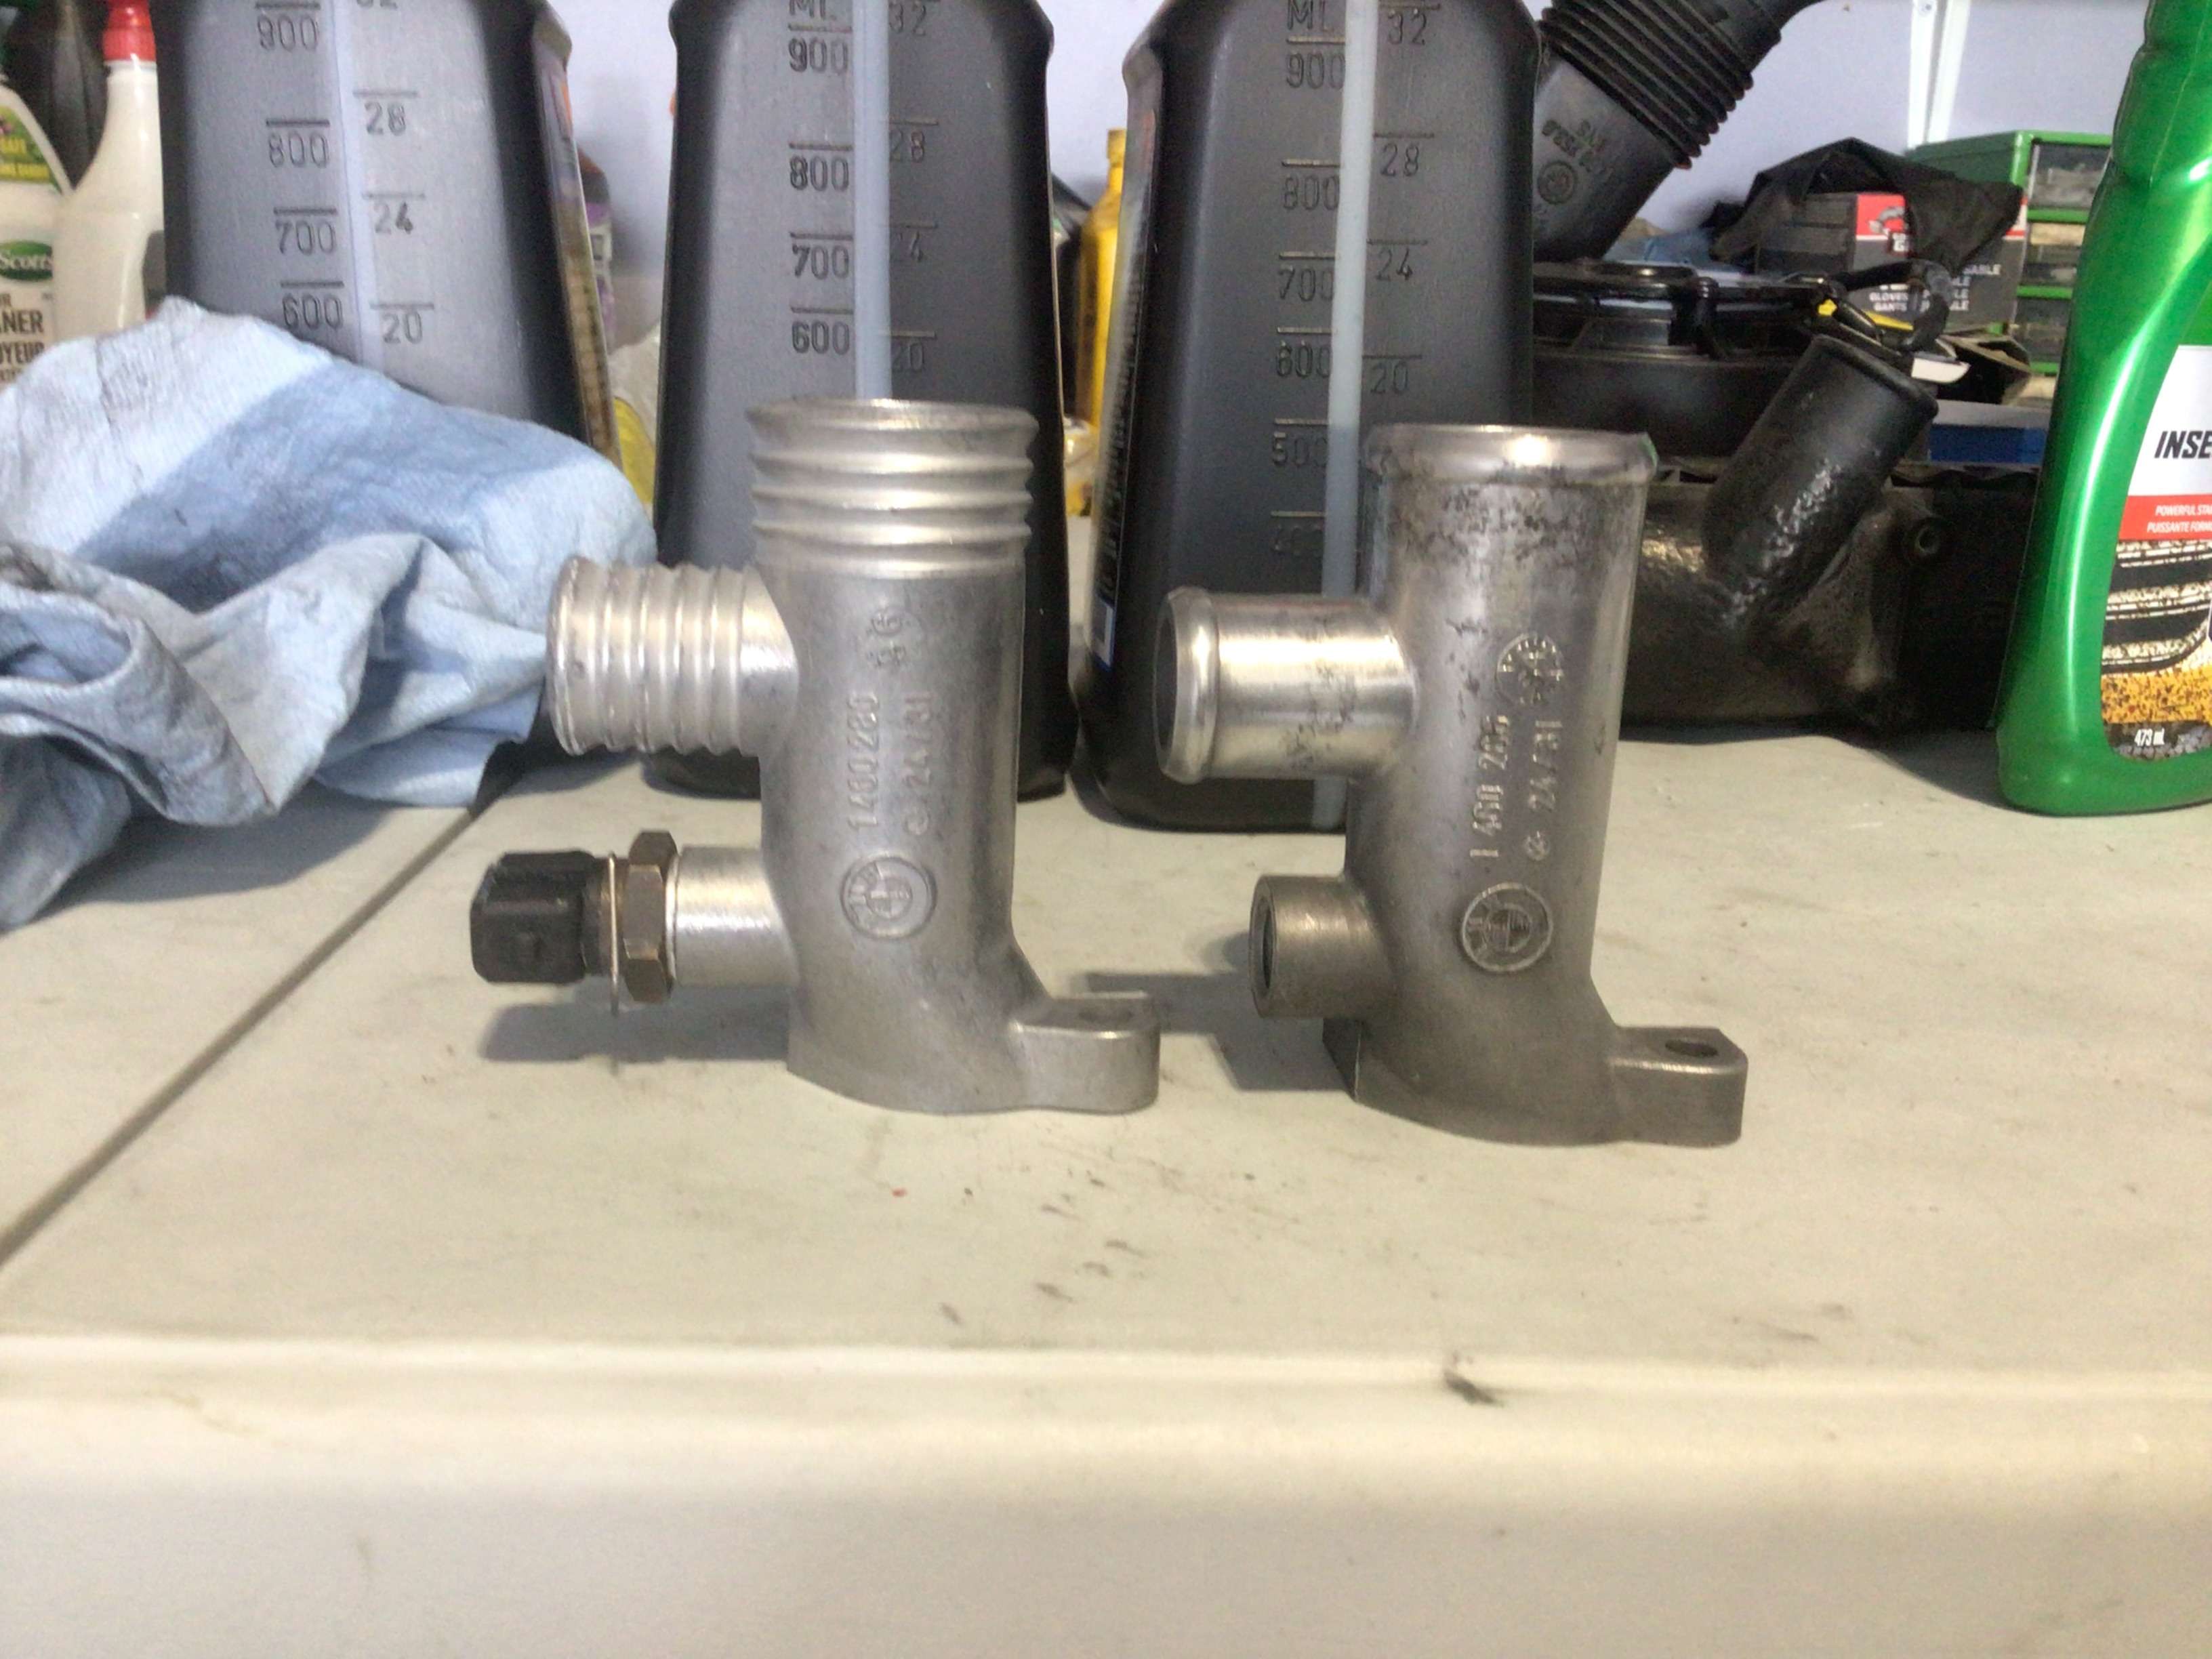
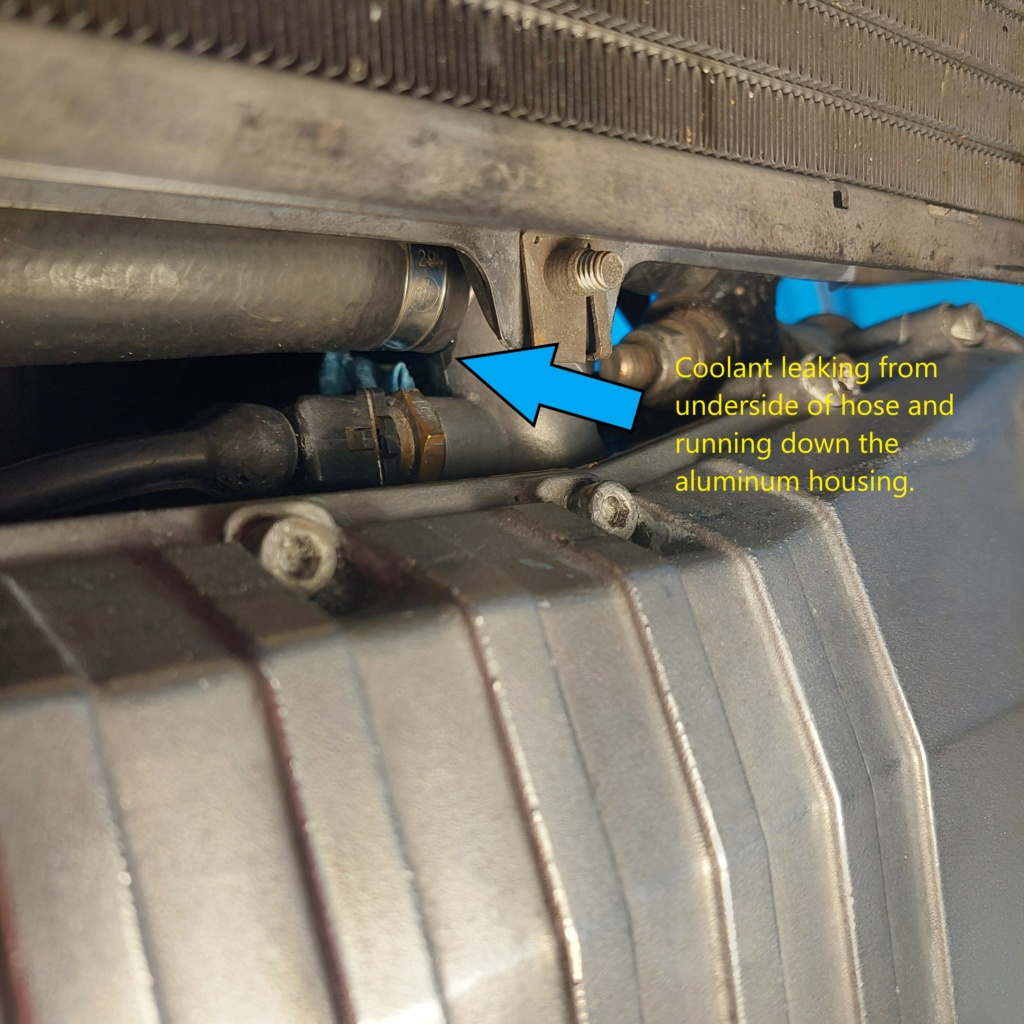
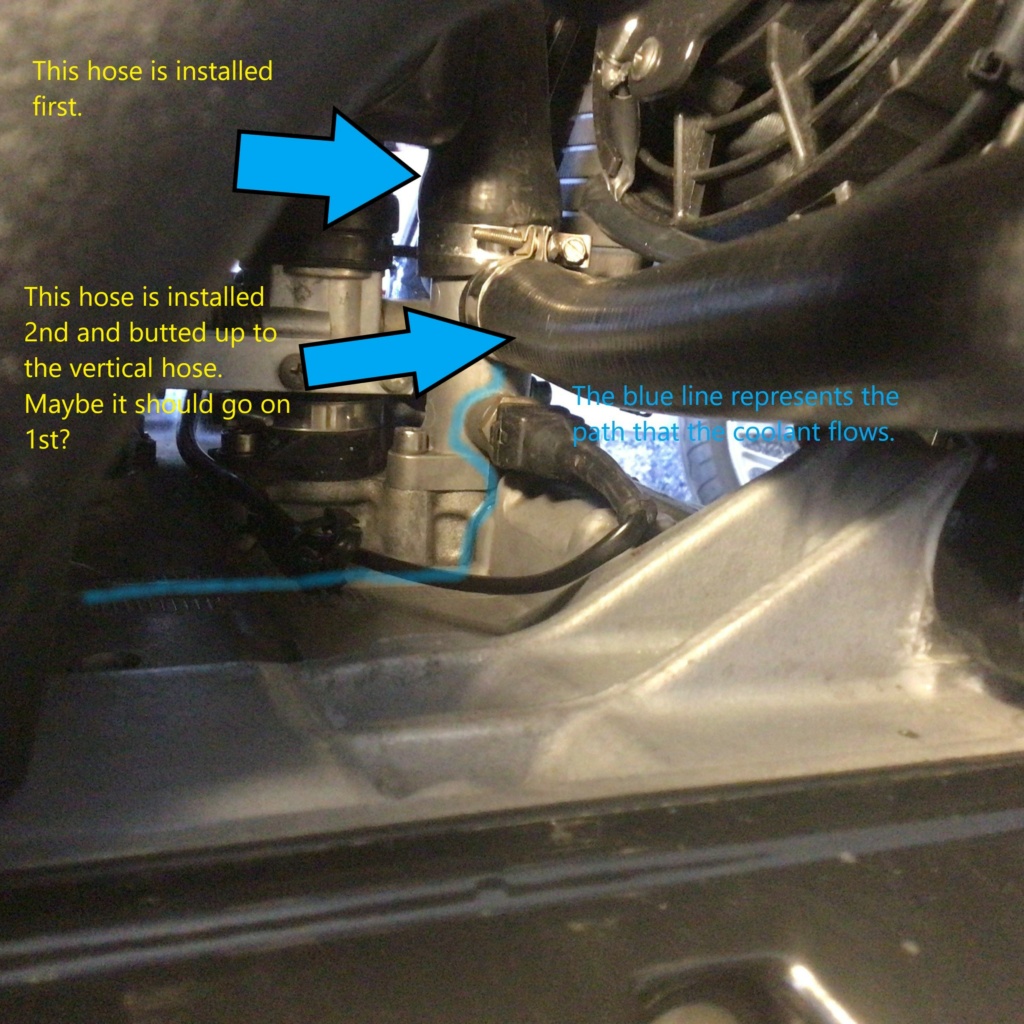
The leak is coming from the underside of the hose that runs behind the cooling fan and clamps onto the aluminum housing where the temp sensor is. The hoses you see are the originals which I reinstalled to see if it was a problem with the Samcos I had. Nope. It still leaks. As you can see I install the vertical hose first and then butt the horizontal one up to it. I can't remember what it was like originally. This is stupid stuff I know. Should I be installing the horizontal hose first and then the vertical one or does it even matter? How are you guys positioning these 2 hoses?

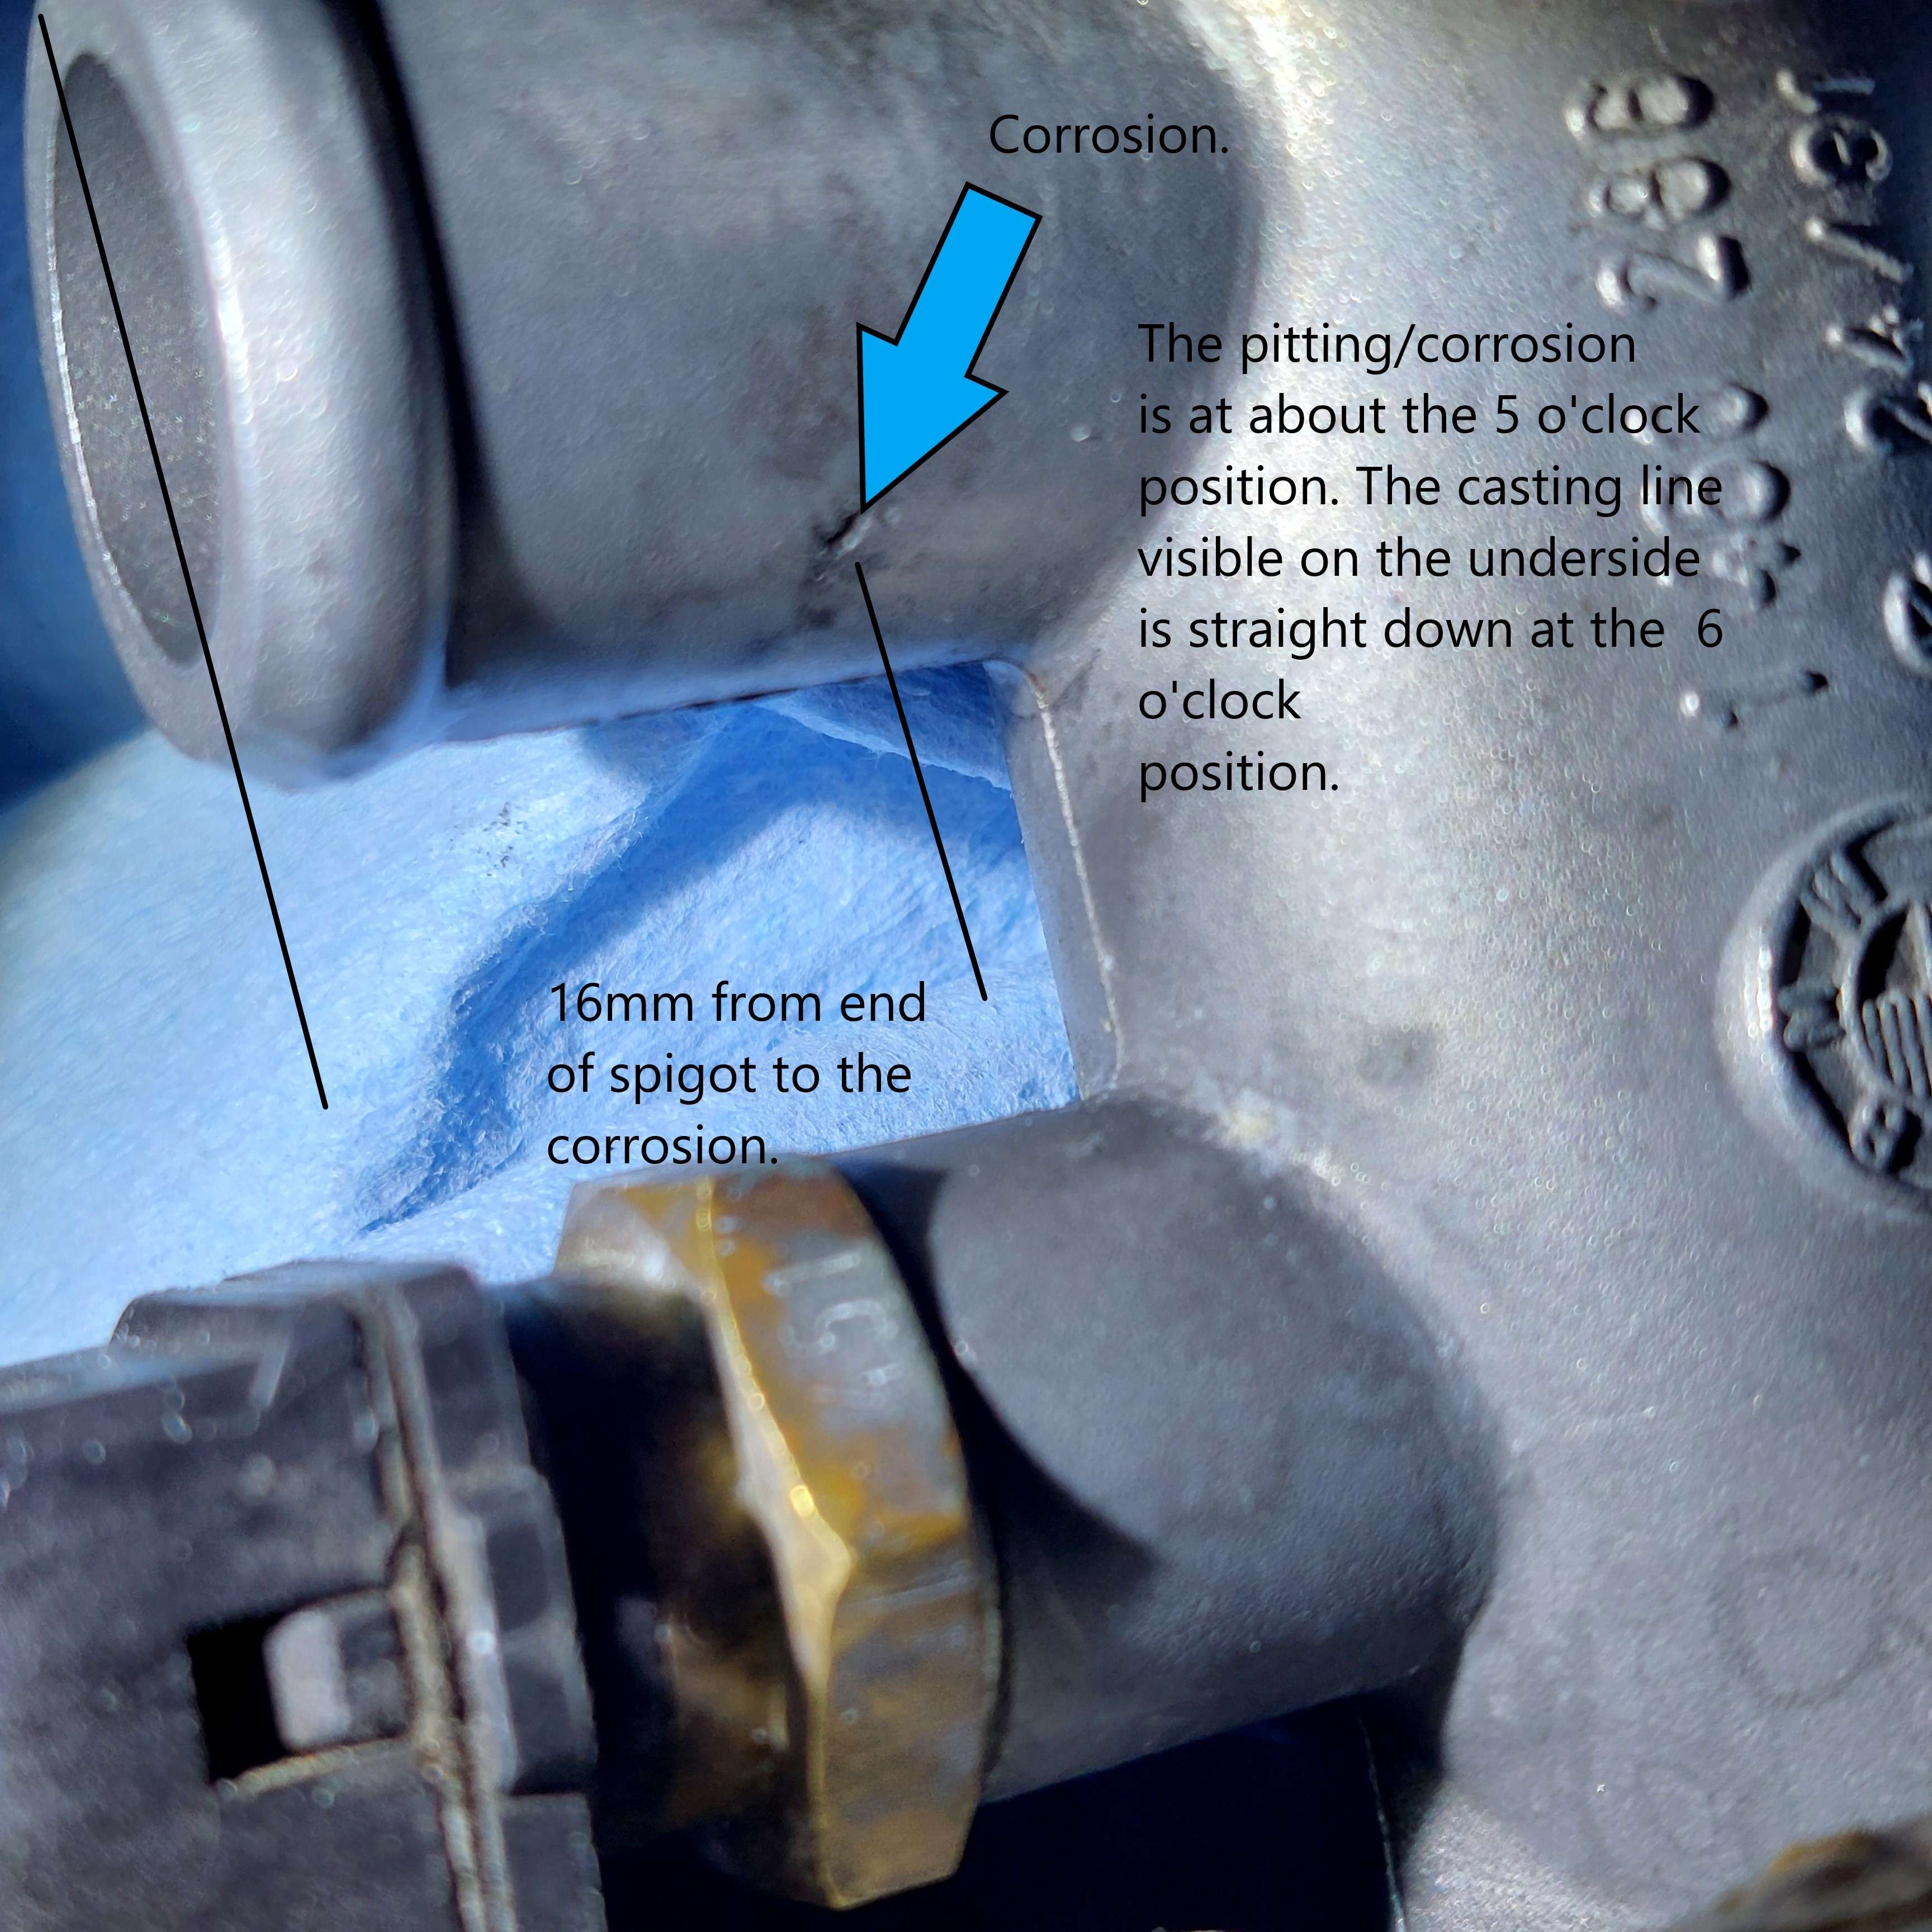
I'm glad that I was actually able to catch this. I have indicated the path the coolant flows with a blue line. I'm glad this leaked straight away as it hadn't before. Initially I thought I had a head gasket problem. Now I know that I don't.
Thanks,
Tom

1985 K100RS nagging coolant leak. 212


1985 K100RS nagging coolant leak. 1_modi11


__________________________________________________
1985 K100RS
    

Point-Seven-five

Point-Seven-five
Life time member
Life time member
I don't think the order the hoses are installed matters.

I would check the spigot on the temperature sensor fitting for corrosion and cracks that may be allowing a little coolant to escape.  Also, are you sure there is no damage to the hose like mineral buildup or chunks of rubber missing?  Have you tried putting some liquid soap on the inside of the hose when you install it so it tightens evenly around the spigot when the clamp is tightened?


__________________________________________________
Present: 1991 K100RS "Moby Brick Too"
 
Past:
1994 K75RT "Ilsa, She Wolf of the SS"
1988 K100RS SE "Special Ed"
1994 K75S "Cheetos"
1992 K100RS "Moby Brick" R.I.P.
1982 Honda FT500
1979 Honda XR185
1977 Honda XL125
1974 Honda XL125
1972 OSSA Pioneer 250
1968 Kawasaki 175
    

RS Rider

RS Rider
Gold member
Gold member
Point-Seven-five wrote:I don't think the order the hoses are installed matters.

I would check the spigot on the temperature sensor fitting for corrosion and cracks that may be allowing a little coolant to escape.

Okay, but it's not leaking from the fitting. In the 1st image you can see that it's leaking between the spigot and the hose.

  Also, are you sure there is no damage to the hose like mineral buildup or chunks of rubber missing?

I don't know if there is damage to the hose as I didn't really look. There was mineral buildup on the housing (don't remember which spigot) that I cleaned off.

  Have you tried putting some liquid soap on the inside of the hose when you install it so it tightens evenly around the spigot when the clamp is tightened?

No, I didn't try that.

Well, I know what I'm doing tomorrow. Thankfully it'll be in the mid-teens here in the Great White North all weekend, so at least I get to have the garage door open, just like today.

Cooo, loo, coo, coo, coo, coo, coo, cooooo! Cooo, loo, coo, coo, coo, coo,coo, cooooo!


__________________________________________________
1985 K100RS
    

Point-Seven-five

Point-Seven-five
Life time member
Life time member
If it works, you can celebrate with a nice cold Elsinore lager.


__________________________________________________
Present: 1991 K100RS "Moby Brick Too"
 
Past:
1994 K75RT "Ilsa, She Wolf of the SS"
1988 K100RS SE "Special Ed"
1994 K75S "Cheetos"
1992 K100RS "Moby Brick" R.I.P.
1982 Honda FT500
1979 Honda XR185
1977 Honda XL125
1974 Honda XL125
1972 OSSA Pioneer 250
1968 Kawasaki 175
    

RS Rider

RS Rider
Gold member
Gold member
Point-Seven-five wrote:If it works, you can celebrate with a nice cold Elsinore lager.

I like my English dark ale. Belgian too. Something WILL work. I just don't know what at this point.


__________________________________________________
1985 K100RS
    

Point-Seven-five

Point-Seven-five
Life time member
Life time member
If I recall correctly, Elsinore was the favorite of the MacKenzie boys.


__________________________________________________
Present: 1991 K100RS "Moby Brick Too"
 
Past:
1994 K75RT "Ilsa, She Wolf of the SS"
1988 K100RS SE "Special Ed"
1994 K75S "Cheetos"
1992 K100RS "Moby Brick" R.I.P.
1982 Honda FT500
1979 Honda XR185
1977 Honda XL125
1974 Honda XL125
1972 OSSA Pioneer 250
1968 Kawasaki 175
    

RS Rider

RS Rider
Gold member
Gold member
Point-Seven-five wrote:If I recall correctly, Elsinore was the favorite of the MacKenzie boys.
That’s for hosers, eh!


__________________________________________________
1985 K100RS
    

8Back to top Go down   1985 K100RS nagging coolant leak. Empty Re: 1985 K100RS nagging coolant leak. Fri Mar 15, 2024 10:56 pm

TacKler

TacKler
Life time member
Life time member
Well, if it was my moto, I would do it this way;    

After removing the fairing for access, I would drain the coolant into a container for reuse.  

Then I would remove the radiator and air box for better access.  

Remove the two hoses that connect to the stub and clean and inspect the inside diameter of them.  If any damage present then replace the hose.  There is probably no need to remove the stub although the the o ring fitted to it does not appear to be the problem so safe to leave in situ.  (Although I would check the torque on the two installation bolts there.  If they are loose then I would remove the stub and replace the o ring)

I would thoroughly clean the stub surface area where the two hoses fit.  Use a fine grade of aluminium oxide sandpaper if you have it otherwise a scouring pad should suffice.  It will just take longer and ensure that ALL corrosion is removed from the mating surfaces.  That includes the powdery stuff and any pitting in the stub.  Do this by hand and don't use power tools.  Inspect the stub with a bright light or torch, looking for any cracks but disregard the casting lines in the stub.  

If there is significant corrosion on the stub then I may have to build it back up with a suitable alloy paste to the required surface area, or replace the stub.  

Whilst in there, I would also remove the temperature sensor replacing the aluminium washer at the same time.  Clean up the surface area where the washer sits on the stub for corrosion as well.  Then give the electrical connection a spray with Deoxit unless done previously.  

Refit both cooling hoses, the lower one first, then the upper one.  Ensure that the hose clamps are fitted so that adjustment is accessible from the OUTSIDE of the engine and not the inside as per your photo.  

Refill the coolant system, as per the manual then complete a system leak check.

That's how I would do it if it was my moto.  

As there does not appear to be any spray associated with the leak, as per your photo then I assume that the leak occurs when the engine is cool.


__________________________________________________
Red 1991 K75S
    

9Back to top Go down   1985 K100RS nagging coolant leak. Empty Re: 1985 K100RS nagging coolant leak. Sat Mar 16, 2024 12:29 am

RS Rider

RS Rider
Gold member
Gold member
TacKler wrote:Well, if it was my moto, I would do it this way;    

After removing the fairing for access, I would drain the coolant into a container for reuse.  

Then I would remove the radiator and air box for better access.  

Remove the two hoses that connect to the stub and clean and inspect the inside diameter of them.  If any damage present then replace the hose.  There is probably no need to remove the stub although the the o ring fitted to it does not appear to be the problem so safe to leave in situ.  (Although I would check the torque on the two installation bolts there.  If they are loose then I would remove the stub and replace the o ring)

It has a new o-ring.

I would thoroughly clean the stub surface area where the two hoses fit.  Use a fine grade of aluminium oxide sandpaper if you have it otherwise a scouring pad should suffice.  It will just take longer and ensure that ALL corrosion is removed from the mating surfaces.  That includes the powdery stuff and any pitting in the stub.  Do this by hand and don't use power tools.  Inspect the stub with a bright light or torch, looking for any cracks but disregard the casting lines in the stub. 
 
I did remove the aluminum housing and clean up the spigots with fine sandpaper because of the leak I’d been having. I will be removing it again just to have a more detailed look (with an optovisor this time) and make sure something wasn’t overlooked.

If there is significant corrosion on the stub then I may have to build it back up with a suitable alloy paste to the required surface area, or replace the stub.  

Whilst in there, I would also remove the temperature sensor replacing the aluminium washer at the same time.  Clean up the surface area where the washer sits on the stub for corrosion as well.  Then give the electrical connection a spray with Deoxit unless done previously.  

This was all done.

Refit both cooling hoses, the lower one first, then the upper one.  Ensure that the hose clamps are fitted so that adjustment is accessible from the OUTSIDE of the engine and not the inside as per your photo.  

My concern is that if I push the lower hose on all the way first, I won’t be able to push the upper hose on far enough so that it pops over the bulged rim around the spigot to install the clamp. That’s why they are installed as you see. I will look into this again.

Refill the coolant system, as per the manual then complete a system leak check.

That's how I would do it if it was my moto.  

As there does not appear to be any spray associated with the leak, as per your photo then I assume that the leak occurs when the engine is cool.

There was no spray. It started leaking as the engine warmed up. It had sat for several weeks with the coolant system filled but not “burped” and did not leak. 

I will follow up whether I find anything or not, and also photos.


__________________________________________________
1985 K100RS
    

10Back to top Go down   1985 K100RS nagging coolant leak. Empty Re: 1985 K100RS nagging coolant leak. Sat Mar 16, 2024 12:43 am

TacKler

TacKler
Life time member
Life time member
Looking at a couple in my stable the lower hose appears to be fitted flush with the upper sitting on that.  There are others but difficult to say whether that is factory installed.  

Good photos otherwise.


__________________________________________________
Red 1991 K75S
    

11Back to top Go down   1985 K100RS nagging coolant leak. Empty Re: 1985 K100RS nagging coolant leak. Sat Mar 16, 2024 3:42 am

92KK 84WW Olaf

avatar
Life time member
Life time member
You mention trying to get the hose clamp on the hose pushed over the ridge of the stub.

I have been in there on most of my Ks and I have first positioned the hose clamp on the stub then pushed the hose on to the stub and into the clamp. That way you can rotate the hose a little as you get it correctly positioned. Its fiddly but with the radiator out of the way its easy to do that. As Tackler has said, position the clamp so you can reach it from outside.

When you bolt the air box bottom back, lots of copper grease on those two bolts.

While you have the air box out, take a good look at your fuel lines and your vacuum line because you now have good access to the connections on to the fuel pressure regulator.

You mention 85 K100RS, bolted down tank as in early 85 has a second vacuum line from no 1 throttle body, to a vacuum sensor thats beside the fuel pressure regulator, nearer to the radiator. You can replace that vacuum line with a vacuum cap and eliminate it.


__________________________________________________
1992 K100LT 0193214 Bertha Blue 101,000 miles
1984 K100RT 0022575 Brutus Baja Red 578 bought 36,000 now 89,150 miles
1997 K1100LT 0188024 Wotan Mystic Red 689 58,645 now 106,950 miles Deceased.
1983 K100RS 0011157 Fricka 606 Alaska Blue 29,495 miles Damn K Pox Its a Bat outta Hell Now 58,200 miles. 
1996 K1100LT 0233004 Lohengrin Mystic Red 38,000 miles currently 48,061 miles.
1983 K100RS 0004449 Odette R100 colours 58,000 miles. Sprint fairing now 61,190 miles

Past:
1968 Yamaha 80 YG1
1971 Yamaha 125 YAS-1
1968 Honda 125 SS
1970 Honda CD 175
1973 Honda CB500-4
Honda CX 500
    

12Back to top Go down   1985 K100RS nagging coolant leak. Empty Re: 1985 K100RS nagging coolant leak. Sat Mar 16, 2024 7:33 pm

RS Rider

RS Rider
Gold member
Gold member
Okay. An update for everyone. The inside of the leaky hose looked pretty good except for one area. See images below. There is what appears to be a "divot" (for lack of a better word) about 10mm in from the outer edge.

1985 K100RS nagging coolant leak. 2_with10


1985 K100RS nagging coolant leak. 4_with10

Below is an image of the aluminum stub showing corrosion/pitting. While the image is slightly blurred, it is easily seen. Now, when I push the hose on AND have the other end at the correct angle (pointed upwards slightly) to attach to the radiator pipe, the "divot" on the inside of the hose and the pitting on the spigot are on the same plane (they line up). However, if I install the upper hose first, then butt the lower hose up to it, those two points don't sit on top of each other, but they pretty much do IF I push the hose all the way on without the upper hose installed, but that's not how I had the hose installed. I had the upper hose on first and then the lower one butted up to it as far is it would go.

It does appear that I can push that lower hose on all the way first and still have the upper hose on far enough so that it will clamp properly below the raised rim on the spigot. What to do? Can I use JB Weld to fill that pitting, or do I need another one? I doubt there are new ones anymore, just used. The aluminum stub looks good otherwise.

1985 K100RS nagging coolant leak. SIX8sQ


__________________________________________________
1985 K100RS
    

13Back to top Go down   1985 K100RS nagging coolant leak. Empty Re: 1985 K100RS nagging coolant leak. Sun Mar 17, 2024 12:23 am

TacKler

TacKler
Life time member
Life time member
Okay, it would appear you have a pin hole leak and the only way to repair that is to remove the stub.  

You will need to completely remove all corrosion and I would start by using a small drill to open up a hole at both ends and then work at enlarging it, so you end up with a loop and not a large hole.  Small circular/rat tail files work best although you can use the drill by angling it initially, to enlarge the hole.  If you have access to air tools rather than electric, it is easy to alternate the speed of the drill, or a bench drill.  You only want to remove the corroded area and no more otherwise the repair will have no strength.  

Because you will need to ensure that the outer surface is flat to enable the the hose to be fitted, I would put a small bevel on this edge of the hole to provide as much surface area on the repair between it and the glue.  The more purchase area the better even though only a very slight increase.  The hose should stop the plug coming out under pressure.  Effectively we are making a very small patch repair and attempting to have as much surface area between the stub and the repair.  

I would use one of those metal set type alloy paste/glue epoxies.  It has to be compatible with the maximum heat of the coolant.  JB Weld probably have something like that but don't use Araldite.  The metal alloy types should allow you to sand it back to keep the surface area flush with the outside surface.  For a bush repair I would use an Araldite steel wool mix.  

When applying the repair, ensure you clean the surface area first with a cleaner that will remove all oils and grease.  Keeping the surface area rough and not smooth will increase the repairs surface area.  

For the ID side of the repair have a piece of tape ready, so that you can place it against the paste when finished.  A rag stuffed in there will apply pressure from that side of the repair.  

You will apply the paste from the outside and you need to tape of the area around the repair by maybe 5-10 mm for an overlap and to allow an area on the outer surface of the repair to work with.  Taping around the repair means less mess to clean off the outside of the stub.  Also push the paste into the repair and wipe off excess on the inside of the stub.  A bit of overlap on the inside of the will allow more purchase area there.  Apply tape so it does not sag.  The rag will hold this in place.  

The hose should be fine when you consider that the rest of the ID is subject to the same pressures and heat.  The divet as you call it, is an indication of the point of failure in the stub.  

This is a lot of effort for such a small repair but as stated previously this is how I would do it on my moto.  It sounds a lot more complicated than it is.  Lastly wear gloves and use a spatula to apply the paste.  You'll thank me afterwards.  

The other alternative is to just replace the stub.


__________________________________________________
Red 1991 K75S
    

14Back to top Go down   1985 K100RS nagging coolant leak. Empty Re: 1985 K100RS nagging coolant leak. Sun Mar 17, 2024 10:42 am

RS Rider

RS Rider
Gold member
Gold member
I don't know that there is a hole clear through that spigot on the stub. To verify that, I am going to use a pen flashlight pushed up against the pitting with the garage lights out. If there is a hole through the spigot casting I should be able to see light on the inside. That's my theory, at least.


__________________________________________________
1985 K100RS
    

15Back to top Go down   1985 K100RS nagging coolant leak. Empty Re: 1985 K100RS nagging coolant leak. Sun Mar 17, 2024 1:17 pm

Point-Seven-five

Point-Seven-five
Life time member
Life time member
...or you could stick a pin in the hole and see if it goes through to the inside.

JB Weld will work nicely.  

Scrub out the hole with a toothbrush and rubbing alcohol.  Mix a little JB Weld and force it into the hole.  After it cures, sand it flush with the surface with 100 grit and put the hose back.  You might want to put a dab of silicone caulk in the divot in the hose and let it cure before you put the hose back.  If the divot is at the same place as the hole in the spigot, the silicone will help support the JB Weld. 

And think about getting a new hose.


__________________________________________________
Present: 1991 K100RS "Moby Brick Too"
 
Past:
1994 K75RT "Ilsa, She Wolf of the SS"
1988 K100RS SE "Special Ed"
1994 K75S "Cheetos"
1992 K100RS "Moby Brick" R.I.P.
1982 Honda FT500
1979 Honda XR185
1977 Honda XL125
1974 Honda XL125
1972 OSSA Pioneer 250
1968 Kawasaki 175
    

16Back to top Go down   1985 K100RS nagging coolant leak. Empty Re: 1985 K100RS nagging coolant leak. Sun Mar 17, 2024 2:08 pm

RS Rider

RS Rider
Gold member
Gold member
I am happy to report that no light was visible on the inside of the spigot casting, which means the pitting is restricted to the outside and maybe 1mm deep. While it may not look like it, the image is looking into the spigot far enough. My phone camera is sensitive to the light, but to the naked eye that light you see through the blue shop towels is virtually non existent. I used a 400 lumen pen flashlight pushed right up to the pitting.

I think what I will do is rough up the area and patch with some JB Weld. What do you guys think?

1985 K100RS nagging coolant leak. VI7BUy


__________________________________________________
1985 K100RS
    

17Back to top Go down   1985 K100RS nagging coolant leak. Empty Re: 1985 K100RS nagging coolant leak. Mon Mar 18, 2024 2:09 am

TacKler

TacKler
Life time member
Life time member
I would use a dental pick or a Bobby pin and push through the corroded area because I believe you may still have a pin hole leak.  At the very minimum you need to clean up the hole because corrosion is like cancer; you think you may have removed it but you need to go further to remove the potential damage you cannot see.  

The problem with pin hole leaks or a crack is that you cannot necessarily see them.  Unfortunately I don't have access to NDI testing anymore where it would be simply a matter of checking for cracks with dye penetrants and UV light*. 

Simply putting a patch on it will be just that, a patch.  There needs to be some strength to the repair and not just gluing a patch on and hope it holds.  It will be held on by the hose when refitted but will eventually leak as it is attempting to hold back a fluid (coolant) under pressure.


*  Many years ago at an aircraft maintenance mob I worked for we had a sideline supporting our beer club where we used to crack test the V8 engine blocks of a very well known national racing team.


__________________________________________________
Red 1991 K75S
    

18Back to top Go down   1985 K100RS nagging coolant leak. Empty Re: 1985 K100RS nagging coolant leak. Mon Mar 18, 2024 12:29 pm

RS Rider

RS Rider
Gold member
Gold member
Thanks, guys. I may just end up getting a good used one. We'll see. Would someone here know if the water connector housings are interchangeable between the 4V and 2V engines? The 4V uses ribbed style spigots and the base looks to have a slightly different shape, but the o-ring between the connector base is the same for both.

Tom


__________________________________________________
1985 K100RS
    

19Back to top Go down   1985 K100RS nagging coolant leak. Empty Re: 1985 K100RS nagging coolant leak. Sat Apr 06, 2024 2:45 pm

RS Rider

RS Rider
Gold member
Gold member
Just a brief update. I did repair the pitting with JB Weld, but I never did bother to test it. As a new water connector pipe was still available, at $41.79 Cdn, I made the decision to just replace it instead of potentially wasting my time. A used one with shipping was going to cost me close to double the price of a new one. And what rabbit hole would that take me down?

Here is what I didn't know. BMW changed the design of the part. It now has ribbed spigots for the two hoses. It otherwise looks exactly the same as the original and is the same part number.

1985 K100RS nagging coolant leak. VDdFKL


__________________________________________________
1985 K100RS
    

20Back to top Go down   1985 K100RS nagging coolant leak. Empty Re: 1985 K100RS nagging coolant leak. Sat Apr 06, 2024 3:05 pm

Two Wheels Better

Two Wheels Better
Moderator
Moderator
Hopefully a good result for you. When I was cleaning up and fitting the 1200 engine into BB, the original spigot was corroded and crumbling. The PO must never have drained and flushed the cooling system, such was the degradation of the aluminium.


__________________________________________________
Patience is something you admire in the driver behind you and scorn in the one ahead.
~Mac McCleary
1977 R75/7-100, '93 K11/K12 Big Block, '95 R100 Mystic, '96 K1100RS, '98 K1200RS, '06 K1200R & '09 K1300GT. Projects: 1993 & '96 K1100RS, & 1st '98 K1200RS.
The Mystic, Big Block, 2nd K1200RS, K12R & K13 are running & ridable.
    

Sponsored content


View previous topic View next topic Back to top  Message [Page 1 of 1]

Permissions in this forum:
You cannot reply to topics in this forum