BMW K bikes (Bricks)


You are not connected. Please login or register

View previous topic View next topic Go down  Message [Page 1 of 1]


Tesla13BMW

Tesla13BMW
Silver member
Silver member
Hello all

Today I successfully dismantled the '86 k100RS forward to the rear main seal. Replace that tomorrow!

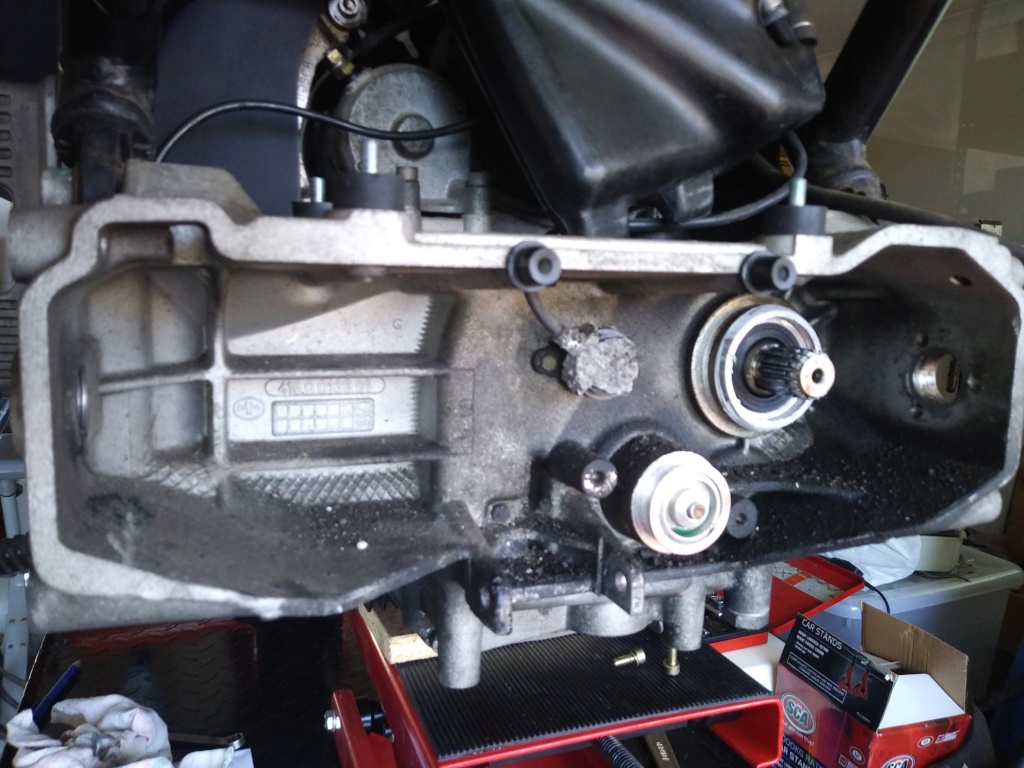
But on the way I found that the gear position sensor has disintegrated although still working.  Is there a fix for this or is replacement the only option.  I thought putting a section of PVC tube around it and filling will some sort of epoxy.

Clutch housing cover and gear position sensor 20180610

The other issue I had was the clutch housing cover was quite rusted and proved a real battle to separate it from the clutch housing.  Although the pins aren't corroded they are very tight in the clutch housing.  Can they get bent on assembly or removal?

What plates are factory marked?  I looked at clutch kits and they supply the diaphragm spring, pressure plate, clutch plate and the housing cover.  Therefore I consider the clutch housing must be "true" i.e. balanced and it is only the pressure plate and housing cover which have factory marks on them to be fitted 180 degrees from each other.

My concern is if I fit the housing cover and the locating pins are bent that the next time I go in that it will not come off!  As said it was a real bugger to get it free this time.

Any suggestions would be gratefully received, at 850 AUD for a clutch kit, I'd rather use what I have!

The clutch plate is at 5.2 mm so will be going back in.  I am surprised it is this worn, recalling a new plate to be 5.5 mm, as the bike only has 11,000 km on it!


__________________________________________________
Brisbane, Australia.  '86 K100RS
    

duck

duck
Life time member
Life time member
"They all do that."  I've taken oodles of K clutches apart and it's always a challenge to separate the clutch.  I wouldn't worry about those pins.

What I've found works well to get a K clutch apart is to use one of these mini nail pullers working around the outer rim of the clutch assembly.

Clutch housing cover and gear position sensor Vaughan-wrecking-pry-bars-222cs-64_1000


__________________________________________________
Current stable:
86 Custom K100 (standard fairing, K75 Belly pan, Ceramic chromed engine covers, paralever)
K75 Frankenbrick (Paralever, K11 front end, hybrid ABS, K1100RS fairing, radial tires)
86 K75C Turbo w/ paralever
94 K1100RS
93 K1100LT
91 K1
93 K75S (K11 front end)
91 K75S (K1 front end)
14 Yamaha WR250R
98 Taxi Cab K1200RS
14 K1600GT
http://www.ClassicKBikes.com
    

92KK 84WW Olaf

avatar
Life time member
Life time member
My RT got a new rear main seal at 78k miles.

The only clutch components replaced were the friction plate and the necessary bolts. The entire of the rest was deemed suitable for reuse. For the plate I bought a Sachs plate. There is no such thing as a BMW manufactured clutch plate, Sachs make them for BMW.

I did replace all the seals O rings etc etc when I was in there, swing arm/driveshaft boot, clutch pivot bearings/boot and all new clips along the way.


__________________________________________________
1992 K100LT 0193214 Bertha Blue 101,000 miles
1984 K100RT 0022575 Brutus Baja Red 578 bought 36,000 now 89,150 miles
1997 K1100LT 0188024 Wotan Mystic Red 689 58,645 now 106,950 miles Deceased.
1983 K100RS 0011157 Fricka 606 Alaska Blue 29,495 miles Damn K Pox Its a Bat outta Hell Now 58,200 miles. 
1996 K1100LT 0233004 Lohengrin Mystic Red 38,000 miles currently 48,061 miles.
1983 K100RS 0004449 Odette R100 colours 58,000 miles. Sprint fairing now 61,190 miles

Past:
1968 Yamaha 80 YG1
1971 Yamaha 125 YAS-1
1968 Honda 125 SS
1970 Honda CD 175
1973 Honda CB500-4
Honda CX 500
    

Dai

Dai
Life time member
Life time member
I'd check those pins very, very carefully. If they bent on the way out - even a tiny fraction - the clutch will not go back together. They're made of a soft metal, so straightening them isn't too much of a problem but be prepared to chase and chase and chase... When it happened to me, I used an 8oz hammer to gently tap the pins straight again but it took a lot of patience and checking and rechecking before the two halves slid back together.

Secondly, clean any crap off them and from inside their housing. A well-fitting, finger-turned drill is good for that.


__________________________________________________
1983 K100 naked upgraded to K100LT spec after spending time as an RS and an RT
1987 K100RT
Others...
1978 Moto Guzzi 850-T3, 1979 Moto Guzzi 850-T3 California,1993 Moto Guzzi 1100ie California
2020 Royal Enfield Bullet 500
    

Point-Seven-five

Point-Seven-five
Life time member
Life time member
I used a sharp wood chisel and gently tapped on it working around the circumference of the clutch for about five minutes to get mine apart. 

Have some paint and a Q-Tip handy to mark the parts as you take them apart.  The Q-Tip makes a nice dot and you can toss it when you're done.  Instead of having the marks at 120 degrees like the factory marks, I marked mine so the marks all lined up with each other.

Before you try to remove the Gear Position Switch, you might want to put some CA glue on it to help hold the crumbling bits together.  You can get the CA at a hobby shop for guys who build model airplanes.  Gently clean the outside of the switch with rubbing alcohol and an artist's paint brush to remove as much of the grunge as possible.  Put the glue on and let it soak in a bit.  Then set it with the catalyst you can get at the hobby shop with the CA glue.  Once it's glued up, you can safely remove it.  Ditch the original screws and replace them with Allen screws.

If I was going to epoxy the switch, I would reinforce the epoxy with some small pieces of fiberglass cloth.  The best stuff for the job is the very fine cloth the model airplane guys use.


__________________________________________________
Present: 1991 K100RS "Moby Brick Too"
 
Past:
1994 K75RT "Ilsa, She Wolf of the SS"
1988 K100RS SE "Special Ed"
1994 K75S "Cheetos"
1992 K100RS "Moby Brick" R.I.P.
1982 Honda FT500
1979 Honda XR185
1977 Honda XL125
1974 Honda XL125
1972 OSSA Pioneer 250
1968 Kawasaki 175
    

robmack

robmack
Life time member
Life time member
I agree with Point Seventy-five's advice on the switch. The outer shell of the switch is a plastic cover for weather protection and needs to be first reinforced with a fabric to retain its shape and a sealant to make it waterproof. An alternative to fibreglass cloth could be heat resistant polymide tape (aka. kapton tape) used for electronics plus an outer coating of silicone sealant. If the integrity of the shell is compromised, then CA glue and reinforced epoxy would offer structural strength and waterproofing.


__________________________________________________
Robert
1987 K75 @k75retro.blogspot.ca
http://k75retro.blogspot.ca/
    

MartinW

MartinW
Life time member
Life time member
+1 replace the bolts with stainless Allen bolts. I replaced mine nearly 20 years ago and coated in red Plastidip it's been going ever since.
Regards Martin.


__________________________________________________
1992 K75s
    

Rick G

Rick G
admin
admin
You will find that the crappy stuff that is crumbling awqay is the remains of a rubbery cover that was supposed to be waterproof. Carefully scrape it away then if necessary the housing can be parted and the innards cleaned then clipped back together. Be careful not to let the springs and bits fly and hide.  I then cover the whole thing in sikaflex (which can be removed with difficulty and a very sharp knife) it is ready to be replaced and wont leak.


__________________________________________________
"Man sacrifices his health in order to make money.
Then he sacrifices money to recuperate his health.
And then he is so anxious about the future that he does not enjoy the present; the result being that he does not live in the present or the future; he lives as if he is never going to die, and then dies having never really lived."   Dalai Lama


Bikes 1999 K1100 LT with a Big Block 1200
    

Tesla13BMW

Tesla13BMW
Silver member
Silver member
Thanks for the advice everyone.

So Dai, how does one gauge when the pins are straight, or is it just see where they go into the housing holes?


__________________________________________________
Brisbane, Australia.  '86 K100RS
    

Dai

Dai
Life time member
Life time member
Tesla13BMW wrote: or is it just see where they go into the housing holes?
Pretty much so, if they're not obviously bent.


__________________________________________________
1983 K100 naked upgraded to K100LT spec after spending time as an RS and an RT
1987 K100RT
Others...
1978 Moto Guzzi 850-T3, 1979 Moto Guzzi 850-T3 California,1993 Moto Guzzi 1100ie California
2020 Royal Enfield Bullet 500
    

Sponsored content


View previous topic View next topic Back to top  Message [Page 1 of 1]

Permissions in this forum:
You cannot reply to topics in this forum